23 DIY Halloween Front Porch Ideas That Are Easy and Spooky
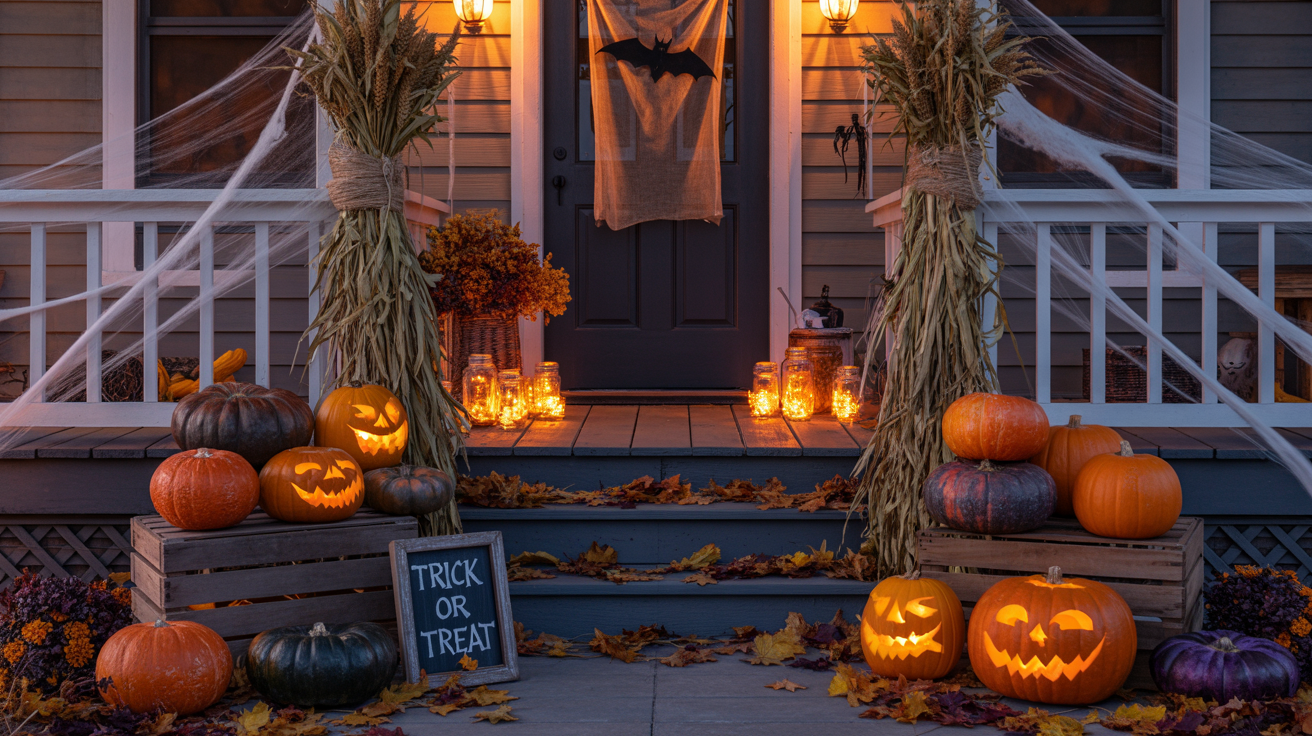
Halloween is the perfect excuse for me to give my front porch a fun seasonal makeover. I don’t need expensive decorations or complicated projects to make the entrance feel spooky. A few pumpkins, simple DIY crafts, and the right lighting can completely change the look.
When I decorate, I like mixing easy homemade pieces with a few store-bought accents. This helps me keep costs down while giving the porch a layered, finished look. Whether I want something cute for kids or a creepier setup for Halloween night, I can build the look around a few simple projects.
I can turn a plain porch into a spooky Halloween display with simple projects such as paper bats, stretched spider webs, floating ghosts, pumpkin groupings, skeletons, skull accents, homemade lanterns, and DIY wreaths. Most of these ideas use inexpensive materials and can be finished in less than a few hours.
For a quick makeover, I recommend starting with one large focal point, such as a pumpkin arch, mini graveyard, or ghost display. Then I add smaller details around the door, steps, railings, and planters. Battery-operated lights are especially useful because they add nighttime impact without relying on open flames.
Save this for later
Table of Contents
I also like mixing scary decorations with friendly fall touches. Mums, natural pumpkins, wooden crates, warm lights, and autumn leaves can keep the porch inviting while the skulls, webs, bats, and ghosts provide the Halloween atmosphere.
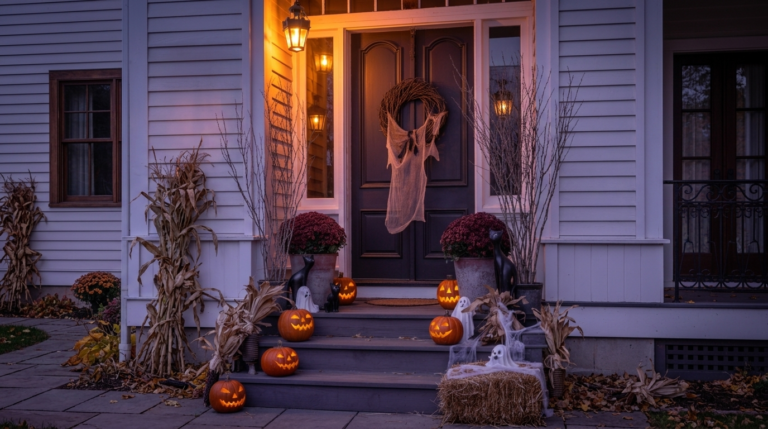
Key Takeaways
- I can create an impressive Halloween porch without buying expensive props.
- Paper bats and spider webs are among the fastest ways to cover a large area.
- Pumpkins, crates, and lanterns help create height and structure.
- Battery-operated lighting works well for outdoor Halloween displays.
- I use removable tape, hooks, zip ties, and weather-resistant materials whenever possible.
- Several ideas are suitable for children, while hot glue, fog equipment, and certain outdoor setups need adult supervision.
- I get the best results when I repeat two or three colors instead of mixing every Halloween decoration I own.
Related article: 17 Halloween Porch Decor Ideas That Are Simple but Stunning
1. Frightful Flying Bats
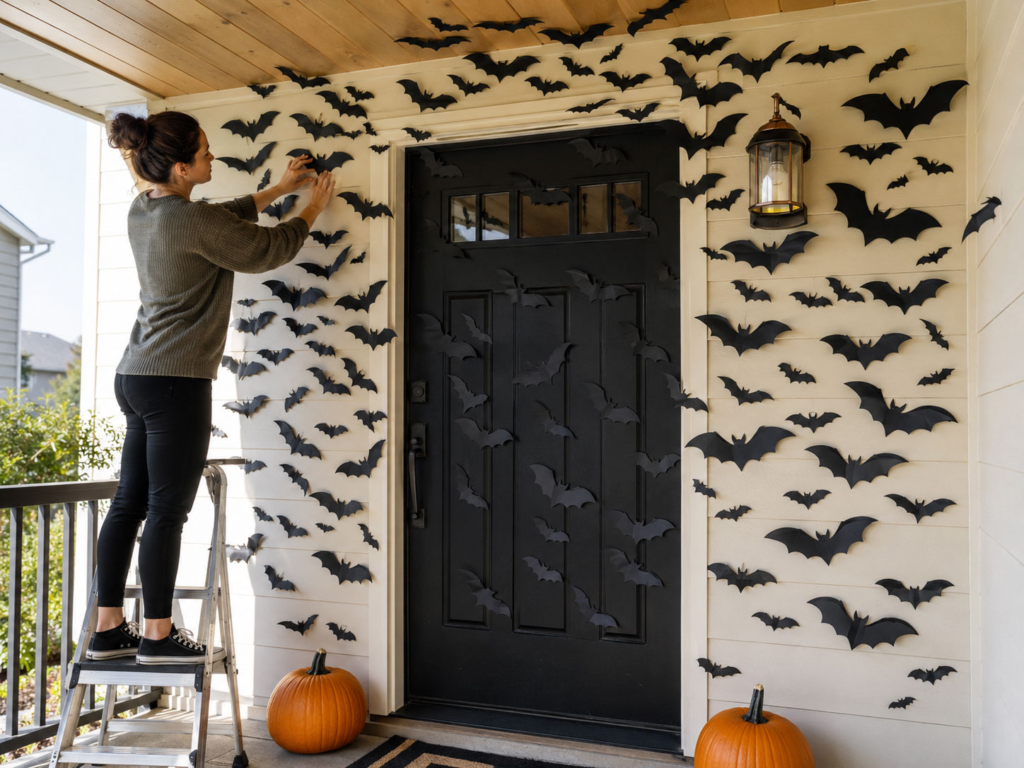
A cluster of black bats is one of the easiest ways I know to make a front door look instantly different for Halloween. I don’t need expensive decorations because cardstock and a pair of scissors can create dozens of bats for very little money.
I like placing the bats close together near the doorway and gradually spreading them farther apart as they move toward the outer wall. That simple arrangement makes the display feel like the bats are flying rather than being randomly stuck to the surface.
Best For: Front doors, porch ceilings, entryway arches. Prep Time: 1–2 hours. Difficulty: Easy, kid-friendly.
What You’ll Need:
- Black cardstock or construction paper
- A bat template or a simple hand-drawn pattern
- Scissors
- Removable double-sided tape or mounting putty
How to Make It:
- I trace or print a bat shape onto black cardstock.
- I cut out a large batch of bats. For a noticeable porch display, I usually make at least 30, although a smaller entrance may need fewer.
- I gently bend each bat along the center so the wings don’t sit completely flat.
- I attach the bats around the door, ceiling, and nearby walls, keeping the largest concentration close to the entrance.
Pro Tip: I use several bat sizes instead of making every cutout identical. The different proportions give the swarm more movement and make the finished display look less repetitive.
2. Spider Webs of Fear
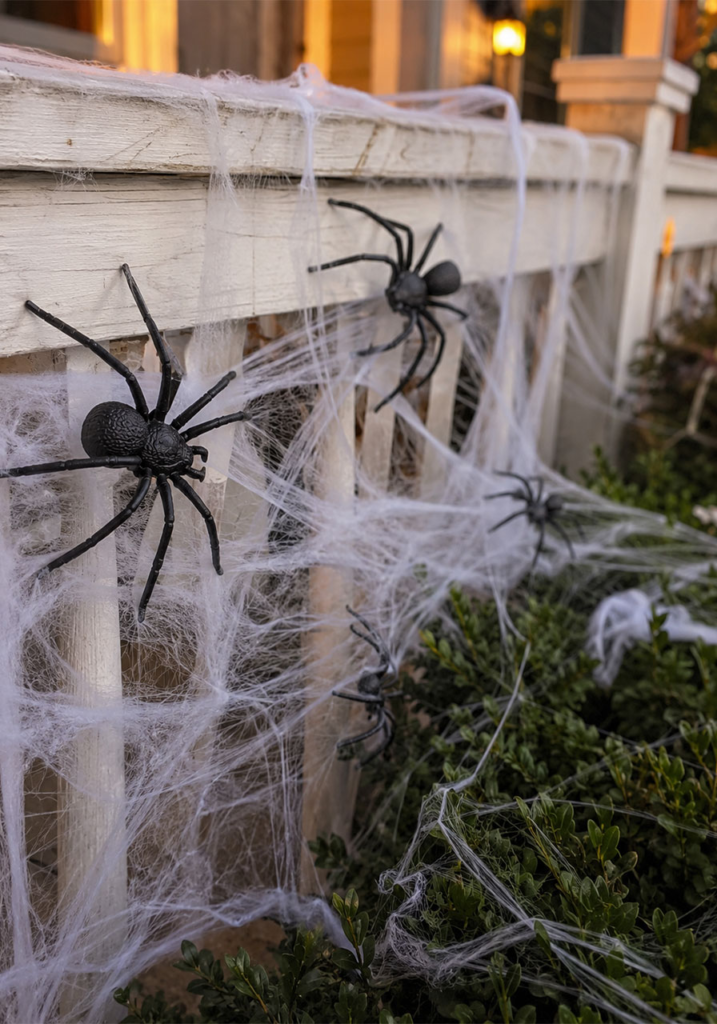
When I need a fast Halloween porch makeover, synthetic spider web is one of my first choices. It covers railings, doorframes, plants, and awkward corners in minutes and doesn’t require much crafting skill.
I don’t try to make the web perfectly neat. In fact, the uneven strands usually look more convincing from a distance.
Best For: Railings, doorways, bushes. Prep Time: 20–30 minutes. Difficulty: Very easy.
What You’ll Need:
- Stretchy synthetic spider web
- Plastic spiders
- Removable hooks or outdoor-safe mounting strips
How to Make It:
- I gently pull apart the web material until it becomes thin and irregular.
- I stretch it across railings, around doorframes, and through suitable bushes or porch features.
- I place plastic spiders at different heights rather than putting them all in one area.
- I allow a few strands to extend beyond the main web for a more abandoned look.
Pro Tip: I always spread the web material much farther than I initially think I need. Thin, stretched strands usually look better than a thick lump of white material.
3. Eerie Floating Ghosts
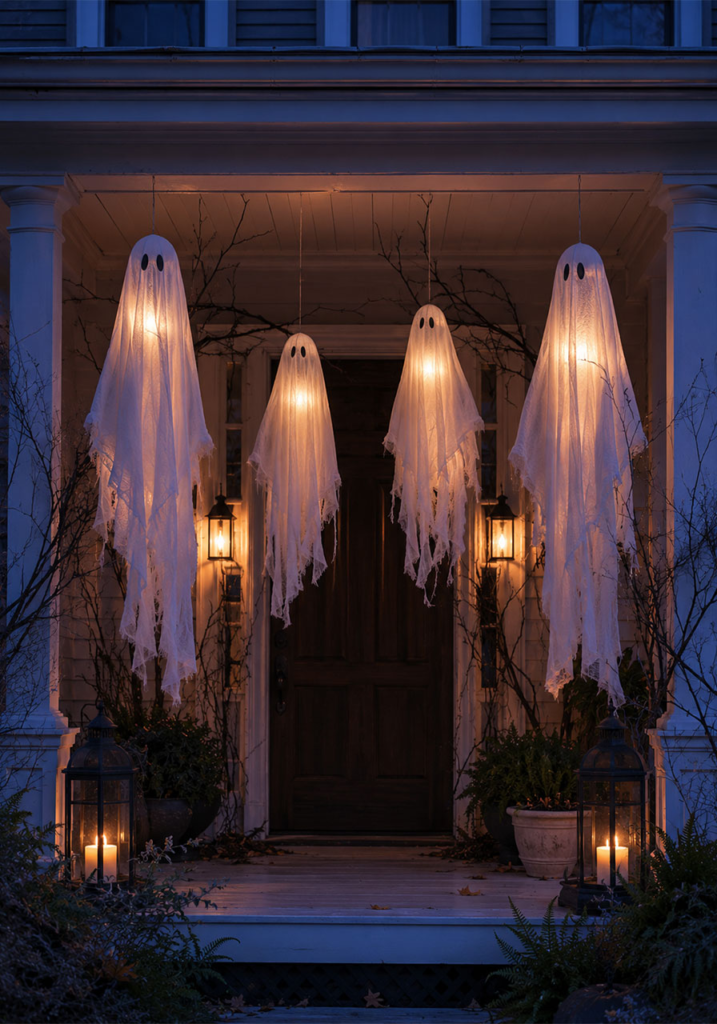
Homemade ghosts are a great choice when I want something inexpensive that still moves with the breeze. I can make them from old white fabric, cheesecloth, or another lightweight material.
I especially like hanging several ghosts together because even simple shapes become much more noticeable when they move at different heights.
Best For: Porch ceilings, tree branches, railings. Prep Time: 30–45 minutes. Difficulty: Easy, kid-friendly with adult help for hanging.
What You’ll Need:
- Old white sheets or cheesecloth
- Styrofoam balls or balloons
- Fishing line or clear string
- Black marker or fabric paint
How to Make It:
- I place a foam ball or balloon beneath the center of the fabric to form the head.
- I tie the material below the head so the ghost keeps its shape.
- I add simple eyes with a black marker or fabric paint.
- I use clear fishing line to hang the ghost from a secure point.
Pro Tip: I hang ghosts at different heights and add a small battery-operated light inside one or two. The mixture of movement and soft light makes them much more noticeable after sunset.
Level It Up: For a larger porch, I can make one oversized ghost the main feature and use several smaller ones around the walkway or windows.
4. Twisted Branch Archway
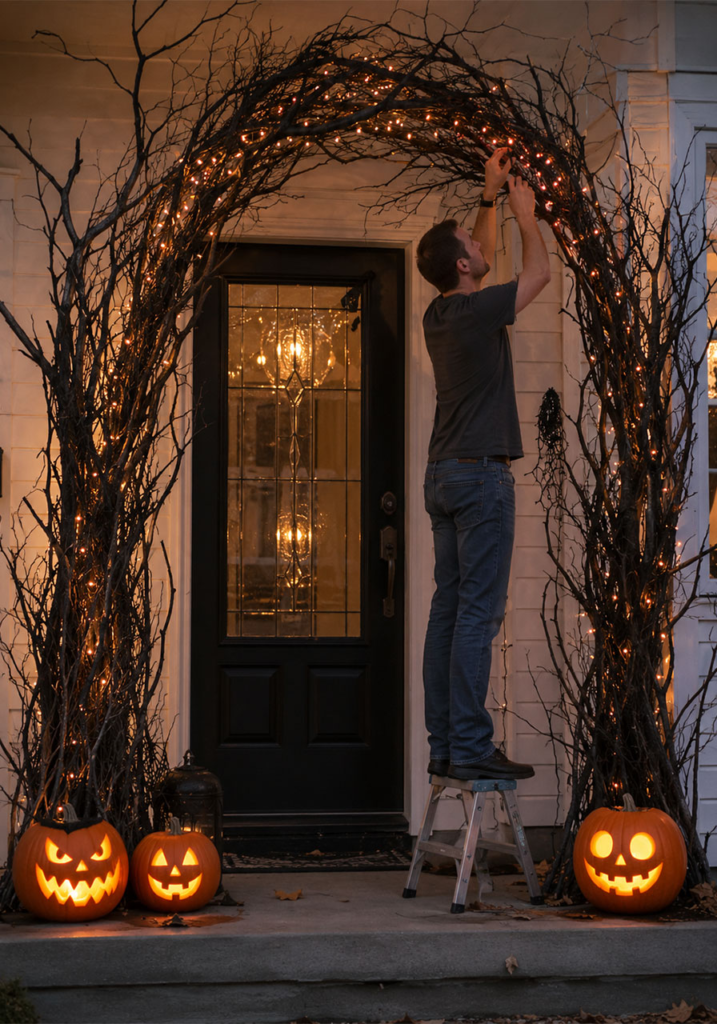
I love using natural branches when I want a haunted-forest appearance without buying a large decorative structure. Fallen branches with interesting curves can become the framework for a dramatic doorway.
This project does require more care than paper decorations because the branches need to be firmly secured and kept clear of walkways.
Best For: Front doors, walkways. Prep Time: 1 hour. Difficulty: Moderate – best with an adult handling the branches.
What You’ll Need:
- Curved or twisted fallen branches
- Zip ties or floral wire
- Warm white or orange fairy lights
- Optional faux cobwebs
How to Make It:
- I collect dry branches with different shapes and lengths.
- I arrange them around the entrance and secure them to stable porch posts or the doorframe with zip ties or wire.
- I weave outdoor-rated fairy lights through the branches.
- I add a small amount of faux webbing to a few areas rather than covering every branch.
Pro Tip: If I want a darker finish, I can paint the branches black before installation. I make sure the paint is appropriate for the material and outdoor use.
5. Rustic Wooden Crates
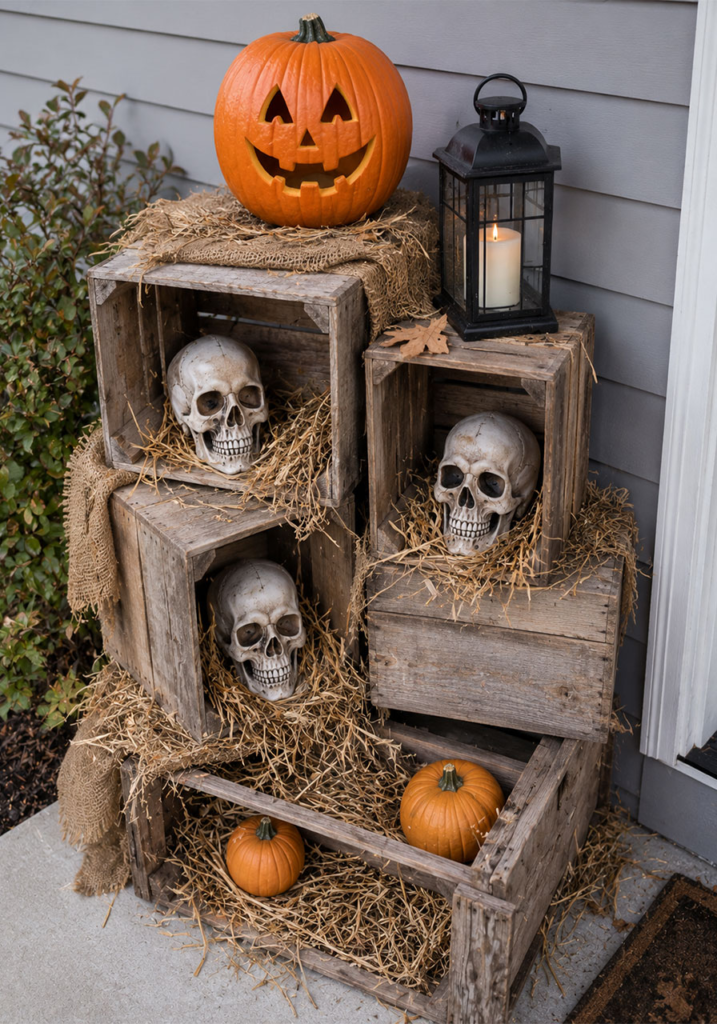
Wooden crates are one of my favorite ways to add height to a porch display. Instead of placing pumpkins and Halloween props directly on the floor, I can stack the crates to create different levels.
I usually combine natural wood, pumpkins, greenery, and a few spooky pieces so the display still feels like fall decor rather than a collection of unrelated props.
Best For: Porch corners, entry steps. Prep Time: 30 minutes. Difficulty: Easy.
What You’ll Need:
- 2–4 wooden crates in different sizes
- Real or faux pumpkins
- Plastic skulls or Halloween figures
- Hay, burlap, or similar fall textures
How to Make It:
- I arrange the crates at slightly different angles and heights.
- I add burlap, hay, or another textured material around the base.
- I place pumpkins and Halloween props inside and on top of the crates.
- I add one taller object, such as a lantern, to give the display some vertical height.
Pro Tip: I prefer groups of three or five when arranging decorative objects. An odd-numbered grouping often feels more relaxed and natural than a perfectly matched pair.
6. Bone-Chilling Mini Graveyard
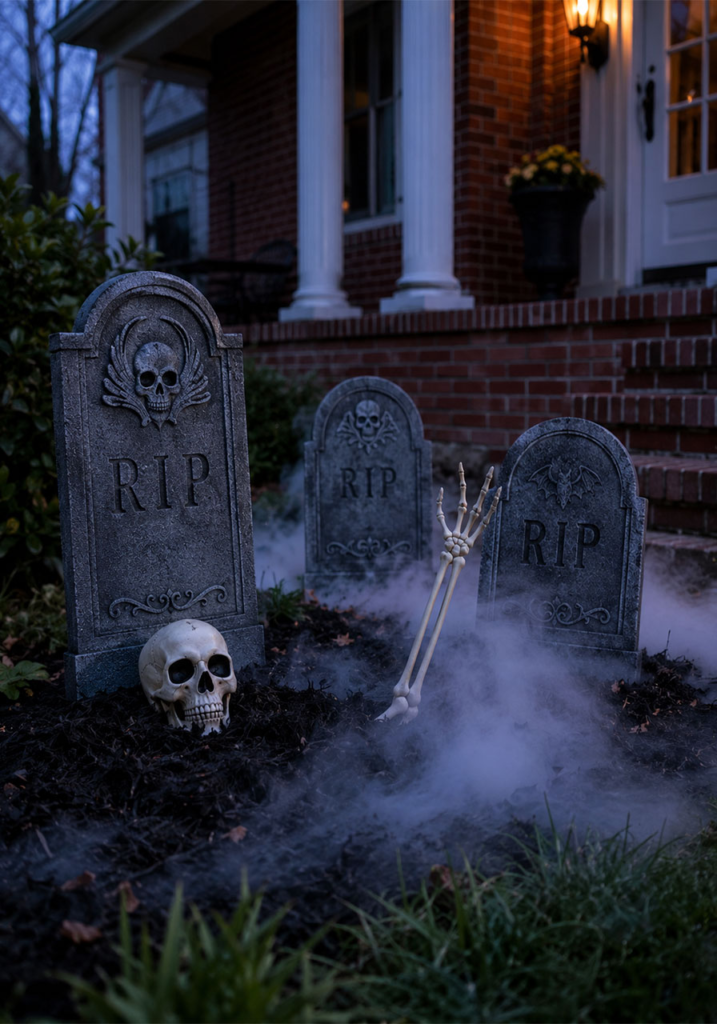
A small graveyard can become the main attraction on a porch or front lawn. I don’t need a large yard to make this work; even three or four tombstones can create the idea of a miniature cemetery.
I get a more realistic result by varying the position of each piece rather than lining everything up evenly.
Best For: Front lawns, porch steps. Prep Time: 1 hour. Difficulty: Easy, great family project.
What You’ll Need:
- Foam or cardboard tombstones
- Plastic skulls and skeleton bones
- Black mulch or dark fabric
- Optional fog machine
How to Make It:
- I cut tombstone shapes from foam board or thick cardboard and paint them in gray tones.
- I add wooden supports behind the tombstones so they can stand securely.
- I arrange the stones at different heights and angles.
- I scatter skulls and bones around the display and partly cover some with mulch.
Pro Tip: I like adding short, playful epitaphs to homemade tombstones. Small details like these give guests something fun to discover.
7. Gory Garlands
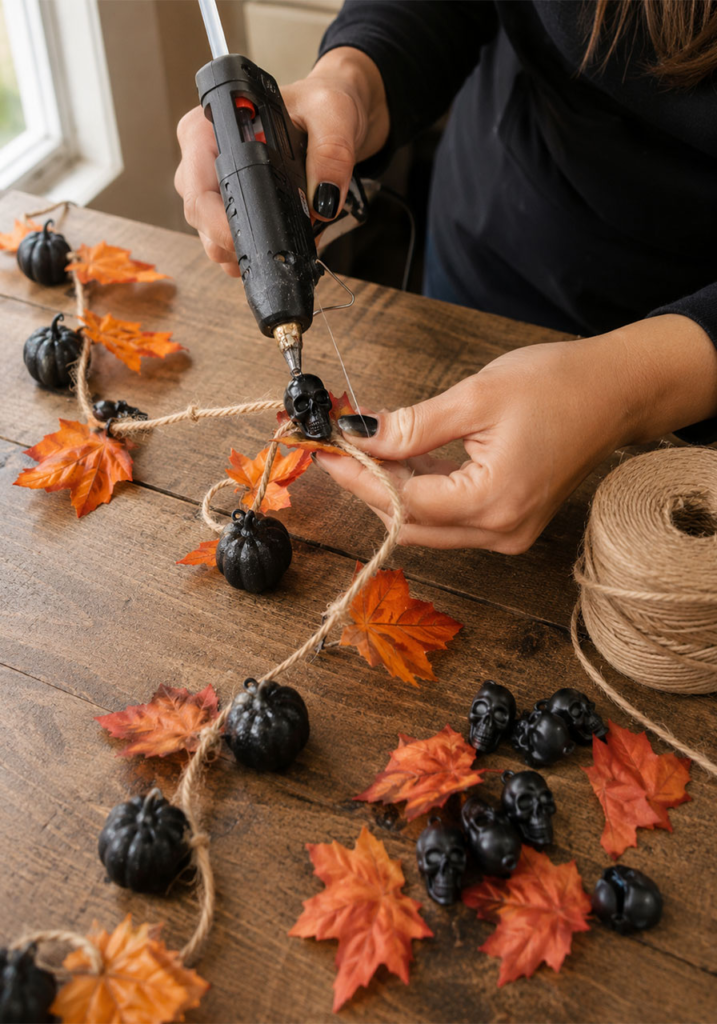
A Halloween garland is an easy way to connect different parts of my porch. I can make one from faux leaves, miniature pumpkins, bones, skulls, or other lightweight decorations.
I usually place garlands where the porch already has a railing or frame because those areas give me natural attachment points.
Best For: Railings, doorframes, windows. Prep Time: 45 minutes. Difficulty: Easy.
What You’ll Need:
- Twine or ribbon
- Faux leaves, mini pumpkins, skulls, or bone decorations
- Hot glue gun
How to Make It:
- I measure the space and cut my twine slightly longer than the area I need to cover.
- I attach the decorative pieces along the twine, leaving enough space between items for the design to breathe.
- I hang the finished garland across railings, windows, or doorframes.
Pro Tip: I avoid pulling the garland completely straight. A few gentle curves between attachment points make it look more relaxed and decorative.
8. Pumpkin Piles
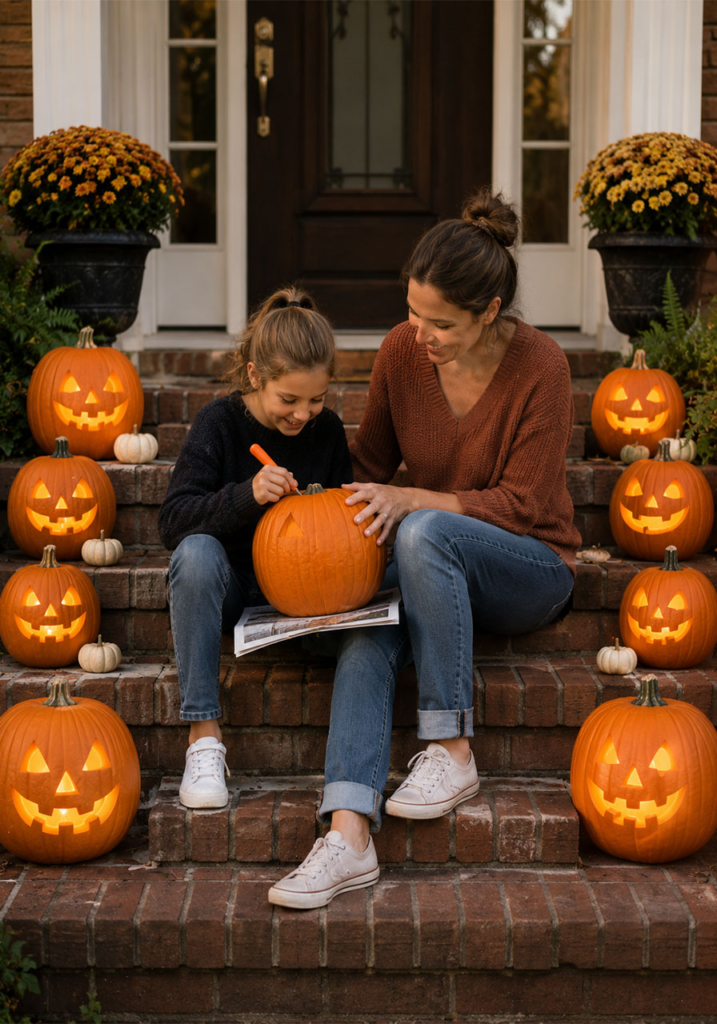
Pumpkins are probably the easiest Halloween decoration for me to use because they work whether my style is traditional, rustic, cute, or spooky.
Instead of putting pumpkins in one straight row, I vary their height and size across the steps. This creates a more layered display and helps guide the eye toward the entrance.
Best For: Porch steps, entryways. Prep Time: 30 minutes (plus carving time). Difficulty: Easy, kid-friendly for design, adults for carving.
What You’ll Need:
- Pumpkins in different sizes and colors
- Carving tools
- Battery-operated tea lights
How to Make It:
- I carve several different expressions instead of giving every pumpkin the same face.
- I arrange large and small pumpkins together along the steps.
- I place battery-operated tea lights inside carved pumpkins.
Pro Tip: I mix carved pumpkins with plain pumpkins, small gourds, and fall plants. The combination keeps the display from looking too uniform.
9. Pumpkin Arch Glow-Up
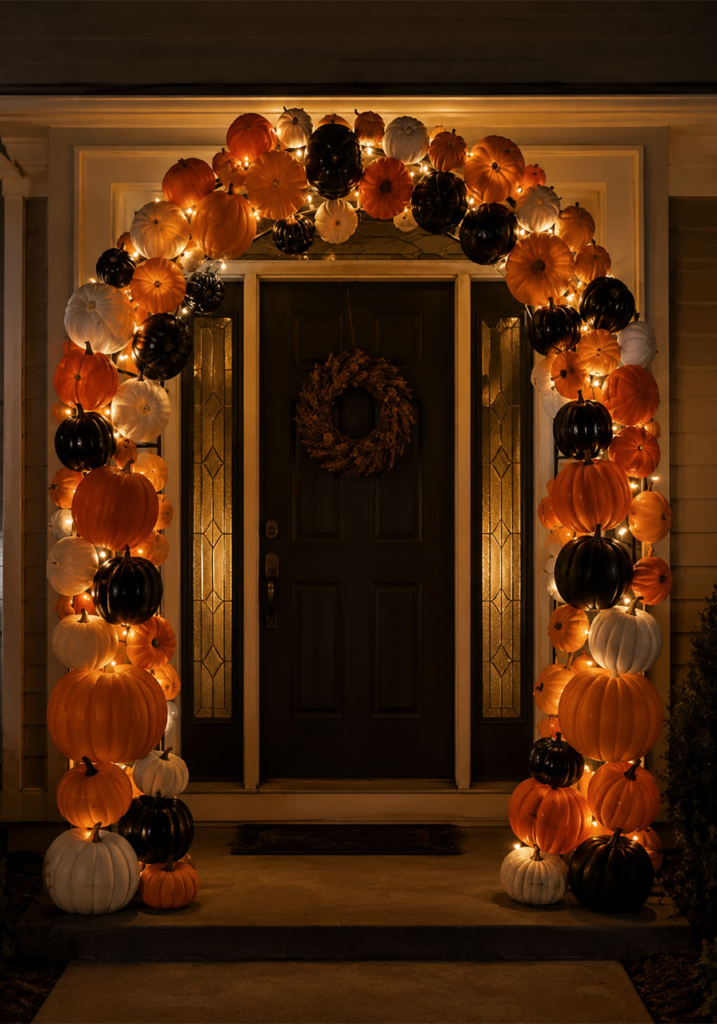
A pumpkin arch can completely change the look of a front entrance. I use lightweight faux pumpkins when I want the display to stay in place for several weeks without adding too much weight.
This is one of the bigger projects on the list, but I can simplify it by creating two pumpkin columns instead of building an entire arch.
Best For: Front doors, statement entryways. Prep Time: 2–3 hours. Difficulty: Moderate.
What You’ll Need:
- Lightweight arch frame made from suitable materials
- Faux pumpkins in orange, white, and black
- Battery-operated string lights
- Zip ties
How to Make It:
- I assemble and secure the arch frame around the entrance.
- I attach faux pumpkins using zip ties, mixing different sizes.
- I weave string lights through the structure so the light appears between the pumpkins.
- I add extra pumpkins around the base to make the structure feel connected to the porch.
Pro Tip: If I don’t have enough materials for a full arch, I make two tall pumpkin arrangements on either side of the door. It gives me a similar framed-entry effect with less work.
10. Bewitched Floating Hats
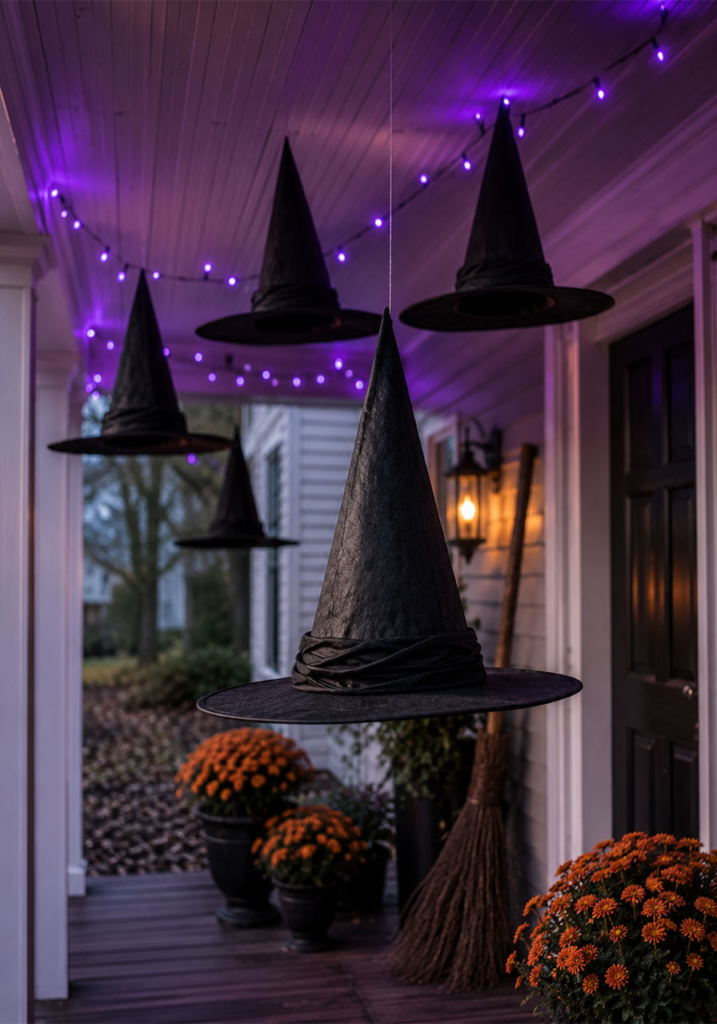
Floating witch hats are a simple way to decorate a porch ceiling without taking up floor space. I like this idea particularly when my porch is small and I don’t want to crowd the entrance with props.
Different hanging heights make the hats appear to be suspended in midair.
Best For: Porch ceilings, entryways. Prep Time: 20 minutes. Difficulty: Easy.
What You’ll Need:
- Witch hats
- Fishing line
- Purple string lights
- Broomsticks, optional
How to Make It:
- I make a small opening near the point of each hat.
- I attach fishing line and hang the hats from secure overhead points.
- I position purple lights nearby to add color after dark.
- I lean broomsticks against the porch if I want to build out the witch theme.
Pro Tip: I balance strong purple lighting with neutral fall pieces such as pumpkins, mums, or lanterns. That keeps the entrance playful instead of making everything look overly dark.
11. Witches’ Broom Parking Lot
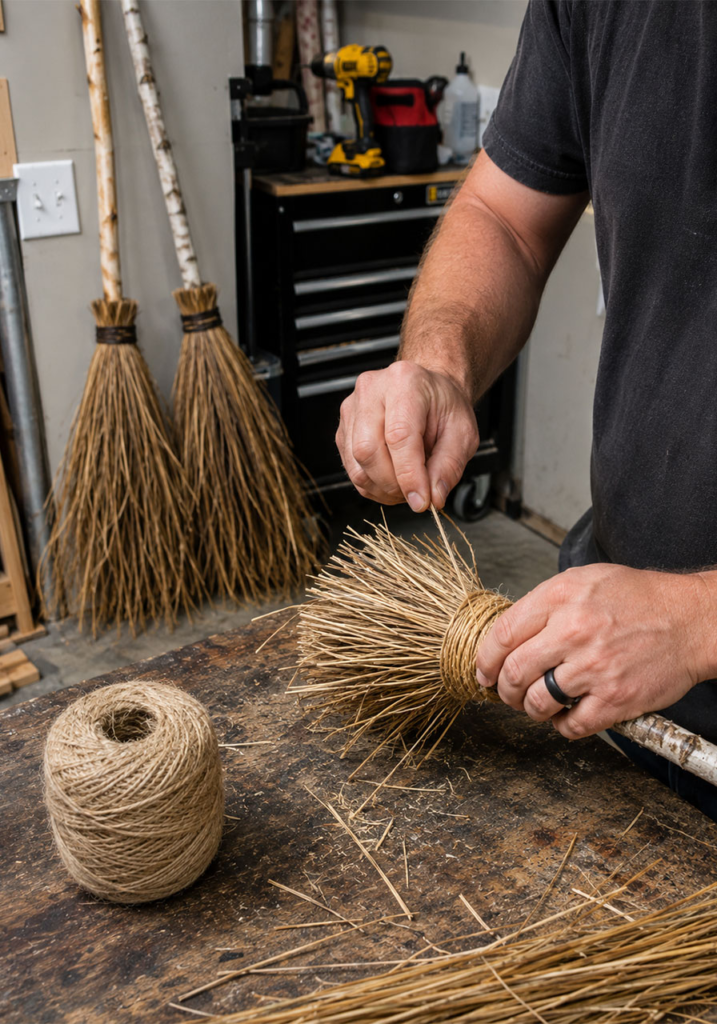
This is one of those decorations that relies more on a funny idea than expensive supplies. A group of homemade brooms paired with a small sign can turn an empty porch corner into a themed display.
I can make the brooms from branches, sticks, twine, and natural materials I already have available.
Best For: Porch walls, entryway corners. Prep Time: 30 minutes. Difficulty: Easy, kid-friendly.
What You’ll Need:
- Sturdy sticks or branches
- Dried straw or twine
- Chalkboard or wooden sign
How to Make It:
- I gather several sticks for the broom handles.
- I bundle dried straw or thin twigs around the bottom of each stick.
- I secure the bristles tightly with twine.
- I lean the finished brooms together and add a humorous parking sign.
Pro Tip: I place a few pumpkins around the bottom of the brooms to hide the ends and make the arrangement look more finished.
12. Sinister Scarecrow
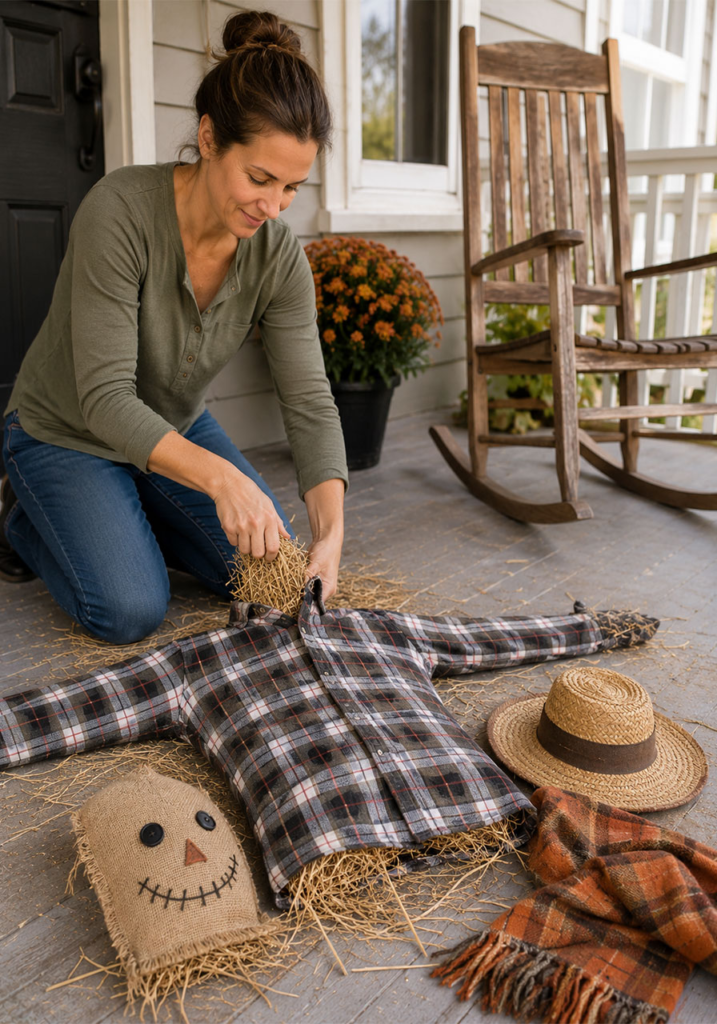
A homemade scarecrow gives me a way to combine traditional fall decoration with Halloween character. I can use old clothes instead of purchasing a new costume or decorative figure.
I like placing mine somewhere where visitors notice it as they approach rather than putting it in the center of the porch.
Best For: Rocking chairs, doorways. Prep Time: 1 hour. Difficulty: Moderate, best with adult supervision.
What You’ll Need:
- Old clothes and gloves
- Straw, newspaper, or other stuffing
- Halloween mask or painted homemade mask
- Hat and scarf
How to Make It:
- I fill old clothing with stuffing until I get a basic body shape.
- I secure the head and add the mask, hat, and scarf.
- I cut a few rough edges into the clothing to make it look aged.
- I place the scarecrow in a chair or secure location where it can be seen safely.
Pro Tip: I angle the scarecrow slightly toward the walkway instead of pointing it directly at the front door. That small change can make the figure feel much more interesting.
13. Scary Skull Accents
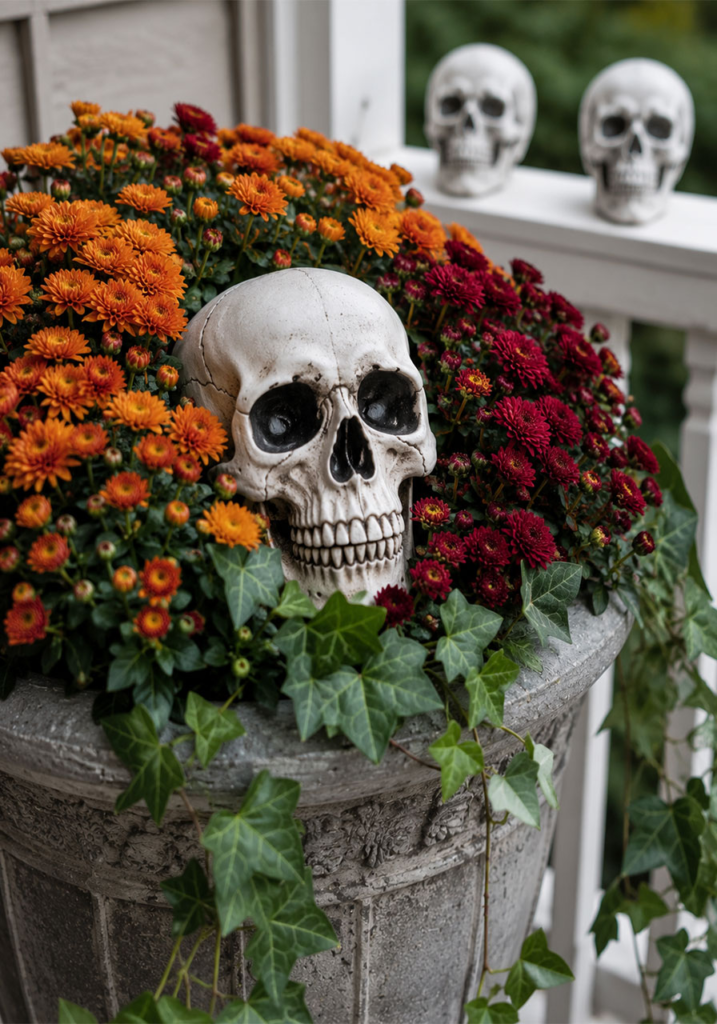
I don’t always need a large Halloween prop to make a porch look spooky. A few small skulls tucked into unexpected places can add just enough Halloween character.
I especially like using skulls inside planters because they can become part of the existing fall display instead of taking over the entire porch.
Best For: Planters, railings, steps. Prep Time: 15 minutes. Difficulty: Very easy.
What You’ll Need:
- Plastic skulls in different sizes
- Optional gray or black craft paint
How to Make It:
- I place skulls among flowers, pumpkins, and planters.
- I position a few along the steps or railing.
- I paint selected skulls if I want them to coordinate with my porch colors.
Pro Tip: I partly cover a few skulls with mulch or soil. The partially hidden effect looks more natural than placing every skull completely in the open.
Also read: How to Make a Front Porch Feel Like an Outdoor Room
14. Grandin Road–Inspired Luxe Look
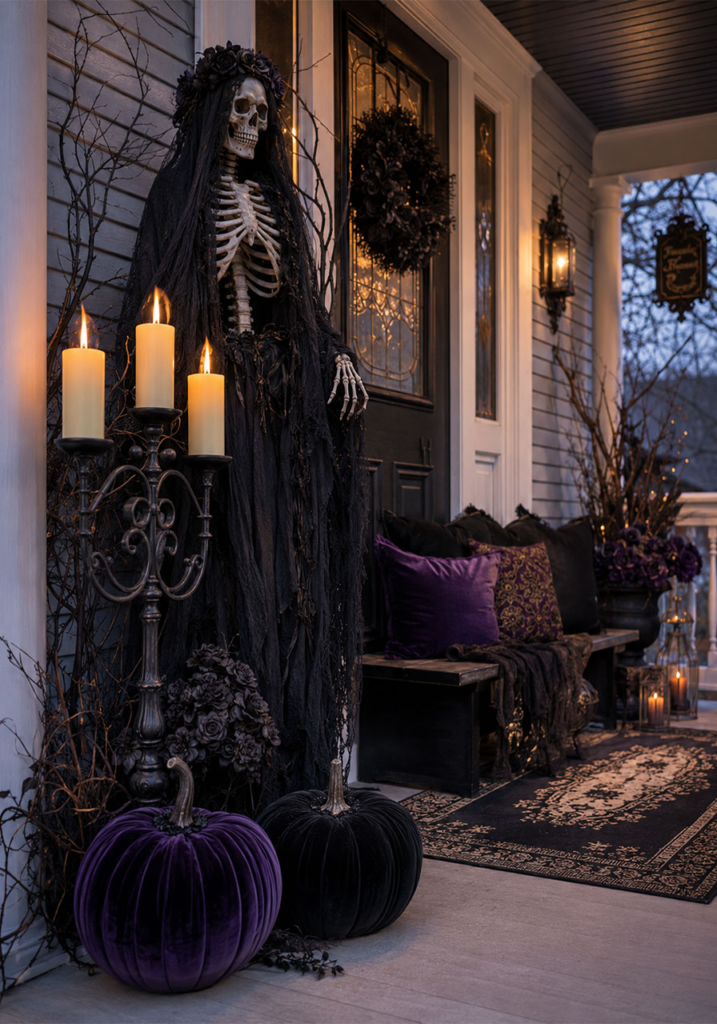
I can create an upscale Halloween porch without buying an entire designer collection. I focus on rich textures, fewer decorative colors, and one or two dramatic statement pieces.
Rather than filling the porch with every Halloween item I own, I choose a limited palette and repeat those shades throughout the display.
Best For: Statement entryways. Prep Time: 2 hours. Difficulty: Moderate.
What You’ll Need:
- Velvet fabric for decorative pumpkins
- Black candelabra or candlestick holders
- Decorative skeleton figures
- Plum, black, deep orange, or similar rich accents
How to Make It:
- I cover foam pumpkins with velvet fabric and secure the material carefully.
- I use a black candelabra as a central decorative element.
- I position a skeleton where it can become the main focal point.
- I repeat my chosen colors through pumpkins, fabric, flowers, and smaller accessories.
Pro Tip: I limit the number of dominant colors. A controlled palette is one of the easiest ways to make inexpensive decorations look more coordinated and polished.
15. Red Lights Mood Lighting
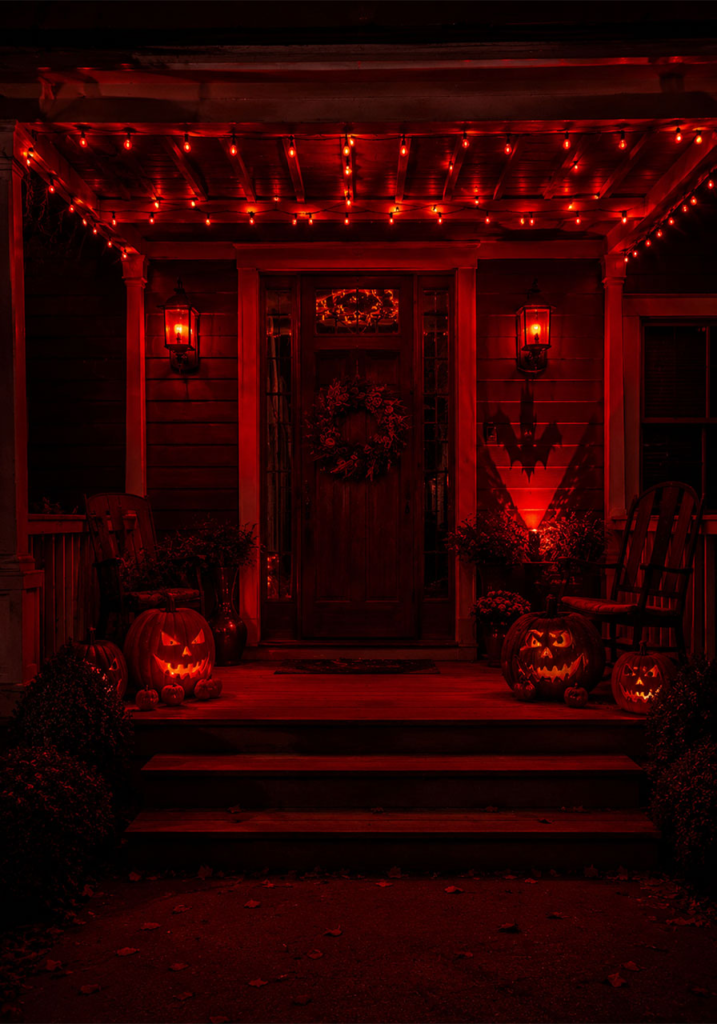
Changing the lighting can completely alter the appearance of my porch after sunset. Red bulbs or outdoor-rated red string lights are a simple way to create a stronger Halloween mood without adding many more decorations.
I use lighting as an accent rather than making the entire porch bright red.
Best For: Porch lamps, string lights. Prep Time: 10 minutes. Difficulty: Very easy.
What You’ll Need:
- Red light bulbs or outdoor-rated red string lights
- Small red spotlights, optional
How to Make It:
- I replace suitable porch bulbs with red versions.
- I add red string lights around railings or the doorway.
- I position small lights behind pumpkins or props to create shadows.
Pro Tip: I combine red lighting with white ghosts or pale decorations because the contrast makes those pieces stand out strongly after dark.
16. A Welcoming Glowing Ghost
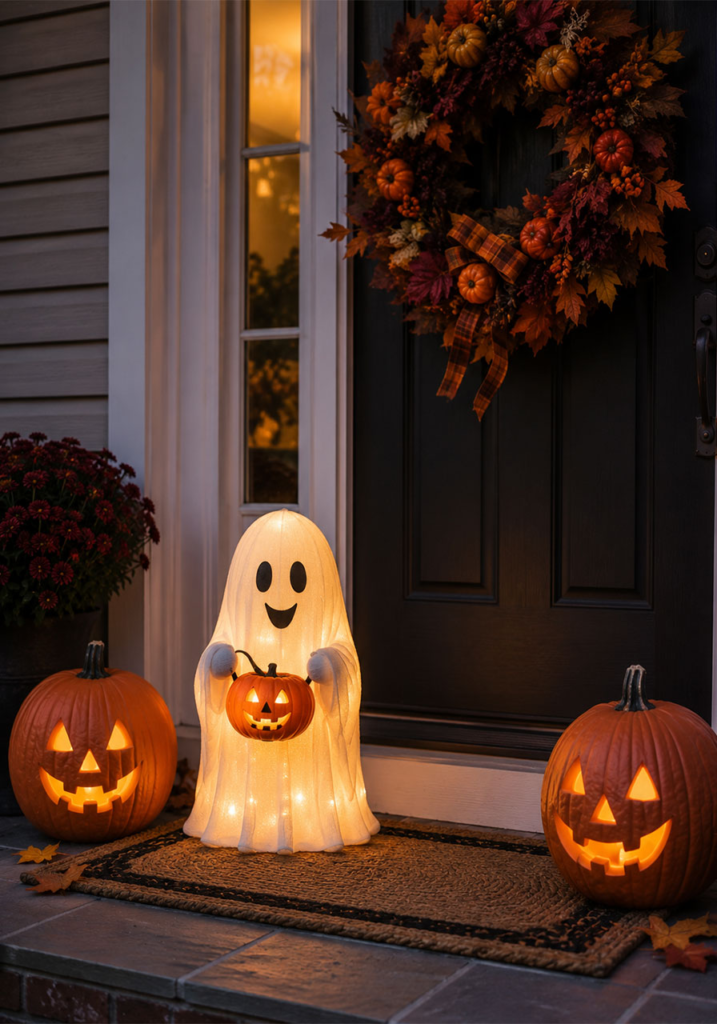
Not every Halloween porch needs to look frightening. I often prefer mixing one friendly decoration with a few scarier details, especially when young children will be visiting.
A glowing ghost beside the door can act as a cheerful focal point while pumpkins and a fall wreath keep the rest of the entrance warm.
Best For: Front door greeters. Prep Time: 15 minutes (if using a pre-made figure). Difficulty: Very easy.
What You’ll Need:
- Light-up ghost figure or DIY illuminated ghost
- Pumpkins
- Fall wreath
- Doormat
How to Make It:
- I place the glowing ghost beside the front door where it can be seen easily.
- I surround it with pumpkins or small fall decorations.
- I add a seasonal wreath above the door.
- I finish the area with a welcoming doormat.
Pro Tip: I like this setup when the rest of my porch is fairly simple. The glowing figure becomes the main feature without requiring dozens of extra decorations.
17. Playful Posed Skeleton
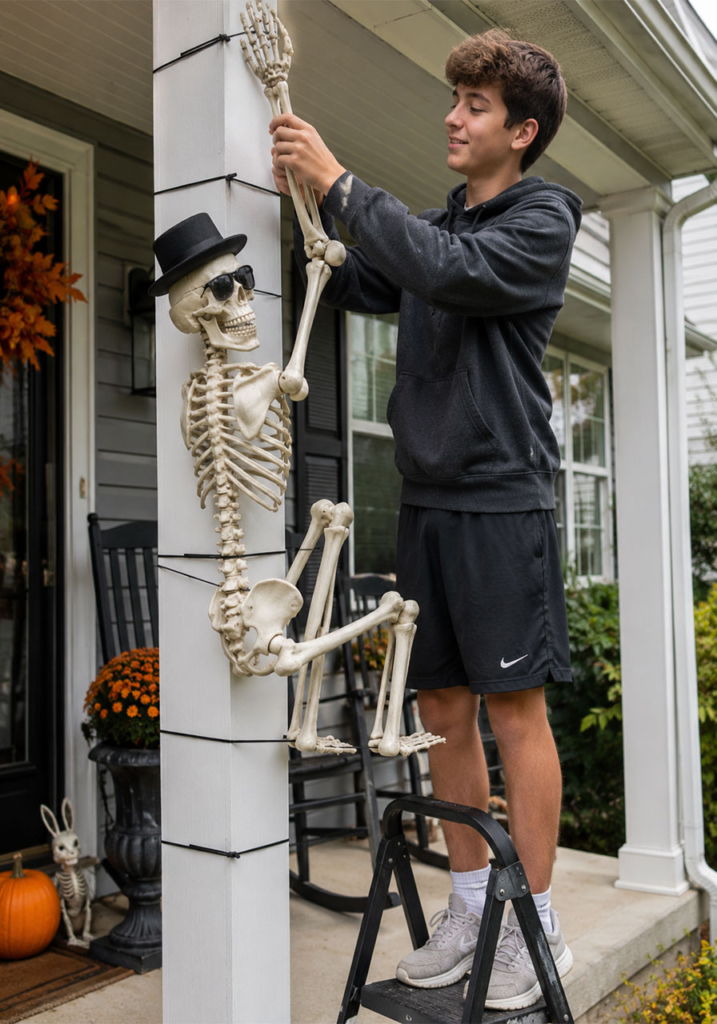
A posable skeleton becomes much more interesting when I treat it like a character instead of simply standing it beside the door.
I can pose it climbing a porch post, reaching toward a pumpkin, sitting in a chair, or appearing to hang from a safe decorative point.
Best For: Porch posts, doorways. Prep Time: 20 minutes. Difficulty: Easy.
What You’ll Need:
- Posable plastic skeleton
- Zip ties or suitable wire
- Optional hats, scarves, or other accessories
How to Make It:
- I bend the skeleton’s joints into a fun or dramatic position.
- I secure the figure so wind cannot easily knock it down.
- I add one or two accessories that fit the rest of my porch.
Pro Tip: I change the skeleton’s pose during October. Moving it occasionally gives the porch a fresh look without requiring another decoration.
18. Milk Jug Ghost Lanterns
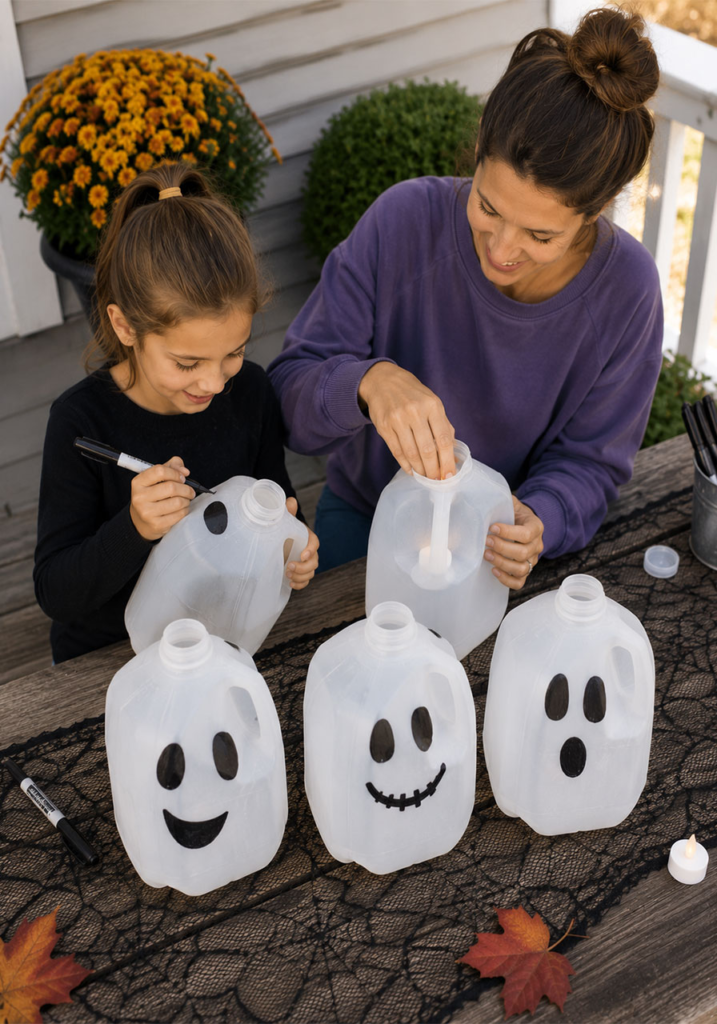
Empty plastic milk jugs can become surprisingly effective Halloween lanterns. I like this project because the materials are inexpensive, easy to find, and simple enough for children to help with.
I use battery-operated lights rather than candles inside the plastic containers.
Best For: Walkways, porch steps. Prep Time: 30 minutes (plus drying time if painting). Difficulty: Very easy, kid-friendly.
What You’ll Need:
- Clean empty milk jugs
- Black permanent marker
- Battery-operated tea lights
How to Make It:
- I wash and completely dry each jug and remove any labels.
- I draw simple ghost faces on the front.
- I place a battery-operated tea light inside each jug.
- I line the walkway or steps with the finished ghost lanterns.
Pro Tip: I keep the spacing fairly consistent on both sides of a walkway. The repeated shapes create a simple path that naturally draws attention toward the entrance.
Teacher & Parent Bonus: I can use this craft to introduce children to reusing household containers. It gives an ordinary plastic jug another purpose before it goes into the recycling stream.
19. Toilet-Paper-Roll Bat Swarm
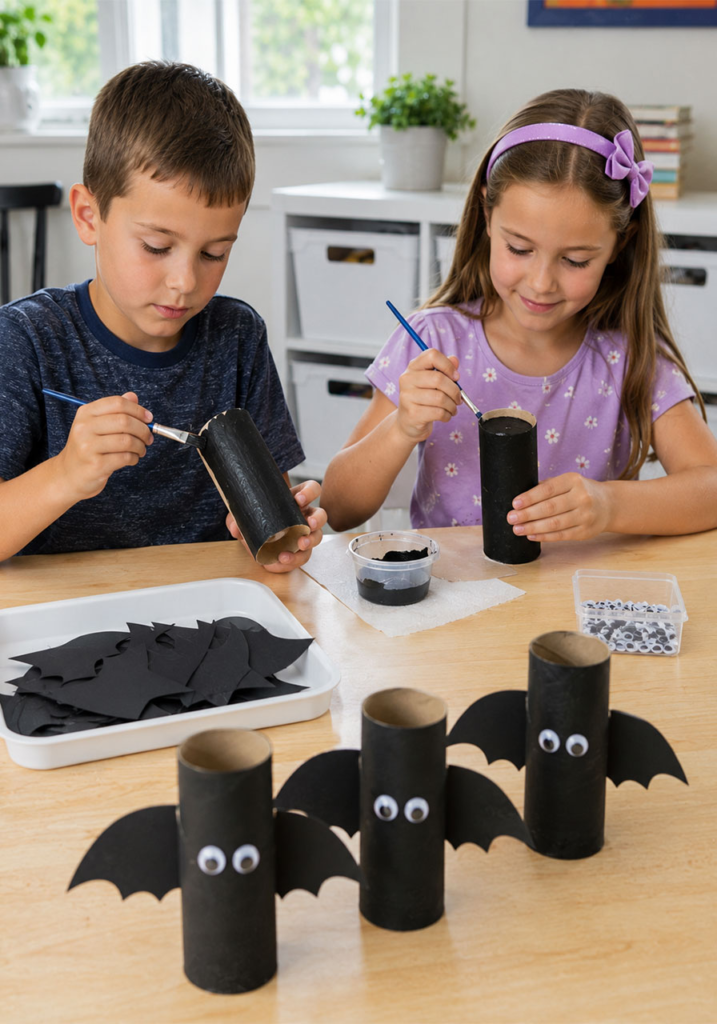
This is another inexpensive craft that I can make from materials already sitting in my recycling bin. Toilet paper rolls provide the body shape, while cardstock creates the wings.
It works particularly well as a small porch, window, shelf, or classroom decoration.
Best For: Windows, small porch accents. Prep Time: 15–20 minutes. Difficulty: Very easy, ideal for young kids.
What You’ll Need:
- Empty toilet paper rolls
- Black paint
- Black cardstock
- Googly eyes
How to Make It:
- I paint the cardboard rolls black and let them dry completely.
- I cut simple pairs of wings from black cardstock.
- I attach the wings to the sides and add googly eyes.
- I group several finished bats together rather than displaying only one.
Teacher & Parent Bonus: I can use this craft as a quick nature lesson. Real bats play important roles in ecosystems, including eating insects and, for some species, helping pollinate plants.
20. Painted Rock Pumpkin Patch
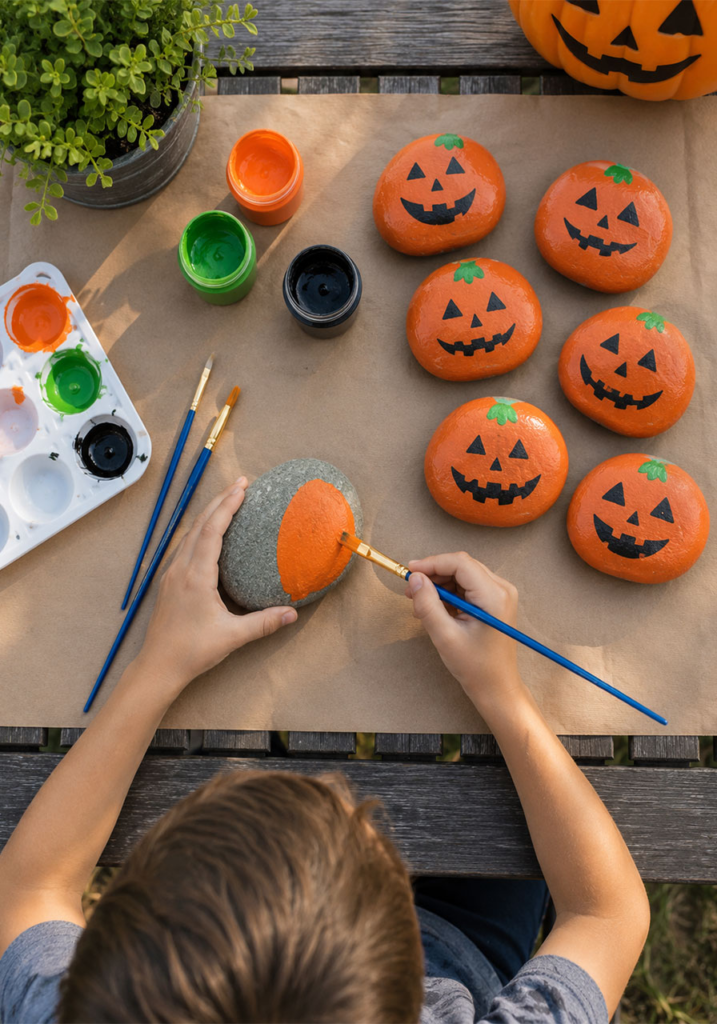
Painted rocks are one of my favorite low-cost seasonal crafts because they are sturdy and can be reused year after year. With a few simple paint colors, ordinary stones can look like a tiny pumpkin patch.
I choose smooth rocks that are clean and dry so the paint adheres more easily.
Best For: Porch steps, planters, garden beds. Prep Time: 30 minutes (plus drying). Difficulty: Very easy, ideal for young kids.
What You’ll Need:
- Smooth rounded rocks
- Orange, green, and black acrylic paint
- Paintbrushes
- Clear outdoor sealant, optional
How to Make It:
- I wash the rocks and allow them to dry completely.
- I paint each one orange.
- Once the base coat is dry, I add jack-o’-lantern faces and small green stems.
- I apply a suitable clear sealant if the rocks will remain outdoors for an extended period.
Teacher & Parent Bonus: While painting, I can talk with children about how rocks form and change over time. It is an easy way to connect a seasonal craft with a basic nature lesson.
21. Mummy-Wrapped Porch Railings
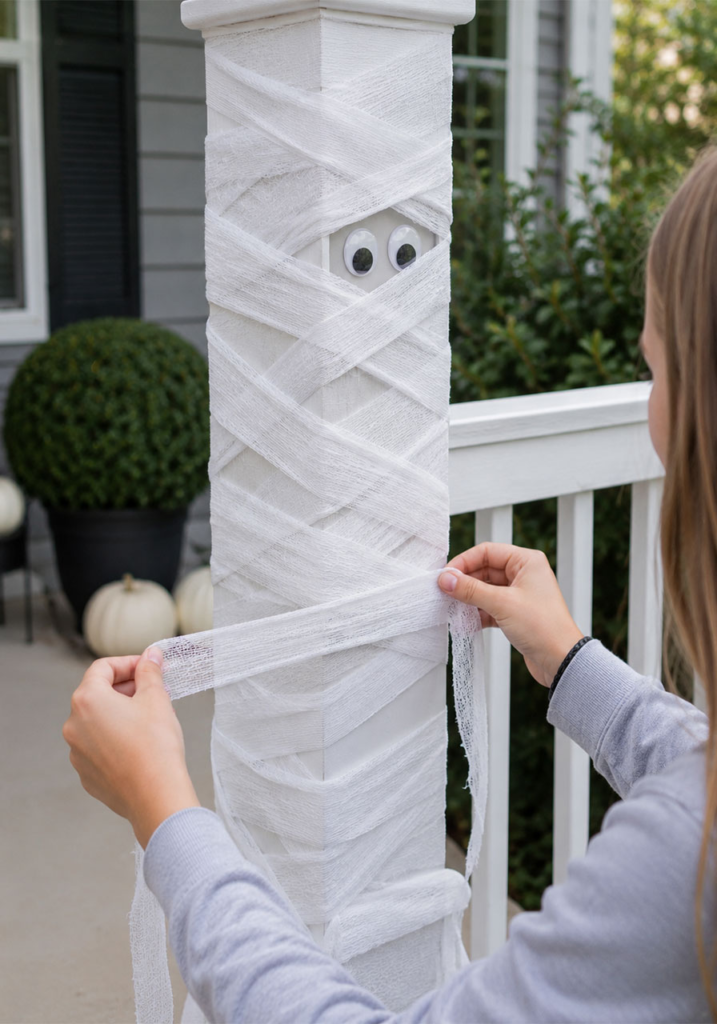
Wrapping a porch post or railing in white gauze is one of the quickest ways I can make an ordinary structure look like part of a Halloween scene.
I prefer slightly uneven wrapping because a mummy should look aged and messy rather than perfectly finished.
Best For: Railings, porch posts, lamp posts. Prep Time: 30–45 minutes. Difficulty: Easy, great group project.
What You’ll Need:
- White gauze or cheesecloth strips
- Hot glue gun or suitable fabric tape
- Googly eyes, optional
How to Make It:
- I cut or tear the gauze into manageable strips.
- I wrap each railing or post from the bottom upward.
- I overlap the strips in different directions and secure loose sections as needed.
- I add a pair of googly eyes where I want the mummy to appear to be watching visitors.
Pro Tip: I leave a few strips hanging loose instead of trying to make every section neat. The uneven edges give the decoration a more convincing aged appearance.
22. Bone-Chilling Fog Garden
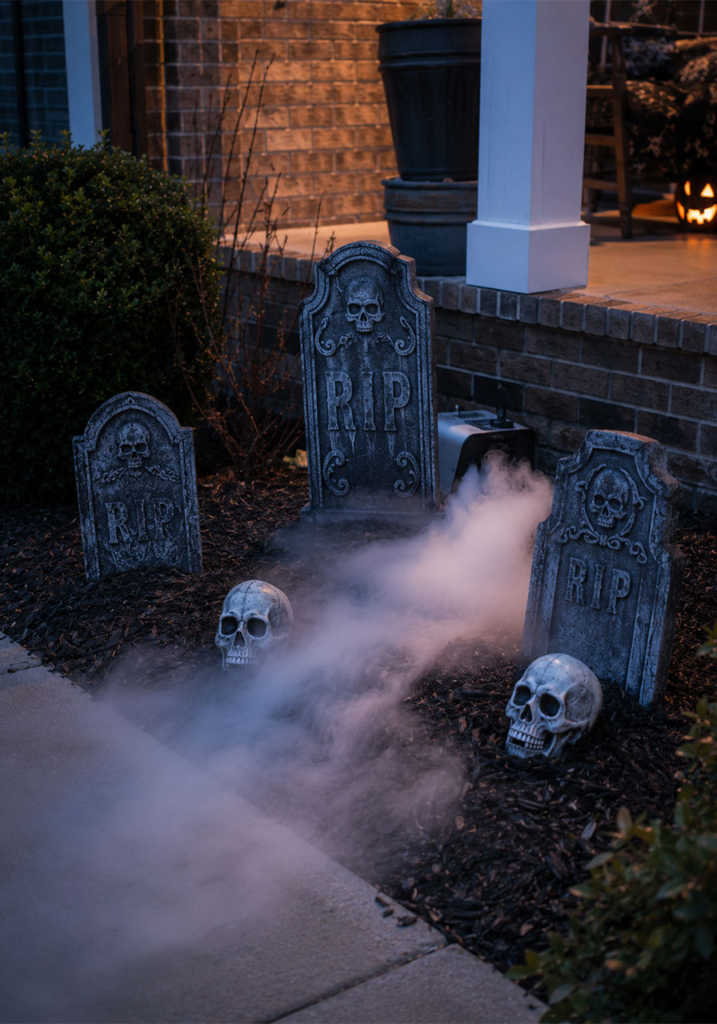
Adding fog can make a small Halloween graveyard feel much more dramatic after sunset. I keep the setup compact so the fog stays around the decorations instead of simply disappearing across a large open area.
I prefer using a suitable fog machine for a home display. If dry ice is considered, I treat it as an adult-only material and follow proper handling guidance.
Best For: Front lawns, garden beds near the porch. Prep Time: 20 minutes to set up. Difficulty: Easy.
What You’ll Need:
- Small fog machine
- Tombstones and skulls
- Black mulch
How to Make It:
- I arrange tombstones and partly buried skulls in a small garden area.
- I use dark mulch around the decorations to hide equipment and create a darker base.
- I position the fog machine in a suitable location behind the props.
- I use short fog bursts around the evening rather than running the machine continuously.
Safety Note: I keep fog equipment, electrical connections, and cords away from areas where children can trip over them. If dry ice is ever used, I keep it away from children and pets and avoid touching it directly because it can cause cold burns.
Read this next: 23 Summer Front Porch Decor Ideas 2026
23. Skull Wreath with Falling Leaves
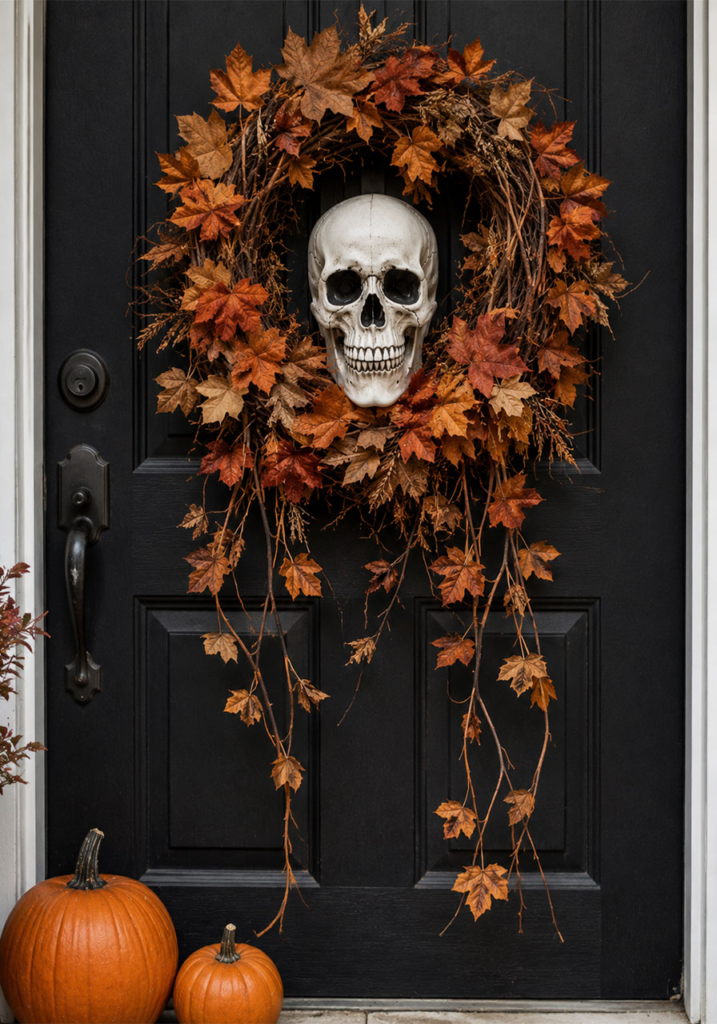
A Halloween wreath doesn’t have to be completely covered in skulls and black decorations. I like combining one skull with autumn leaves and natural grapevine because it gives the front door a seasonal look while still feeling spooky.
This is also a relatively quick project when I want to refresh the door without decorating the entire porch.
Best For: Front doors. Prep Time: 45 minutes. Difficulty: Easy.
What You’ll Need:
- Grapevine wreath base
- Dried or faux fall leaves
- One plastic skull
- Hot glue gun
How to Make It:
- I weave leaves and vines through the wreath base, leaving a few pieces loose.
- I secure the skull near the upper center of the wreath.
- I hang the finished wreath securely on the front door.
- I repeat a few of the same leaves, pumpkins, or skull details near the doorway so the wreath feels connected to the rest of the porch.
Pro Tip: I let a few vine pieces extend beyond the circular shape. Those longer pieces create movement and keep the wreath from looking too perfectly arranged.
FAQ’s
What are the cheapest Halloween porch decorations to make?
I would start with paper bats, painted rocks, toilet-paper-roll bats, and milk-jug ghosts because many of the basic materials can already be found at home. Spider web material is another inexpensive option when I need to cover a larger area quickly.
What Halloween decorations are safe for young kids to help make?
I find painted rocks, paper bats, milk-jug ghosts, and cardboard-roll bats to be good choices for children when age-appropriate supervision is provided. I keep hot glue guns, sharp carving tools, electrical setups, and fog equipment with adults.
How do I make my porch decorations last the whole season?
I choose weather-resistant materials whenever possible. Faux pumpkins, sealed painted rocks, outdoor-rated lights, and plastic props generally handle outdoor conditions better than paper. If rain or strong wind is expected, I bring lightweight decorations indoors.
Can these ideas work for a classroom Halloween party too?
Yes. I can scale down paper bats, painted rocks, cardboard-roll bats, and milk-jug ghosts for a classroom. These projects can also support simple lessons about recycling, symmetry, animals, or the natural world.
Ready to Get Spooky?
I don’t need a huge budget or a porch packed with decorations to make Halloween feel special. When I choose two or three larger ideas and support them with smaller details, the whole entrance looks more organized and intentional.
My favorite approach is to begin with the focal point. I might choose a pumpkin arrangement, floating ghosts, a mini graveyard, or a decorated wreath. Then I repeat the same colors and materials around the porch so everything feels connected.
For families, I also like choosing at least one project that children can make themselves. Paper bats, painted rocks, and milk-jug ghosts can turn decorating into a fun afternoon activity instead of another item on the holiday to-do list.
The best Halloween porch is not necessarily the most expensive one. For me, it is the one that feels creative, welcoming, and just spooky enough to make people stop and look.
Conclusion
I can create a memorable Halloween front porch with simple supplies, a little planning, and a few well-placed decorations. I don’t have to recreate a professional haunted house to make an impact.
If I’m decorating on a budget, I start with inexpensive projects such as bats, spider webs, ghosts, pumpkins, and painted rocks. If I want a bigger statement, I add a graveyard, pumpkin arch, scarecrow, or dramatic lighting.
Most importantly, I keep safety in mind. I secure outdoor decorations against wind, use suitable outdoor lights, keep cords out of walking paths, and reserve tools or materials that need extra care for adults.
Whether my goal is cute, creepy, rustic, or dramatic, I can mix these ideas to create a Halloween porch that feels personal and ready for trick-or-treaters.

One Comment