
81 Easy DIY Christmas Decorations You’ll Love
I love decorating my home for Christmas, but I don’t think creating a festive space needs to cost a lot of money. Some of my favorite Christmas decorations can be made with leftover ribbon, scrap fabric, paper, twigs, pinecones, and a few basic craft supplies. Handmade pieces also let me choose colors and styles that fit my home instead of buying decorations that look like everyone else’s.
In this collection, I’m sharing 81 DIY Christmas decoration ideas for trees, mantels, walls, front porches, holiday tables, and handmade gifts. I’ve included simple projects for beginners, natural decorations for a rustic look, colorful crafts for families, and a few more detailed ideas for anyone who enjoys spending time making things by hand.
When I want to refresh my Christmas decor without stretching my holiday budget, I look for projects that use inexpensive materials and can be customized to suit my space. Paper garlands, handmade ornaments, rustic wreaths, decorated candles, miniature trees, and homemade advent calendars are all useful ways to add a festive touch.
Save this for later

Table of Contents
These 81 Christmas crafts offer options for almost every part of the home. Some take only a few minutes to assemble, while others are better suited to a relaxed afternoon of crafting. I recommend starting with materials you already own, choosing projects that match your decorating style, and making a few coordinated pieces rather than trying to complete everything at once.
Key Takeaways
- Budget-friendly decorating: I can turn leftover ribbon, fabric scraps, old paper, and natural materials into attractive Christmas decorations.
- Easy handmade ornaments: Painted wooden shapes, salt dough, paper stars, and small twig trees are practical projects for beginners.
- Decor for every room: I can decorate the Christmas tree, mantel, dining table, windows, walls, and front porch with handmade pieces.
- Family-friendly crafts: Paper snowflakes, sock snowmen, and simple garlands offer creative activities for children when age-appropriate tools are used.
- Natural holiday style: Pinecones, dried oranges, cinnamon sticks, and evergreen branches add texture and seasonal character.
- Safer decorating: I use battery-operated lights when possible, keep flammable materials away from open flames, and choose sturdy hanging methods.
Related article: 27 Christmas Gift Wrapping Ideas You’ll Want To Try This Year
1. Ribbon Christmas Tree

I like the idea of turning leftover ribbon into miniature Christmas trees. This project is a good way to use small pieces that are too short for gift wrapping but still have plenty of decorative potential.
I would cut the ribbon into different lengths, tie or attach each piece to a thin twig, and arrange them from longest at the bottom to shortest at the top. A small loop of twine makes it easy to hang the finished ornament on a Christmas tree.
Pro Tip: I would choose two or three coordinating ribbon colors to keep the ornament looking intentional rather than overcrowded.
2. Mini Christmas Tree Gift Toppers

I enjoy gift wrapping more when I can add a handmade detail to each package. Tiny Christmas trees made from twigs and colored string are an inexpensive alternative to store-bought gift toppers.
I would arrange small sticks into a triangular tree shape, secure them with craft glue or string, and wrap the branches with red, green, or neutral thread. Once dry, each tree can be attached to a wrapped present with ribbon or twine.
These toppers work especially well on kraft paper, plain white wrapping paper, and reusable fabric gift wraps.
3. Christmas Tree Garland

A homemade garland is one of the easiest ways I can make a room feel ready for Christmas. Wooden pegs or clothespins can be painted in different shades of green and attached to string to create a simple tree-inspired display.
I would paint the pieces in a gradual color pattern, let them dry completely, and arrange them along twine. The finished garland can hang over a mantel, across a shelf, or along a stair railing.
Pro Tip: Before hanging the garland, I would measure the space and leave a little extra string at both ends for attaching hooks.
4. DIY Sliced Wood Christmas Ornaments

I love how wood slice ornaments bring a natural look to Christmas decorating. Their simple shapes suit farmhouse, woodland, Scandinavian, and traditional holiday themes.
I would use smooth, dry wood slices and decorate them with small trees, stars, snowflakes, or initials. Acrylic paint works well for colorful designs, while white paint and twine create a more understated finish.
After the paint dries, I would use a pre-drilled hole to attach a ribbon or string. If I am preparing these ornaments for children, I would choose ready-made slices with smooth edges rather than cutting wood myself.
5. Heavenly Scented Christmas Ornaments

For a Christmas tree that looks and smells festive, I would make cinnamon-scented ornaments using a simple dough or a suitable air-dry ornament mixture. Star, heart, and gingerbread-style shapes fit the season beautifully.
I would shape the mixture with cookie cutters, make a hole for hanging before it dries, and add ribbon once the ornaments are firm. A cinnamon-based craft dough can give off a gentle seasonal scent without requiring additional fragrance products.
Pro Tip: I would label these as decorative ornaments rather than edible treats, and keep them away from pets and small children who might mistake them for food.
6. Miniature Winter Hats

I find miniature yarn hats especially charming because they add a soft, cozy texture to Christmas decorations. They are also a useful way to use up leftover yarn from knitting or crochet projects.
I would make small hat shapes using yarn and a simple looped construction, then add a tiny pom-pom at the top. A collection of hats in red, cream, green, and gray would look lovely on a tree or strung together as a garland.
This project is best for anyone who enjoys working with yarn, but simple versions can be made without advanced knitting skills.
7. Frosty Pine Cones

When I want a natural Christmas display, pinecones are one of the first materials I consider. Their layered texture already looks decorative, so I only need a small amount of paint or glitter to give them a wintry finish.
I would start with clean, fully dry pinecones and lightly brush the tips with white paint or craft glue. A small amount of silver glitter can create a frosted appearance without covering every scale.
I would display the finished pinecones in a bowl, arrange them around a centerpiece, or attach a loop of ribbon for hanging.
8. DIY Snow Covered Pine Cones

For a snowy look without waiting for winter weather, I would coat the tips of pinecones with white craft paint or a suitable artificial snow product. These decorations look attractive in baskets, outdoor-themed arrangements, and covered porch displays.
I would clean and dry the pinecones first, then apply the snow effect in light layers. Once everything has dried according to the product instructions, I could place them in a lantern-style display or use them in a wreath.
Pro Tip: For outdoor use, I would choose materials labeled for the intended conditions and keep lightweight decorations sheltered from strong wind and rain.
9. Rustic Acorn Marble Ornaments

I like crafts that combine natural textures with unexpected materials. Acorn caps and decorative marbles can create unusual woodland-style ornaments with very little additional decoration.
I would clean the acorn caps, select marbles that fit securely, and attach them using a suitable strong craft adhesive. A small loop of twine can turn each finished piece into a hanging ornament if the construction is sturdy enough.
Because marbles are small and can break, I would keep these decorations out of reach of young children and avoid using them where they could fall onto a hard floor.
10. Painted Woodland Ornaments

Hand-painted woodland ornaments are a great choice when I want a Christmas tree with a nature-inspired theme. Wooden shapes featuring animals, trees, or forest details can be customized with just a few paint colors.
I would begin with a simple base coat, allow it to dry, and add details using a fine brush or paint marker. Small dots, stars, scarves, and snowy accents are easier to paint than complicated scenes.
These ornaments also make thoughtful handmade gifts because I can personalize the colors or designs for each recipient.
11. Popsicle Twig Tree Christmas Ornaments

I would combine popsicle sticks and small twigs to make miniature trees with a rustic finish. This is a straightforward project for using inexpensive craft supplies and leftover natural materials.
I would arrange three sticks into a triangle, secure the corners with craft glue, and add short twigs across the center to suggest tree branches. A small star or bead at the top completes the design.
After the glue has dried, I would add a string loop and hang the ornament on a tree or attach it to a holiday gift.
12. Ho Ho Ho Wooden Sign

A vertical Christmas sign can fill an empty corner without taking up much floor space. I would use a narrow wooden board and paint a simple holiday message in large, easy-to-read lettering.
Red, white, and green are traditional choices, but cream and dark green can create a more understated look. I would sand the board, apply a suitable base coat, and let each layer dry before adding the lettering.
For a porch display, I would select a finish suitable for the expected weather and secure the sign so it cannot tip over easily.
13. Christmas Arrow Signs

I think directional Christmas signs are a fun way to decorate a front garden or entryway. Several wooden arrows pointing in different directions can feature messages such as Santa’s Workshop, North Pole, and Reindeer Crossing.
I would paint each arrow separately, add the lettering with a stencil or paint marker, and attach the pieces to a sturdy post. The signs can be decorated with small stars, snowflakes, or striped details.
For outdoor placement, I would anchor the post securely and use paint designed for exterior projects.
14. Reindeer Logs

For a natural outdoor display, I would turn small logs into reindeer using twigs for antlers and simple painted details for the face. A red fabric scarf adds color and makes the finished decoration look more festive.
I would choose logs with flat bases so they stand securely, then attach the antlers with suitable fasteners or strong craft adhesive. Larger logs can be used for a porch display, while smaller pieces work well near a doorway.
Pro Tip: I would check the stability of each log before placing it outdoors, especially if the display will be near a walkway.
15. Log Snowmen

I would make log snowmen when I want a winter decoration that can be reused year after year. Stacked wood pieces create the body, while white paint, dark buttons, and a colorful scarf give each snowman personality.
I would arrange the wood pieces on a level surface and secure them so they cannot roll or separate easily. A painted face and a simple hat made from fabric or felt finish the design.
These decorations are particularly useful for porches, sheltered entryways, and garden corners where larger ornaments would look out of place.
16. Giant Paper Plate Lollipops

Giant paper plate lollipops bring a playful candy-shop look to Christmas decorating. I would paint paper plates with spiral stripes or alternating red and white sections, then attach a lightweight stick to the back.
For a group craft, everyone can create a different candy pattern. Several lollipops displayed together can decorate a playroom, party area, or covered porch.
I would use these in dry locations because ordinary paper plates are not designed to withstand prolonged exposure to rain or snow.
17. DIY Evergreen Gnome

I like the idea of using evergreen branches to make a holiday gnome with a natural, textured body. A pointed fabric hat, a round nose, and small mittens can give the decoration a cheerful appearance.
I would arrange the branches around a sturdy base, secure the fabric pieces, and use a wooden bead or other suitable decoration for the nose. If I want to place the gnome outdoors, I would protect its base and use materials that can handle the location.
This craft works particularly well alongside log reindeer, painted signs, and pinecone displays.
18. Foraged Triangle Wreath

A triangle wreath offers a fresh alternative to the traditional round shape. I would collect suitable fallen twigs, arrange them into a triangle, and secure the corners with floral wire or twine.
A small amount of evergreen foliage, dried flowers, or a ribbon can decorate one corner while leaving the rest of the frame simple. This gives the wreath a clean, natural appearance without requiring many supplies.
Pro Tip: I would only collect natural materials where permitted and avoid cutting protected plants. A reusable wooden or metal frame is another good option.
19. Glitter Paper Feather Garland

Paper feathers are a lovely option when I want a lighter, more delicate garland. Old book pages, sheet music, or plain craft paper can be cut into feather shapes and decorated with metallic accents.
I would cut several matching pieces, add small slits along the edges, and brush the tips with glue before applying a little gold glitter. Once dry, the feathers can be attached to string and spaced evenly.
I would hang the garland along a mantel or above a console table where it can be displayed without getting tangled.
20. Homemade Potpourri Mason Jars

I enjoy making decorative gifts that look attractive and bring seasonal scents into the home. A jar filled with dried orange slices, cinnamon sticks, whole cloves, and other dry botanicals can make a thoughtful holiday present.
I would layer the ingredients in a clean, completely dry jar and finish it with twine, a fabric lid cover, or a handwritten label. If I want the recipient to use the mixture as simmering potpourri, I would include clear instructions and note that it is not for eating.
Fresh cranberries and fresh rosemary contain moisture, so I would avoid sealing them into a dry potpourri jar for long-term storage.
21. DIY Macrame Christmas Balls

Macrame-covered ornaments are a good choice when I want to add texture to a Christmas tree without relying on glitter or bright colors. Cotton cord wrapped around a plain bauble creates a soft, handmade finish.
I would start with a sturdy ornament, secure the cord at the top, and work small knots around the surface until the design looks balanced. Cream, beige, and natural cotton shades work particularly well with wooden ornaments and warm-white lights.
If I use glass baubles, I would handle them carefully and hang them where they are less likely to be knocked down.
22. DIY Snow Globes

I would make a homemade snow globe when I want a small decoration that captures a winter scene. A clean jar, a miniature figure, artificial snow, and a secure lid provide the basic structure.
I would attach a waterproof miniature to the inside of the lid using an adhesive suitable for the materials. If I want a water-filled globe, I would use compatible components and seal the lid carefully to reduce leakage.
Pro Tip: For a simpler version, I would skip the water and create a dry snow globe with artificial snow. It is easier to maintain and avoids leaks.
23. DIY Snow Globe in Plant Pot

A small plant pot can become the base for a snow globe-inspired decoration. I would paint the pot in a festive color, let it dry, and place a clear dome or suitable transparent container above a miniature winter scene.
Small trees, tiny houses, and artificial snow can create a charming display without taking up much room. I would keep the pieces firmly attached so the scene stays in place when moved.
This is a useful project for decorating a bookshelf, side table, or holiday display shelf.
24. Colourful Mantel Garland

I like colorful garlands because they can change the look of a room without requiring a complete decorating makeover. Felt shapes, paper circles, pom-poms, and lightweight ornaments can all be used to create a cheerful display.
I would choose a small color palette first, then repeat those colors along the garland to make the arrangement feel coordinated. A mixture of shapes and textures keeps the decoration interesting.
For a mantel above a fireplace, I would keep fabric, paper, and other flammable decorations well away from heat and open flames.
25. DIY Wooden Christmas Tree Forest

A group of small wooden trees can create a simple winter display on a shelf, mantel, or dining table. I would use unfinished wooden tree shapes or similar blanks and paint them in complementary colors.
A few trees in green and white create a traditional woodland look, while muted pink, cream, and sage can make the display feel more modern. I would arrange them at different heights to give the miniature forest some depth.
This project is also easy to personalize with painted dots, tiny stars, or a light dusting of decorative snow.
26. Bauble Napkin Rings

I would use bauble napkin rings to give a Christmas table a coordinated finishing touch. Small ornaments attached to ribbon, wire, or a sturdy napkin-ring base can create a festive place setting with little effort.
I would match the colors to the plates, table runner, and centerpiece. Red and silver create a classic holiday combination, while green and gold work well with natural greenery.
Before setting the table, I would check that each ring holds its napkin securely and that no sharp wire ends are exposed.
27. DIY Christmas Village

A handmade Christmas village lets me create a small festive scene that suits my own style. I would use wooden house shapes, cardboard buildings, or simple craft blanks and decorate each one with windows, doors, roofs, and snowy details.
Keeping the buildings in a coordinated color scheme makes the village feel connected, even when the shapes differ. I would add bottle-brush trees or small figurines to fill empty spaces.
For a more useful display, I would arrange the tallest buildings at the back and the smallest pieces toward the front.
28. Fresh Christmas Garland

Fresh greenery can make a home feel festive through its natural texture and scent. I would combine suitable evergreen branches with dried citrus slices, pinecones, and ribbon to make a garland for a mantel or entryway.
I would attach the materials to a sturdy base and check the greenery regularly as it dries. Fresh branches can shed needles, so I would place the garland where it is easy to clean beneath.
Pro Tip: I would keep fresh greenery away from candles, heaters, and other heat sources. If I want a longer-lasting decoration, artificial greenery with reusable dried accents is a practical alternative.
29. Christmas Village Stocking Hanger Box

I like decorations that combine display space with a practical purpose. A Christmas village stocking hanger can bring miniature houses and hanging stockings together in one arrangement.
I would build or decorate a sturdy box, add a row of miniature houses along the top, and install properly rated hooks for the stockings. The base should be wide and stable enough to support the intended weight.
Before hanging stockings, I would check the hooks, fasteners, and box construction rather than relying on decorative glue alone.
30. Colour Blocked Wood Christmas Card Holder

Christmas cards can quickly take over a table, so I would make a wooden holder to keep them organized and visible. Small wooden blocks painted in two or three festive colors can form a simple stand with slots or clips for displaying cards.
I would keep the design clean and add a short message such as Merry and Bright if I want a decorative finish. A neutral base with red or green accents can suit many different decorating styles.
This project is especially useful for a console table, desk, or kitchen counter.
31. DIY Honeycomb Christmas Bulbs

Honeycomb paper ornaments bring volume and color to a Christmas tree without adding much weight. I would use pre-made honeycomb paper shapes or fold suitable paper into a layered design that opens into a rounded bulb.
Bright colors work well for playful decorations, while cream, gold, and muted green create a calmer display. A string loop makes each ornament easy to hang.
Because paper decorations can tear, I would store them flat or in a protective box after the holidays.
32. DIY Nordic Sweater Mini Christmas Trees

I would use old knitted sweaters to cover small cone-shaped forms and make cozy miniature trees. This project gives worn-out fabric a new purpose and adds a soft texture to shelves and tabletops.
I would cut the fabric to fit the cone, secure it neatly at the back, and finish the base with felt or a small wooden stand. Sweaters with simple Nordic patterns can add extra character without requiring additional paint.
Pro Tip: I would use clean, dry fabric and choose a cone that stands securely so the finished tree does not tip over.
33. Copper Pipe Centerpiece

For a modern Christmas table, I would consider a copper-colored centerpiece with a simple geometric shape. Copper pipe fittings or a decorative metal frame can create a clean structure for holding suitable candle cups or decorative greenery.
I would plan the layout before assembling the pieces and make sure any candle holders are stable and designed for their intended use. A few sprigs of greenery or a neutral table runner can complete the arrangement.
For safety, I would not place ordinary candles directly against improvised metal fittings or flammable decorations. Battery-operated candles are a practical alternative.
34. Rustic Twig Ornaments

Twig ornaments are an easy way to bring natural materials into Christmas decorating. I would collect small fallen twigs, trim them into similar lengths, and arrange them into snowflakes, stars, or simple geometric patterns.
Twine or craft glue can hold the pieces together, depending on the shape. Once the ornament is dry, I could leave the wood natural or add white paint, metallic accents, or small beads.
These are useful for trees with rustic decorations and can also be tied onto wrapped presents.
35. Giant DIY Wreath

A large wreath can make a strong statement on an otherwise empty wall or door. I would begin with a sturdy wreath frame and decorate it with greenery, ribbon, pinecones, or a simple central sign.
I would avoid adding too many different elements because the size alone already gives the wreath plenty of presence. A limited color palette helps the finished design look balanced.
Before hanging it, I would check the weight of the wreath and use a hook or fixing rated to support it securely.
36. Tea Candle Snowman Ornaments

I would turn battery-operated LED tea lights into little snowmen using simple craft materials. The round light provides the face, while felt, ribbon, and small painted details can create the eyes, nose, and scarf.
This is a good craft for a family activity because it requires very little construction. I would use craft adhesive appropriate for the materials and avoid covering the light or battery compartment.
Pro Tip: I would use battery-powered LED lights rather than real flames for this project, especially if the ornaments will be handled by children.
37. DIY Twinkle Light Canvas

A light-up canvas is a creative way to add a festive message to a wall or shelf. I would paint a blank canvas in a neutral color, add lettering such as Merry and Bright, and use small battery-operated fairy lights to create a glowing effect.
I would plan the light placement before making any holes and secure the wire along the back so it remains out of sight. The battery pack should remain accessible for switching the lights on and off.
This project works well in an entryway, living room, or seasonal photo corner.
38. DIY Rustic Wood Candle Holders

Wooden candle holders can add a rustic look to a Christmas table, but I would prioritize stability and fire safety when making them. A decorative arrangement of small logs with battery-operated tea lights gives a similar warm appearance without introducing an open flame.
I would select pieces with flat bases and arrange them on a tray with pinecones or artificial greenery. The different wood heights create visual interest without requiring elaborate decoration.
If I use real candles, I would choose purpose-built holders and keep them away from dry wood, ribbon, foliage, and other flammable materials.
39. Sock Snowmen

I find sock snowmen especially useful for using clean socks that no longer have a matching pair. With a little stuffing and a few decorative details, they can become soft winter figures for a shelf or side table.
Supplies
- Clean white socks
- Rice or polyester stuffing
- Rubber bands or strong thread
- Buttons, felt, ribbon, or fabric scraps
- Craft glue or a suitable hot-glue tool
- Scissors
Instructions
- Fill the sock with rice or stuffing until it forms a rounded body.
- Separate the head and body with thread or a rubber band.
- Fold the open end down to form a hat, securing it so the filling cannot escape.
- Add a scarf, buttons, and facial details using suitable adhesive.
I would use polyester stuffing if the snowman will be stored for a long time, since rice can attract pests if the decoration gets damp. For projects involving hot glue, an adult should handle the glue gun.
40. Glitter Pinecone

Gold glitter pinecones are a simple way to add sparkle to a natural Christmas display. I would brush a small amount of craft glue onto the tips of a dry pinecone and sprinkle glitter over the coated areas.
After the glue has dried fully, I would shake off any loose glitter and attach a ribbon loop. The finished pieces can hang on the tree or sit in a decorative bowl.
Pro Tip: I would work over a tray to catch excess glitter and use a fine craft glitter intended for decorative projects to make cleanup easier.
41. DIY Stamped Christmas Cards

I like handmade Christmas cards because even a simple design feels more personal than a mass-produced greeting. Rubber stamps, ink pads, blank cards, and a few pens are enough to create a small collection.
I would stamp a tree, star, snowflake, or wreath onto the front and add extra details with a white or metallic marker. After the ink dries, I would write a short message inside that suits the recipient.
Making cards in batches is a useful way to save time if I have a long holiday mailing list.
Also read: 21 Festive Christmas Crafts That Sell Like Crazy
42. Hand Painted Christmas Tree Card

A watercolor Christmas tree is a lovely option when I want a handmade card with a soft, artistic finish. I would use blank watercolor cards, a small brush, and green paint to build a simple tree from short horizontal strokes.
Once the paint dries, I could add a brown trunk, tiny gold stars, or a handwritten greeting. The design does not need to be perfectly symmetrical to look appealing.
Pro Tip: I would test the paint on a scrap of the same paper first, especially if the card stock is thin or prone to curling.
43. DIY Natural Wreath

For a traditional holiday look, I would decorate a grapevine wreath with evergreen branches, pinecones, and a simple red ribbon. Natural materials add texture, while the wreath base helps hold everything in a circular shape.
I would attach the greenery with floral wire, then position the larger decorative pieces before securing them. A ribbon at the top can hide the hanging point and create a finished look.
If I use fresh greenery, I would check it regularly for drying and shedding. I would also keep the wreath away from open flames and other heat sources.
44. Recycled Paper Decorations

I enjoy crafts that give old materials a new purpose. A miniature tree made from recycled paper, old sheet music, or unused book pages can create a decorative centerpiece while making use of supplies I already have.
Supplies
- Recycled paper or old sheet music
- Bamboo skewer or suitable support
- Small plant pot
- Paint for the pot
- Scissors
- Craft glue
Instructions
- Paint the plant pot and allow it to dry completely.
- Secure the support upright inside the pot.
- Cut paper into squares of different sizes.
- Thread or layer the pieces onto the support, starting with the largest at the bottom.
- Adjust the paper layers to create a tree shape, then secure any loose pieces.
I would use recycled paper that is clean and dry, and I would skip spray paint indoors unless I have proper ventilation and follow the product instructions.
45. Reindeer Ornaments

Miniature reindeer can make a Christmas tree or tabletop display feel more playful. I would combine a small wooden head, a fluffy pom-pom body, wire legs, and a flat wooden base to create a little standing figure.
Supplies
- Small wooden reindeer heads or suitable wooden shapes
- Brown pom-poms
- Small white or red pom-poms for noses
- Paint markers or acrylic paint
- Thin craft wire
- Small wooden bases
- Twine and tiny bells
- Suitable craft adhesive and scissors
Instructions
- Add eyes and other facial details to the wooden head.
- Attach a small pom-pom nose.
- Secure the larger pom-pom behind the head to create the body.
- Cut four equal lengths of craft wire for the legs.
- Attach the legs to the body and secure their ends to the base.
- Finish with a small bell or ribbon around the neck.
I would make sure the wire ends are covered or firmly secured and keep the finished pieces away from small children who might pull off the tiny parts.
46. Simple Twig Trees

Twig trees are one of the simplest natural decorations I can make with a few fallen branches and some string. I would trim the twigs into progressively shorter lengths and arrange them into a triangular tree shape.
A small vertical branch can act as the trunk, while glue or twine holds the horizontal pieces in place. I could leave the wood natural or add small beads and battery-operated lights for extra decoration.
These miniature trees look good on a mantel, shelf, or dining table alongside other woodland-style ornaments.
47. Stamped Wooden Slices

Wood slices make attractive ornaments because their natural grain provides a simple background for festive patterns. I would use stamps featuring snowflakes, stars, trees, or short holiday messages to create a consistent set.
I would test the stamp on scrap wood first, then apply a suitable ink or paint to each slice. Once the design dries, I would attach twine through a pre-drilled hole.
For a coordinated tree, I would repeat the same two or three patterns rather than giving every ornament a completely different design.
48. Hand Painted Tree Ornaments

Painting my own ornaments gives me control over the colors and style of the Christmas tree. I would start with unfinished wooden shapes and use acrylic paint to add trees, trains, stars, snowflakes, or simple geometric patterns.
For an easy design, I would paint the background first and add the details once it has dried. Fine brushes and paint markers help with small accents, while stencils can make repeated shapes easier.
Pro Tip: I would paint several ornaments in the same palette so the finished tree looks coordinated, even if the designs are different.
49. Easy & Elegant Wooden Ornaments

Simple wooden ornaments are useful when I want a traditional Christmas tree with a natural finish. Tree, heart, and star shapes look attractive with their original wood grain or a light coat of white, green, or metallic paint.
I would smooth any rough edges, add small painted details if needed, and thread ribbon or twine through the hanging holes. These ornaments can also be personalized with initials or dates for special occasions.
They are easy to store in a small box and reuse for future Christmas seasons.
50. Bark Heart Tree Hangers

Bark heart ornaments bring a woodland look to the Christmas tree. I would use suitable clean bark pieces and shape them into hearts, keeping the natural texture visible.
Supplies
- Suitable pieces of bark
- Ribbon or twine
- Small drill and appropriate bit, if needed
- A clamp and protective equipment for cutting
- A saw suitable for the material
Instructions
- Choose bark that is dry, stable, and free from signs of decay.
- Shape the pieces into hearts using appropriate tools.
- Secure the bark before drilling a small hanging hole near the top.
- Thread ribbon or twine through the hole and tie a loop.
Because bark can split, I would use pre-cut heart shapes if I did not have the right tools or experience. Cutting and drilling should be handled carefully, with appropriate eye protection and secure clamping.
51. Popcorn and Cranberry Garland

A popcorn and cranberry garland has a simple, old-fashioned charm. I would thread plain, fully cooled popcorn and firm cranberries onto a length of strong thread, alternating the colors to create a repeating pattern.
I would use a blunt-ended craft needle where possible and work on a clear surface. The garland can be draped around a tree or used as a short decorative accent.
Because food-based garlands can attract insects and spoil, I would keep them away from pets, discard them promptly after use, and avoid storing them with reusable decorations.
52. Green & White Cardstock Garland

I would make a paper tree garland when I need an inexpensive decoration for a wall, window, or holiday party. Green and white cardstock gives the finished piece a clean look, and the trees are simple enough to cut in batches.
I would draw a basic tree template, trace it onto the cardstock, and cut out several matching shapes. After making small holes or attaching the pieces to string, I would space them evenly along the garland.
This project is a good option for crafting with friends or older children who can safely use scissors.
53. Scrap Paper Christmas Tree

I would use leftover paper to create a colorful tree decoration instead of throwing small scraps away. Different paper patterns can make each tree unique, while repeating a few colors helps the design feel balanced.
I would cut paper into strips, triangles, or small squares and layer them onto a cardboard tree base. Glue each piece in place, starting at the bottom and working upward until the shape is covered.
This is an easy craft for using wrapping-paper offcuts, old greeting cards, and leftover scrapbook paper.
54. Rustic Plant Pot Candle Holder

A small plant pot can become the base for a rustic Christmas centerpiece. I would decorate the outside with paint, twine, or greenery and place a battery-operated candle on a stable platform above or beside it.
Pinecones, artificial berries, and small ornaments can fill the surrounding space and give the display a festive finish. I would choose a pot that sits flat and cannot wobble when moved.
For real candles, I would use only a purpose-built holder and keep every flammable decoration well away from the flame.
55. Fabric Christmas Tree Decoration

Fabric scraps can become soft Christmas tree ornaments in shapes such as trees, stars, hearts, or mittens. I would select a few coordinating fabrics and cut matching front and back pieces for each ornament.
After sewing or carefully joining the edges, I would add a small amount of stuffing and attach a ribbon loop. Dried orange peel or a small fabric sachet containing suitable dry botanicals can add a seasonal touch, provided the filling stays securely enclosed.
Pro Tip: I would use clean, dry filling and avoid placing scented fabric ornaments directly beside open flames or heat sources.
56. Dried Fruit & Spice Festive Wreath

A wreath decorated with dried fruit and spices can create a warm, natural look without relying on plastic ornaments. I would use dried orange slices, cinnamon sticks, star anise, and a simple wreath base.
I would arrange the larger pieces first, then fill the gaps with smaller accents and secure everything with floral wire or suitable adhesive. A natural ribbon can finish the design without overpowering the materials.
To help the wreath last, I would use thoroughly dried ingredients and display it away from moisture and direct heat.
57. DIY Snowman Button Christmas Card

I would make a snowman card by arranging buttons of different sizes on the front of a blank card. A few thin twigs, a small orange paper triangle, and a hand-drawn hat can complete the design.
I would attach the buttons securely and let the adhesive dry before writing inside the card. A simple winter greeting keeps the design from feeling crowded.
For cards sent through the mail, I would check the finished thickness and weight, since raiseddesigns may need extra postage.
58. Simple DIY Advent Calendar

I would make a fabric-pouch advent calendar when I want a Christmas decoration that offers something to look forward to each day. Small bags clipped to a piece of string create a simple display that can hang on a wall, door, or mantel.
I would number 24 pouches and fill them with small treats, handwritten notes, family activities, or encouraging messages. Using matching fabric keeps the calendar looking neat, while different ribbons can add a little variety.
Pro Tip: I would prepare the notes and treats before hanging the calendar so I can fill every pouch without rushing during the busy holiday season.
59. Mini Santa Sack Advent Calendar Garland

Mini Santa sacks are another way I would create a reusable advent calendar. I would choose small fabric bags in festive colors, add numbers from 1 to 24, and attach them to a garland with clips or ribbon.
Each bag could contain a small toy, a piece of wrapped candy, a joke, or a simple holiday activity. I would keep the contents lightweight so the garland remains secure.
This idea works especially well on a wall or across a sturdy mantel where each bag can be reached easily.
60. Hanging Tree Advent Calendar

I like this advent calendar idea because the bags become part of the Christmas display. I would arrange small paper bags on a wooden frame shaped like a tree, then use miniature clothespins to attach them.
Each bag can hold a small surprise, a Christmas activity, or a note suggesting something enjoyable to do that day. I would decorate the bags with numbered stickers, simple drawings, or small paper stars.
For a sturdy display, I would make sure the frame is properly supported and avoid overfilling the bags.
61. DIY Twig Star

A twig star is an easy decoration that works indoors or in a sheltered outdoor space. I would arrange five similar-length twigs into a star shape and secure the joints with twine or craft glue.
Once the structure is stable, I could wrap it with string lights or add a simple ribbon. Leaving the twigs natural gives the star a woodland appearance, while a coat of white or gold paint creates a different look.
I would use battery-operated lights and keep the finished star away from anything that could catch fire.
62. Gingerbread Cookie Ornaments

I would make gingerbread ornaments when I want decorations that bring both a traditional appearance and a pleasant seasonal scent to the home. Star, bell, heart, and gingerbread-person shapes are all suitable choices.
I would roll out the dough, cut the shapes, and make a small hole near the top before baking. Once the cookies have cooled completely, I would decorate them with icing and thread ribbon through the holes.
These ornaments are best treated as short-term decorations because humidity and handling can affect their condition. If I plan to hang them on a tree, I would keep them away from pets and avoid using them where crumbs could cause a mess.
63. Jute Wrapped Gifts
I would use jute twine and natural decorations when I want presents to look thoughtful without buying expensive wrapping accessories. Plain paper, twigs, dried leaves, and small handmade ornaments can create a coordinated rustic finish.
One simple design is to arrange short twigs into a miniature Christmas tree on top of the wrapped gift. I would secure them with twine or a small amount of suitable adhesive, then add a tiny star at the top.
Pro Tip: I would keep the decorative pieces flat enough that the package can still be stacked and transported without damaging the design.
64. Pink, Frosty Ribbon Wrapped Candle Centrepiece

Pink candles can add a softer color to Christmas decorating, especially when paired with white, silver, or pale gold accents. I would arrange the candles on a stable tray and add ribbon or decorative details around the outside of the arrangement.
For a safer display, I would use battery-operated candles if I want ribbon, twine, or ornaments close to the candle bodies. With real candles, I would keep all fabric and decorative materials well away from the flame and follow the candle manufacturer’s safety guidance.
A few small baubles and sprigs of artificial greenery can finish the centerpiece without making it look too busy.
65. Dried Orange Skin Pine Cone Ornaments

I would combine pinecones and dried orange peel to create ornaments with a natural holiday look. The textured pinecones provide the base, while small citrus shapes add a warm color and an interesting detail.
I would dry the orange peel thoroughly before cutting it into stars or other small shapes. Then I would attach the pieces to the pinecones using a suitable craft adhesive and add a ribbon loop if I wanted to hang them.
For longer-lasting ornaments, I would make sure every natural material is completely dry before storing it.
66. DIY Christmas Tree From Pine Branches

A wall-mounted branch tree is a practical alternative when I do not have room for a full-size Christmas tree. I would arrange branches horizontally, beginning with a long piece at the bottom and gradually shortening the branches toward the top.
I would secure them with wall-safe hooks or another mounting system appropriate for the wall surface and the weight of the decorations. Small ornaments and battery-operated string lights can complete the shape.
Pro Tip: I would test the mounting points before decorating the tree and keep the finished arrangement away from heaters or other heat sources.
67. Paper Snowflakes

Paper snowflakes are one of my favorite choices for inexpensive seasonal decorating. I only need paper, scissors, and a little patience to create patterns that look different every time.
I would fold a square sheet into sections, cut small shapes along the folded edges, and unfold it carefully to reveal the snowflake. Thinner paper is easier to cut into detailed patterns, while heavier paper makes sturdier decorations.
I would hang the finished snowflakes in windows, arrange them across a wall, or attach them to a garland with string.
68. Orange and Cinnamon Stick Ornaments

I would use dried orange slices and cinnamon sticks to make simple ornaments that fit a traditional Christmas theme. Their warm colors look lovely alongside evergreen branches, wooden decorations, and neutral ribbon.
I would dry the orange slices completely, bundle them with a small cinnamon stick, and tie everything together with twine. A loop at the top makes each bundle easy to hang.
These decorations can also be arranged in a bowl or attached to gift wrapping for a natural finishing touch.
69. Hand Painted Wine Glasses

Painted glassware can make a holiday table feel more personal. I would decorate the outside of suitable glassware with simple Christmas trees, snowflakes, stars, or tiny dots using paint specifically intended for glass.
Before painting, I would clean and dry the surface according to the paint manufacturer’s instructions. I would also check whether the finish is suitable for washing and follow the recommended curing process.
For everyday use, I would keep paint away from the rim and any surface that comes into contact with food or drinks.
70. Candy Cane Place Holders

I would use candy canes as simple place card holders for a Christmas dinner or holiday party. Their striped pattern already fits the season, so they need very little extra decoration.
I would arrange two or three candy canes together to create a stable base, then secure a small name card between them. A ribbon or tiny paper star can finish the arrangement.
Since candy canes are edible, I would keep the place holders wrapped until they are ready to use and make sure the cards are supported securely.
71. Salt Dough Ornaments

Salt dough ornaments are a useful craft for making personalized Christmas decorations at home. I would combine flour, salt, and water to form a workable dough, then roll it out and cut festive shapes.
Before baking or drying the shapes according to a suitable recipe, I would make a small hole for the hanging ribbon. Once the ornaments are completely dry and cool, I could paint them, add simple patterns, and seal them with a suitable craft finish.
Pro Tip: I would clearly label salt dough ornaments as non-edible and keep them away from pets, since the salt content can be harmful if eaten.
72. Popsicle Stick Soldier Ornament
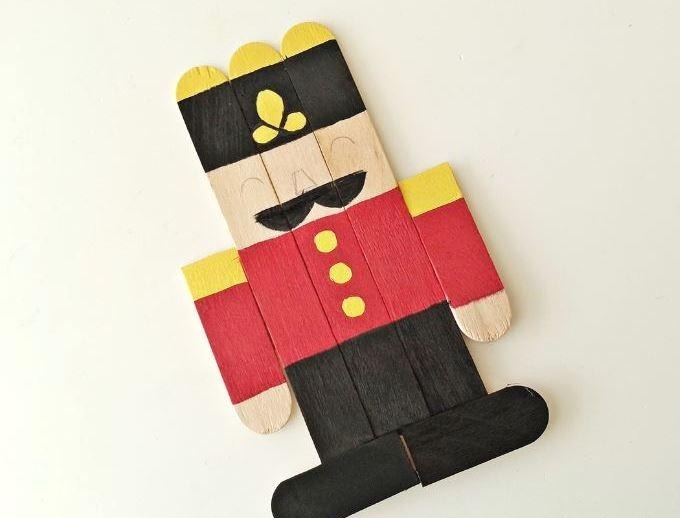
I would make a miniature soldier ornament using popsicle sticks, paint, and a few small craft details. The traditional red, black, white, and gold color palette gives the design a classic Christmas appearance.
I would paint the main body first, allow it to dry, and then add the face, buttons, belt, and hat. A small ribbon loop can turn the finished piece into a tree ornament.
This is a good project for children who enjoy painting, with adults handling any cutting or hot-glue work.
73. Greenery & Burlap Candle

Burlap and greenery create a rustic look that works well with farmhouse-style Christmas decorations. I would wrap a decorative candle with a band of burlap, then add a little twine and artificial greenery for extra texture.
For the safest version, I would use a battery-operated candle so the fabric and greenery can remain part of the design without sitting near an open flame.
I would arrange several pieces on a tray and keep the colors simple to create a centerpiece that looks coordinated rather than crowded.
74. Cinnamon Stick Wrapped Candle

Cinnamon sticks add a warm, natural look to a Christmas centerpiece. I would arrange the sticks around the outside of a battery-operated candle and secure them with twine or a decorative ribbon.
The result works well with dried orange slices, pinecones, and small evergreen accents. I would use a candle with a stable base and ensure the decorative materials do not interfere with the light or battery compartment.
If I want a cinnamon scent, I would rely on the spices themselves rather than adding an untested fragrance product.
75. Christmas Tree Bows

I would use ribbon bows when I want to refresh a Christmas tree without replacing all the ornaments. Velvet, satin, cotton, and wired ribbon can each create a different look.
I would make bows in a consistent size or use a mixture of large and small bows for a layered effect. Matching the ribbon to the tree’s existing ornaments helps everything look connected.
Pro Tip: I would secure each bow with a soft tie or suitable ornament hook so it stays in place without damaging the branches.
76. Wire and Ornament Wreath With Pretty String Lights

A wreath made from wire and Christmas baubles can create a bright focal point for an entryway or living room. I would begin with a sturdy wreath frame and attach ornaments in a planned color pattern.
Once the baubles are secure, I would wrap battery-operated string lights around the frame and position the battery pack so it remains accessible. A mixture of ornament sizes can make the wreath look fuller without requiring excessive decoration.
I would check every attachment before hanging the wreath and use a secure fixing suitable for its finished weight.
77. Santa Baubles Wreath

I like the playful look of a Santa-inspired wreath made from red and white baubles. I would arrange red ornaments around the main frame, then use white and black details to suggest Santa’s beard, belt, or hat.
I would plan the design on a flat surface before attaching the ornaments permanently. A small number of well-placed details can make the theme recognizable without overcrowding the wreath.
For hanging, I would use a strong frame and a hook that can support the finished decoration securely.
78. Paper Advent Calendar Village

A paper village advent calendar combines a miniature Christmas display with a daily countdown. I would make small paper houses, number them from 1 to 24, and add little doors or openings for notes and treats.
White paper creates a snowy village effect, while kraft paper gives the display a warmer, natural appearance. I would arrange the houses at different heights to make the scene more interesting.
This project takes a little preparation, so I would assemble the houses before December and keep the small contents ready to fill each compartment.
79. DIY Gift Wrapping

I would use simple wrapping materials to make presents look thoughtful without spending extra on elaborate gift packaging. Kraft paper, reusable fabric, leftover ribbon, twine, and small natural decorations all work well together.
For one design, I would wrap the gift in plain paper and add a sprig of artificial greenery or a small handmade ornament. For another, I would use paper scraps to make a layered tree or star on the front.
Pro Tip: I would keep decorations flat when wrapping gifts that need to be packed into bags or transported together. This helps prevent delicate details from breaking.
80. Reindeer Mason Jars

Mason jars can be turned into cheerful reindeer decorations with paint, simple facial details, and a few craft supplies. I would paint the outside of the jar if I wanted a solid-colored finish, or leave the glass clear and add a brown paper covering.
A red pom-pom nose, eyes, and antlers made from suitable craft materials complete the design. I could use the jar to hold artificial greenery, wrapped treats, or battery-operated fairy lights.
If the jar will contain food, I would keep paint and glue away from the inside and any food-contact surfaces.
81. DIY Origami Star Garland

I would make an origami star garland when I want a lightweight decoration with a delicate finish. Folded paper stars can be made in a range of colors, from traditional red and green to white, gold, and soft neutrals.
I would fold several stars using paper of a similar size, then attach them to a length of thread or string. Spacing them evenly gives the garland a balanced appearance, while varying the colors adds interest.
This decoration looks lovely across a mantel, along a window, or above a desk. I would store the stars in a box where they cannot be crushed between heavier decorations.
Read this next: 41 Classy Christmas Crafts You Should Make
Before You Go…
I find that the best Christmas decorations are the ones that make a home feel welcoming without creating unnecessary expense or stress. These 81 DIY Christmas decoration ideas offer plenty of ways to use simple materials, personalize familiar ornaments, and create festive displays for different rooms.
I would start with two or three projects that suit my available time and decorating style. A handmade garland, a few painted ornaments, or a natural wreath can make a noticeable difference without requiring a complete home makeover.
I also like choosing decorations that can be packed away and reused next year. With a little planning, I can build a collection of handmade Christmas pieces that grows over time and becomes part of my family’s holiday traditions.
Whether I am making gifts, decorating the Christmas tree, or preparing a festive table, the process itself can be a fun part of the season. I hope these ideas help you find a few projects that you will enjoy making and displaying in your own home.
Merry Christmas, and happy crafting!







One Comment