41 Classy Christmas Crafts You Should Make
I love Christmas decorations that feel personal, look beautiful, and don’t require spending a fortune. Handmade wreaths, thoughtful ornaments, cozy garlands, and simple decorations made from everyday materials can give a home a festive look without making every corner feel cluttered.
When I plan Christmas crafts, I look for ideas that balance style, cost, and practicality. I also like projects that I can customize to match my existing decorations, reuse next year, or turn into thoughtful gifts for family and friends.
In this collection, I’ve brought together 41 classy Christmas craft ideas, ranging from delicate paper ornaments and handmade jewelry to rustic wreaths and upcycled decorations. Whether I have an afternoon to spare or want to work on a project over several evenings, I can find something to suit my time, skills, and decorating style.
I can make Christmas feel more special with handmade decorations that suit my home, budget, and personal taste. These 41 ideas include map ornaments, pastel wreaths, personalized gift bags, crochet decorations, clay ornaments, recycled sweater stockings, mason jar luminaries, and creative Christmas card displays.
I don’t need expensive supplies for every project. Paper, leftover fabric, old sweaters, cardboard packaging, natural greenery, and glass jars can become attractive holiday decorations with a little planning. I can also choose projects based on my skill level, from simple paper folding and painting to crochet, sewing, and resin work.
Save this for later
Table of Contents
My best approach is to choose a consistent color palette, prepare the materials before starting, and make decorations that I can store and reuse safely. That way, my handmade Christmas decor feels coordinated rather than crowded.
Key Takeaways
- I can create an elegant Christmas look with affordable materials and a few well-chosen colors.
- I can personalize ornaments, stockings, gift bags, and cards to make them more meaningful.
- I can reuse household items such as jars, cardboard, and old sweaters to reduce waste.
- I can choose easy crafts for children and save more detailed projects for when I have extra time.
- I can make decorations last longer by using suitable adhesives, allowing paint to dry completely, and storing fragile pieces carefully.
- I can create a coordinated display by repeating a few colors and materials throughout my home.
Related article: 20 Eazy Christmas Crafts for Adults
Classy Christmas Crafts
1. Map Ornaments

I like ornaments that tell a story, and map ornaments are a lovely way to remember a favorite trip, hometown, or special family destination. I can cut a small section from an old paper map and fit it inside a clear ornament or a circular frame.
To make the design more personal, I can mark a meaningful location with a tiny heart, add the year, or tie a ribbon around the top. A few matching ornaments can represent different places I’ve visited over the years.
What I need: An old map, clear ornaments or jar rings, scissors, ribbon, and suitable craft adhesive.
Pro Tip: I would use a printed copy of a map rather than cutting up a valuable original. That lets me keep the memory without damaging something irreplaceable.
2. Vintage-Inspired Pastel Wreaths

Traditional red and green decorations are beautiful, but I also enjoy softer Christmas colors. A wreath made with pale pink, mint, ivory, champagne, and dusty blue ornaments can create a vintage-inspired look that feels fresh without losing its festive charm.
I would start with a sturdy wreath base, cover any visible sections with fabric or ribbon, and attach shatterproof ornaments in a planned color pattern. Mixing different ornament sizes gives the finished wreath more depth.
What I need: A wreath base, assorted pastel ornaments, ribbon, fabric, and a hot glue gun.
Pro Tip: I would arrange all the ornaments on the base before gluing them. This makes it easier to balance the colors and avoid empty patches.
3. DIY Christmas Card Holder

Christmas cards often end up scattered across tables and shelves, so I prefer giving them a dedicated display area. An old wooden shutter can work well because its horizontal slats provide natural places to tuck cards.
I would clean the shutter, check that there are no loose or sharp pieces, and repaint it if necessary. Then I could slip cards into the slats or attach small clips to hold them securely.
The finished display can lean against a wall or hang in a suitable location. I can also add a simple bow or a small strand of greenery to connect it with the rest of my Christmas decorations.
What I need: A wooden shutter, cleaning supplies, optional paint, and card clips or ribbon.
Pro Tip: I would place heavier cards near the bottom and check that the shutter is stable before displaying it around children or pets.
4. DIY Cone Christmas Trees

I like miniature Christmas trees because they add height to a mantel, bookshelf, or dining table without taking up much space. A simple cone wrapped in yarn, mop fibers, fabric strips, or twine can become a textured tree with very little expense.
I would secure the end of the material at the bottom of a foam cone and wrap it upward, keeping the layers close together. A small star, ribbon, or understated bead at the top can finish the design.
For a coordinated display, I could make three trees in different heights and keep them in the same color family.
What I need: Foam cones, clean mop fibers or yarn, craft adhesive, scissors, and optional decorations.
Pro Tip: I would check the material for loose fibers before using it and keep the finished trees away from candles, heaters, and other heat sources.
5. Personalized Christmas Bags

Personalized Christmas bags make gift-giving feel more thoughtful, especially when everyone in the family has a bag with their name on it. I can use them instead of wrapping every present individually, and the bags can be brought out again each year.
I would choose cotton, canvas, or another sturdy fabric and add names using fabric paint, iron-on letters, embroidery, or a simple stencil. Different ribbon colors can help distinguish each person’s bag.
For children, I could fill the bags with small gifts, books, and treats. For adults, a neutral fabric with a simple name design would look elegant beside the tree.
What I need: Fabric gift bags, name stencils or lettering materials, ribbon, and suitable fabric paint or embellishments.
Pro Tip: I would follow the paint manufacturer’s curing instructions before washing or reusing the bags.
6. DIY Gem Christmas Stockings

I can give plain Christmas stockings a more decorative finish by adding jewel-like embellishments. The gems can be arranged around the cuff, scattered across the fabric, or used to create a small snowflake or star pattern.
For an easier version, I would use ready-made fabric gems or sew-on rhinestones. If I choose resin embellishments, I would make them separately, allow them to cure fully, and attach them only when they are suitable for the fabric and intended use.
I would keep the stocking fabric flexible and avoid placing heavy decorations where they could pull the material out of shape.
What I need: Plain stockings, fabric-safe adhesive or sewing supplies, and suitable decorative gems.
Pro Tip: I would avoid small detachable gems on stockings used by young children, as loose pieces can pose a choking risk. Resin should be handled according to its safety instructions, with appropriate ventilation and protective equipment.
7. 3D Snowflake Ornaments

Paper snowflakes are an affordable way to decorate a Christmas tree, window, or ceiling. I especially like three-dimensional versions because their folded layers create shadows and make simple paper look more substantial.
I would begin with several equal squares of paper, fold and cut them according to a snowflake pattern, then assemble the sections with tape or glue. White paper creates a classic snowy appearance, while metallic or pastel paper gives the decoration a different style.
Once I have the folding method down, I can make several matching snowflakes for a coordinated display.
What I need: Paper, scissors, tape or glue, and thread for hanging.
Pro Tip: I would test one snowflake with inexpensive paper before making a whole batch. Thin paper folds easily, while heavier paper may hold its shape better in larger designs.
8. Felted Christmas Tree Soap

Felted soap is a practical handmade gift that also looks attractive in a guest bathroom. A layer of wool fiber around a bar of soap creates a soft, textured covering, and I can shape the outside with green felt to suggest a little Christmas tree.
I would start with a bar of soap and wool roving, then use a suitable wet-felting method to wrap the fibers tightly around it. For a tree effect, I could add small felted dots or use contrasting strands to create a simple garland pattern.
Because this craft is meant to be used with water, I would make sure the wool fits securely and does not have loose pieces that could come away easily.
What I need: A bar of soap, wool roving, warm water, and a towel for the felting process.
Pro Tip: I would make a small test piece first if I am new to felting. I would also check the recipient’s preferences before gifting scented soap.
9. Modern PVC Christmas Tree
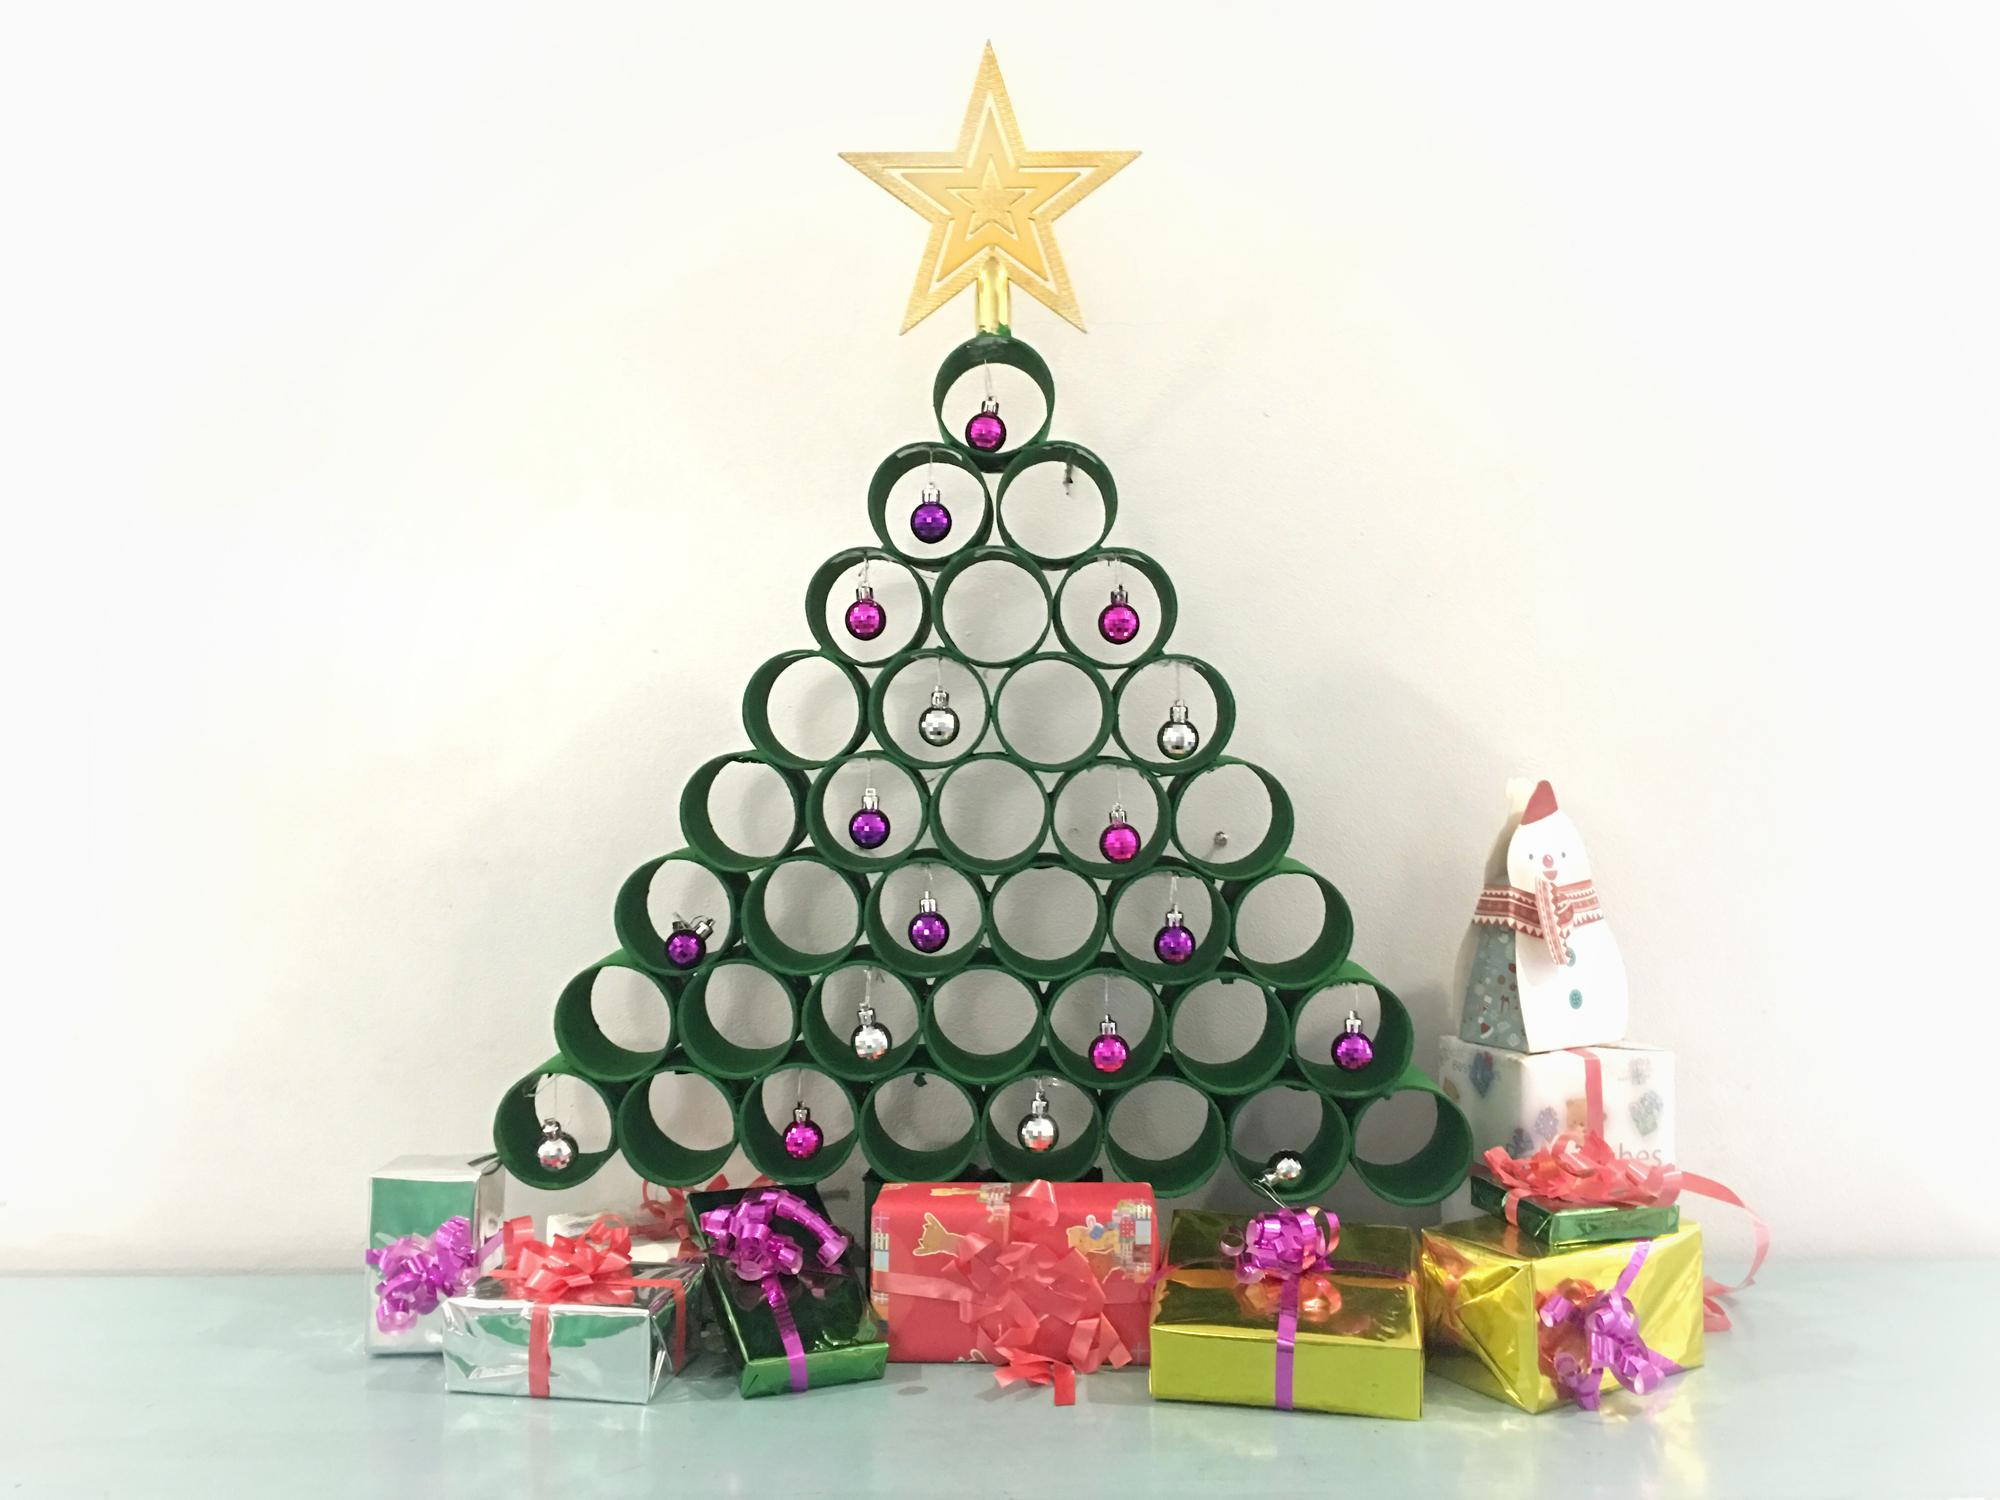
A modern PVC Christmas tree can be a good alternative when I want something unusual or need a compact display. The clean lines suit contemporary rooms, and I can use colorful ornaments to create a gradient or keep everything neutral for a more understated result.
I would plan the layout before cutting any pipe, using a sketch to determine the overall height, branch spacing, and support. Smooth the cut edges and assemble the pieces securely so the structure does not wobble.
This style works particularly well in an entryway, office, or small apartment where a full-sized tree may be impractical.
What I need: PVC pipe, suitable connectors, a measuring tool, a saw, and lightweight ornaments.
Pro Tip: I would have an adult handle cutting tools and make sure the tree has a stable base. I would keep it away from heat sources and use only appropriate, undamaged decorations.
10. Mini Cabinet Wreaths

Mini wreaths can make a kitchen feel festive without filling the counters with decorations. I like the idea of hanging one on each cabinet door or using just a few wreaths across a row of cupboards.
I would use small artificial greenery rings or make miniature wreaths from flexible branches. A matching ribbon creates a neat hanging loop, while tiny bells, dried orange slices, or cinnamon sticks can add extra detail.
Before attaching them, I would check the cabinet finish and choose a removable hanging method that will not leave marks.
What I need: Mini wreath bases, artificial or suitable natural greenery, ribbon, and optional small decorations.
Pro Tip: I would keep wreaths away from the stove and other hot surfaces. Dried fruit and natural greenery should be replaced if they become damp, moldy, or brittle.
11. Snow Globe Crochet

Crochet snow globe ornaments combine a familiar winter scene with the warmth of handmade yarn. I would choose a pattern featuring a small tree, snowman, or snowy landscape and use a few contrasting yarn colors to make the details stand out.
This is a good project for using leftover yarn, although I would check the pattern before starting to make sure I have the correct hook size and enough yarn for the base and decorative elements.
A beginner can work on a simpler flat snow globe design, while someone with more crochet experience may enjoy a stuffed three-dimensional version.
What I need: Yarn, a crochet hook, a yarn needle, stuffing if required, and a suitable hanging loop.
Pro Tip: I would keep the stitches firm enough to prevent stuffing from showing and secure all ends carefully before hanging the ornament.
12. Vintage Christmas Light Garlands

I love how vintage-inspired decorations bring color and personality to a traditional Christmas display. A garland decorated with colorful bulb shapes can recreate that nostalgic look without requiring an actual string of old electrical lights.
I would start with a greenery garland and attach decorative bulb-shaped ornaments at regular intervals. If I want a handmade version, I could make the bulbs from felt, painted lightweight shapes, or other suitable craft materials.
The key is to keep the colors balanced so the garland looks cheerful rather than overly busy.
What I need: A garland, lightweight decorative bulbs, ribbon or craft wire, and optional fairy lights.
Pro Tip: I would use only tested, undamaged electrical lights and follow the manufacturer’s instructions. Handmade decorative bulbs should never be mistaken for functioning light bulbs.
13. Gnome Christmas Ornaments

Gnome ornaments are a fun way to add character to a Christmas tree. I can make them from leftover yarn, felt, and small wooden beads, so I don’t need a large collection of specialist supplies.
I would create a yarn beard, shape a felt hat, and attach a small wooden bead where the hat meets the beard. A loop of twine or ribbon turns the finished gnome into a hanging ornament.
For a coordinated set, I would repeat the same hat colors and change only the beard or trim. Children can help choose colors and assemble pieces, with adult supervision when using hot glue.
What I need: Yarn, felt, wooden beads, twine, scissors, and suitable craft glue.
Pro Tip: I would use a cool-temperature craft adhesive where practical and keep small beads away from young children who might put them in their mouths.
14. DIY Affordable Christmas Wreaths

I can create a lovely Christmas wreath without buying an expensive finished decoration. Evergreen cuttings, flexible branches, and a simple base are often enough to create a natural arrangement.
I would collect only greenery I am allowed to take, avoid protected plants, and check for insects before bringing branches indoors. Then I would attach small bunches of greenery to a wreath frame, overlapping them to hide the wire.
A few pinecones or a simple ribbon can finish the design without overwhelming its natural look.
What I need: A wreath frame, suitable greenery, floral wire, pruning shears, and optional ribbon or pinecones.
Pro Tip: I would keep a fresh wreath away from candles, fireplaces, and direct heat. Natural greenery dries out indoors, so I would check it regularly and replace it when it becomes brittle.
15. Unique Crochet Snowman Wall Art

Crochet snowman wall art is a lovely way to bring handmade texture into a winter display. Rather than hanging another conventional wreath, I can arrange crochet snowflakes, a small snowman, and simple fabric details inside a frame.
I would choose a background fabric that contrasts with the white crochet pieces so their shapes remain visible. A few small buttons or embroidered details can add personality without making the design too busy.
This project is also a good opportunity to use crochet motifs left over from other seasonal projects.
What I need: Crochet snowman and snowflake motifs, fabric or cardstock backing, a frame, and suitable adhesive or stitching supplies.
Pro Tip: I would secure the motifs to the backing before placing everything in the frame, and keep the finished piece away from damp areas that could affect the yarn.
16. Clay Shooting Star Ornaments

Shooting star ornaments suit a calm, Scandinavian-inspired Christmas theme. I would make them from air-dry clay or another suitable craft clay, using natural shades such as cream, pale gray, and warm brown.
After rolling the clay to an even thickness, I would cut out star shapes with a short trailing tail. A small hole near the top allows me to add twine once the pieces are completely dry.
These ornaments look particularly attractive when the finish is simple and the shapes are slightly varied.
What I need: Suitable craft clay, a rolling pin, a star-shaped cutter or template, a straw for hanging holes, and twine.
Pro Tip: I would follow the clay manufacturer’s drying and sealing instructions. Air-dry clay is decorative rather than waterproof, so I would store these ornaments in a dry place.
17. Victorian Tinsel

Victorian-inspired tinsel gives a Christmas tree a rich, old-fashioned appearance. I would use silver or muted metallic strands sparingly so they catch the light without covering the tree’s branches completely.
For a handmade interpretation, I could attach narrow metallic strips to a cord or use a decorative garland designed for crafts. Combining it with traditional ornaments, glass-look baubles, and warm lighting can create a balanced vintage display.
I would choose materials that suit the tree and avoid anything that sheds excessively or tangles easily.
What I need: Suitable metallic garland or craft strips, string, scissors, and optional vintage-style ornaments.
Pro Tip: I would keep metallic decorations away from electrical connections, hot bulbs, and open flames. If I use vintage materials, I would inspect them carefully for deterioration before putting them on display.
18. Watercolor Christmas Cards

Hand-painted Christmas cards let me send a personal message with a design that feels different from a store-bought card. I don’t need advanced painting skills to make something attractive; simple trees, stars, berries, and baubles work well with watercolor.
I would use watercolor paper or ready-made watercolor cards, sketch a light outline, and build up the paint in thin layers. Once the design dries, I could add a short greeting with a fine pen.
Making several cards in the same style helps me prepare a coordinated set for friends and family.
What I need: Watercolor paper or cards, watercolor paints, brushes, water, and a pencil.
Pro Tip: I would let the paint dry completely before writing on the card or placing it in an envelope. Heavier watercolor paper also helps reduce curling.
19. Santa Napkin Rings

Small details can make a holiday table feel more thoughtful, and Santa napkin rings are a cheerful way to decorate each place setting. I would make a simple red band with white trim and a black belt detail, keeping the size consistent for all the napkins.
A cardboard tube cut into rings can provide the base, while felt and craft foam add color. I would cover the edges neatly so the finished rings look tidy from every angle.
These are particularly useful for a family dinner or a children’s Christmas party.
What I need: Cardboard tubes, red and white felt, black and gold craft material, scissors, and suitable glue.
Pro Tip: I would let all adhesive dry fully before placing the rings near food or clean napkins. I would also avoid loose glitter that could transfer onto the tableware.
20. Christmas Tree Diamonds

Fabric diamond ornaments are a good choice when I want something softer than glass or plastic decorations. Their geometric shape can look traditional or modern, depending on the fabric I choose.
I would select two or three coordinating fabrics, cut the pieces using a template, and sew them together carefully. A small loop and a tassel can provide the finishing touch.
This project is particularly useful for using fabric scraps from quilting or other sewing work.
What I need: Fabric scraps, a template, needle and thread or a sewing machine, scissors, and ribbon or thread for hanging.
Pro Tip: I would test the pattern with inexpensive fabric first and keep seam allowances consistent so the finished ornaments hold their shape.
21. Recycled Christmas Sweater Stockings

I like crafts that give old belongings a second life, and sweater stockings are a practical way to reuse knitwear that no longer fits. The fabric already has a cozy winter texture, so I can turn it into a decoration that looks thoughtful without much extra embellishment.
I would draw a stocking shape on paper, place it over the sweater, and cut two matching pieces. After sewing the pieces together with the right sides facing inward, I would turn the stocking right side out and add a loop for hanging.
I could use contrasting cuffs, buttons, or embroidered initials to personalize each stocking.
What I need: An old knitted sweater, paper for a pattern, scissors, a needle and thread or sewing machine, and ribbon.
Pro Tip: I would check the knit for holes and weak seams before cutting. I would also reinforce the hanging loop, especially if I plan to fill the stocking with small gifts.
22. Clay Christmas Holly Earrings

Christmas-themed earrings are a thoughtful gift for anyone who enjoys handmade jewelry. I would use polymer clay to create small holly leaves and red berries, keeping the shapes simple so the finished earrings are comfortable to wear.
After shaping the clay, I would follow the manufacturer’s instructions for baking or curing it. Once the pieces are cool, I could attach them to suitable jewelry findings and check that every connection is secure.
I would make the earrings as a matching pair, paying attention to their size and weight.
What I need: Polymer clay, a clean work surface, suitable shaping tools, jewelry findings, and appropriate pliers.
Pro Tip: I would use tools dedicated to crafting with polymer clay rather than food preparation, and follow the clay manufacturer’s temperature and ventilation instructions.
23. Crochet Mittens

Crochet mittens make charming Christmas ornaments because their shape is instantly recognizable and their texture adds warmth to a tree. I can use traditional red and white yarn or choose cream, gray, and natural brown for a more understated style.
I would follow a mitten pattern suited to my crochet experience and make sure both pieces are approximately the same size. A small hanging loop can turn miniature mittens into ornaments, while a larger pair can be finished as wearable mittens if the pattern is designed for that purpose.
What I need: Yarn, a crochet hook, a yarn needle, and a pattern in the size I want.
Pro Tip: I would label the yarn and pattern together if I plan to make more mittens later. That makes it easier to reproduce the same size and color combination.
24. Modern Christmas Tree Sign

A modern Christmas tree sign is a good option when I want a decorative focal point without spending hours on a complicated project. A wooden board, simple tree stencil, and restrained color palette can produce a polished result.
I would clean and lightly sand the board if needed, position the stencil, and apply paint in thin layers. After removing the stencil, I would allow the design to dry completely before adding any hanging hardware.
I could lean the sign on a shelf or hang it above a mantel, depending on the room.
What I need: A suitable wooden board, a Christmas tree stencil, paint, a stencil brush, and optional hanging hardware.
Pro Tip: I would test the stencil on scrap wood first. Using a small amount of paint and dabbing rather than brushing heavily helps prevent paint from bleeding under the stencil.
Also read: 21 Wooden Christmas Crafts
25. Crochet Star Garland

A crochet star garland is one of the decorations I would choose for a cozy, handmade Christmas theme. The stars can be made from leftover yarn and connected with a simple chain or separate lengths of twine.
I would use one consistent star pattern so the pieces look balanced when hung together. Cream, white, and natural beige yarn create a calm look, while red and green make the garland more traditional.
The finished garland can go across a mantel, along a shelf, or around a small tree.
What I need: Yarn, a crochet hook, a yarn needle, and thread or cord for connecting the stars.
Pro Tip: I would block the crochet stars if needed so their points lie flat. I would also hang the garland securely and keep it away from open flames and hot lights.
26. Folded Star Ornaments

Folded paper stars are an inexpensive way to create attractive Christmas decorations. I can make them from origami paper, patterned craft paper, or plain paper that matches my chosen color scheme.
I would start with a folding pattern suited to my skill level and make one test star before producing several. Once I understand the folds, I can make a coordinated batch to hang on the tree or attach to gift wrapping.
Paper stars are also useful when I want lightweight decorations that are easy to store after the holidays.
What I need: Square paper, a ruler if needed, scissors, and thread or ribbon for hanging.
Pro Tip: I would choose paper with color on both sides if the star will be visible from different angles. This helps the finished ornament look neat from every direction.
27. Clay Christmas Gift Tags

I can make gift tags feel like part of the present by shaping them from clay instead of using disposable paper labels. Small stars, circles, trees, and simple name tags look lovely with neutral wrapping paper and natural twine.
I would roll the clay evenly, cut out the shapes, and create a hanging hole before the pieces dry. I could press letters or simple patterns into the surface while the clay is still workable.
Once dry, the tags can be painted or left in a natural finish. They can also be saved and reused if the recipient wants to keep them.
What I need: Air-dry clay, a rolling pin, shape cutters, letter stamps if desired, and twine.
Pro Tip: I would make the hanging hole slightly larger than the cord because some clay products can shrink as they dry. I would also let the tags dry completely before wrapping them with gifts.
28. Glittering Santa Mason Jars

Mason jars are versatile craft materials because I can decorate them for several uses. A Santa-inspired jar can feature a red body, white trim, and a black belt with a gold buckle.
I would clean the jar thoroughly, dry it, and apply craft paint or suitable decorative materials to create the design. For a soft glow, I would place a battery-operated LED light inside rather than using a candle.
The same jar could also hold wrapped sweets, craft supplies, or artificial greenery, provided the decoration is suitable for its intended use.
What I need: A clean glass jar, suitable paint, decorative trim, craft adhesive, and a battery-operated LED light if desired.
Pro Tip: I would avoid using real flames inside decorated jars. I would also keep glitter and paint away from the rim if the jar will hold food.
29. Oversized Christmas Ornaments

Oversized ornaments can make a strong visual statement without requiring lots of small decorations. I would use a few large baubles in complementary colors and place them in a basket, beside the tree, or in a sheltered entryway.
For a budget-friendly project, I could decorate lightweight oversized craft spheres or reuse large plastic ornaments. A coat of suitable paint, ribbon, or a simple metallic finish can make them fit my Christmas color palette.
I would consider where the ornaments will be displayed before choosing the materials, especially if they will be outdoors.
What I need: Large lightweight ornaments or craft spheres, suitable paint, ribbon, and optional decorative accents.
Pro Tip: I would use weather-resistant materials for an outdoor display and secure large ornaments so they cannot roll into a walkway or become a hazard in strong wind.
30. Cereal Box Christmas Trees

I enjoy finding uses for packaging that would otherwise go into the recycling bin. Empty cereal boxes can become lightweight Christmas tree shapes for a mantel, desk, or shelf.
I would flatten the cardboard, draw matching tree outlines, and cut out the shapes carefully. Depending on the design, I could glue several layers together for thickness or create a freestanding tree with interlocking slots.
A coat of paint or paper covering gives the cardboard a finished appearance and helps the decorations coordinate with the rest of the room.
What I need: Clean cardboard packaging, a pencil, a ruler, scissors or a craft knife, glue, and paint or decorative paper.
Pro Tip: I would have an adult handle craft knives and make sure the base is stable before displaying the trees. I would keep cardboard decorations away from flames, damp areas, and heat sources.
31. Felted Christmas Tree Garlands

Felt Christmas trees are simple to make and easy to customize. I would cut small tree shapes from felt sheets, using two or more shades of green or mixing green with cream and red.
I could sew the pieces together, glue matching shapes back-to-back, or add tiny felt circles to suggest ornaments. Once the trees are ready, I would attach them to twine with enough space between each shape so the garland hangs neatly.
This is a useful project for decorating a child’s room, a shelf, or a small artificial tree.
What I need: Felt sheets, a paper template, scissors, thread or craft glue, and twine.
Pro Tip: I would use a template to keep the trees approximately the same size. If I add fairy lights, I would choose a suitable low-heat LED string and follow its safety instructions.
32. Frosted Mason Jar Luminaries

Frosted mason jars create a soft winter look that works well on a windowsill, side table, or holiday dining display. I would decorate a clean jar with a suitable frosted glass finish or a craft medium designed to create a snowy appearance.
Snowflake stencils, twine, and a few small decorative accents can help give each jar a consistent theme. Once the surface has dried, I would add a battery-operated tea light or LED string to create a gentle glow.
I could make a set of three jars in different sizes for a simple centerpiece.
What I need: Clean glass jars, suitable frosted-effect craft materials, stencils, twine, and battery-operated lights.
Pro Tip: I would test the finish on a spare jar first and follow the product instructions for curing and cleaning. I would use battery-operated lights rather than an open flame.
33. Farmhouse Style Winter Star Wreath

A star-shaped wreath is a nice alternative to the usual round design. I would use a simple star frame, add greenery in small overlapping sections, and finish it with a neutral ribbon or a few natural accents.
For a farmhouse look, I would keep the materials restrained. Pinecones, dried seed heads, or small wooden decorations can add texture without competing with the shape.
I would make sure the greenery is secured evenly so the outline of the star remains easy to see.
What I need: A star-shaped wreath frame, suitable greenery, floral wire, scissors or pruning shears, and optional ribbon.
Pro Tip: I would check the wreath from a distance before finishing it. That makes it easier to spot gaps and keep the star shape balanced.
34. Family Photo Ornament

Family photo ornaments turn favorite memories into part of my Christmas decorations. I could use a picture from a recent holiday, a childhood photograph, or a special family milestone.
I would print the photo in a size that fits a small frame or clear ornament. A black-and-white image creates a timeless look, while a narrow ribbon or simple border helps the photograph stand out.
I could add the year to the back so the ornament becomes a record of family memories over time.
What I need: A printed photograph, a suitable ornament frame or clear bauble, scissors, ribbon, and adhesive if required.
Pro Tip: I would use a copy of the original photograph rather than cutting an irreplaceable print. I would also make sure the photo is sealed or protected if the ornament design allows moisture to reach it.
35. Poinsettia Clothespin

Poinsettias are strongly associated with Christmas, and a clothespin version offers a way to recreate their shape without using fresh flowers. I would arrange painted wooden clothespin pieces into a flower pattern and add a small center detail.
Red is the traditional choice, but white, cream, or metallic paint can create a different look. A loop of ribbon makes the finished flower easy to hang on a tree, wreath, or gift package.
I would arrange the pieces before gluing them to check that the petals look balanced.
What I need: Wooden craft clothespins, suitable paint, craft adhesive, a small center embellishment, and ribbon.
Pro Tip: I would let the paint dry fully before assembling the flower. I would also check that the glue is suitable for wood and secure the hanging loop firmly.
36. Snowflake Door Hanger

A snowflake door hanger adds a seasonal detail without taking up shelf space. I would choose a wooden, felt, or other suitable lightweight snowflake shape and decorate it in white, silver, pale blue, or a neutral color.
For a simple finish, I would paint the shape, add a few small accents, and attach a ribbon or hanging loop. A larger snowflake can work as a focal point on an interior door, while smaller ones can be grouped together.
What I need: A snowflake-shaped base, suitable paint, a brush, ribbon, and optional decorative accents.
Pro Tip: I would check the weight and hanging method before placing the decoration on a door. I would also use a finish suited to the material and the conditions where it will hang.
37. Dollar Tree Santa Gnome

A Santa gnome is a playful addition to Christmas decorations, especially when I want something more relaxed than a formal wreath. I would use an inexpensive base, a red felt hat, a white yarn beard, and a small nose to create the familiar shape.
I could make the hat long and floppy for a whimsical look or keep it short for a neater wall hanging. A loop at the back allows me to display the gnome on a door, wall hook, or decorative board.
What I need: Felt, white yarn, a wooden bead, a suitable base, ribbon or twine, and craft adhesive.
Pro Tip: I would trim the beard evenly after assembly and check that the hanging loop can support the full decoration. I would keep small parts away from young children.
38. Rustic Wood Slice Ornaments

Wood slice ornaments are a good fit for rustic Christmas decor. Their natural grain makes each piece slightly different, and I can leave the wood plain or add painted stars, small trees, initials, or a year.
I would start with clean, dry wood slices and smooth any rough edges. Then I would add the design using paint or a suitable wood-burning technique, if I have the right equipment and experience. A drilled hole and a loop of twine complete the ornament.
Small bells can add a festive touch, while a simple natural finish keeps the design understated.
What I need: Wood slices, sandpaper, paint or suitable decorating tools, twine, and optional bells.
Pro Tip: I would use dry wood and inspect each slice for cracks before decorating. I would avoid hanging pieces that are splintered or too heavy for the branch.
39. Stenciled Potholders

Stenciled potholders are useful gifts for people who enjoy cooking or baking. I would start with plain potholders and add a small Christmas tree, star, holly leaf, or seasonal word using paint designed for the fabric.
I would keep the design away from areas that receive the most heat and make sure the potholder remains flexible enough to handle comfortably. A matching ribbon or gift tag can finish the presentation.
I could make a pair with complementary designs rather than trying to fit too many details onto one small surface.
What I need: Plain potholders, fabric-safe paint, stencils, a stencil brush, and optional ribbon.
Pro Tip: I would check that the finished potholders remain suitable for their intended heat protection. I would follow the paint curing and washing instructions and never cover essential heat-resistant areas with unsuitable materials.
40. Salt Dough Gingerbread Garlands

I can get the look of a gingerbread garland without using edible cookies that might crumble or tempt everyone to snack on the decorations. Salt dough can be shaped into gingerbread people, stars, hearts, and other festive figures.
I would roll the dough evenly, cut out the shapes, and make holes for the hanging cord before drying or baking them according to a reliable salt-dough recipe. Once the pieces are completely dry and cool, I could paint them with simple icing-style details.
The finished shapes can be threaded onto twine to make a garland for a mantel or tree.
What I need: Flour, salt, water, cookie cutters, a rolling pin, paint, and twine.
Pro Tip: I would make the holes large enough for the cord before drying. Salt dough ornaments are decorative, not edible, and should be kept away from pets and small children who might swallow them.
41. Christmas Card Display Holder

For my final idea, I would use a freestanding card display when I want to show holiday greetings without adding more wall decorations. A wooden shutter or similar slatted display can hold cards while also serving as a decorative feature in the room.
I would clean the piece, check that it stands securely, and arrange the cards so that their colors and designs remain visible. If the gaps between the slats are too wide, small clips or ribbon can help keep the cards in place.
This is a practical option for an entryway, side table, or living room corner where family and friends can enjoy the cards throughout the season.
What I need: A stable wooden shutter or display frame, greeting cards, and optional clips or ribbon.
Pro Tip: I would position the holder away from busy walkways and secure it if there is any chance it could tip over. I would also avoid overcrowding it, so each card has room to be seen.
Read this next: 29 Best Christmas Gift Ideas For Expecting Mothers
FAQs About Christmas Crafts
1. What are some easy Christmas crafts to make at home?
Easy Christmas crafts include paper snowflakes, pinecone ornaments, handmade wreaths, painted mason jars, and DIY Christmas garlands. These projects use simple materials and are suitable for beginners.
2. What materials do I need for DIY Christmas crafts?
Common materials include cardstock, ribbons, glue, scissors, paint, pinecones, felt, twine, wooden pieces, and recycled jars. Choose supplies based on your project and reuse items you already have to save money.
3. How can I make Christmas crafts look classy and elegant?
Use a coordinated color palette, such as white and gold, cream and green, or red and natural wood. Add subtle details, natural textures, and simple finishes to create a polished look without making decorations feel overcrowded.
4. Can I make Christmas crafts with kids?
Yes! Paper ornaments, painted pinecones, simple garlands, and handmade greeting cards are fun Christmas crafts for children. Choose age-appropriate projects and supervise children when using scissors, hot glue, or small decorative pieces.
Conclusion
I find that the best Christmas crafts are the ones that suit my home and feel worth bringing out year after year. I don’t need to make all 41 projects to create a beautiful holiday display. A handmade wreath, a few personalized ornaments, a cozy garland, and a thoughtful card holder can be enough to make a room feel festive.
When choosing a project, I consider the time it will take, the materials I already have, and whether the finished decoration will be easy to store. I also like to repeat a few colors and textures so my decorations look coordinated without every item being identical.
Most importantly, I make room for creativity rather than perfection. Whether I’m reusing an old sweater, painting a Christmas card, or making a small ornament with my family, these projects give me a chance to create decorations that feel personal and meaningful.


3 Comments