31+ Easy DIY Cardboard Halloween Decorations For You To Recreate!
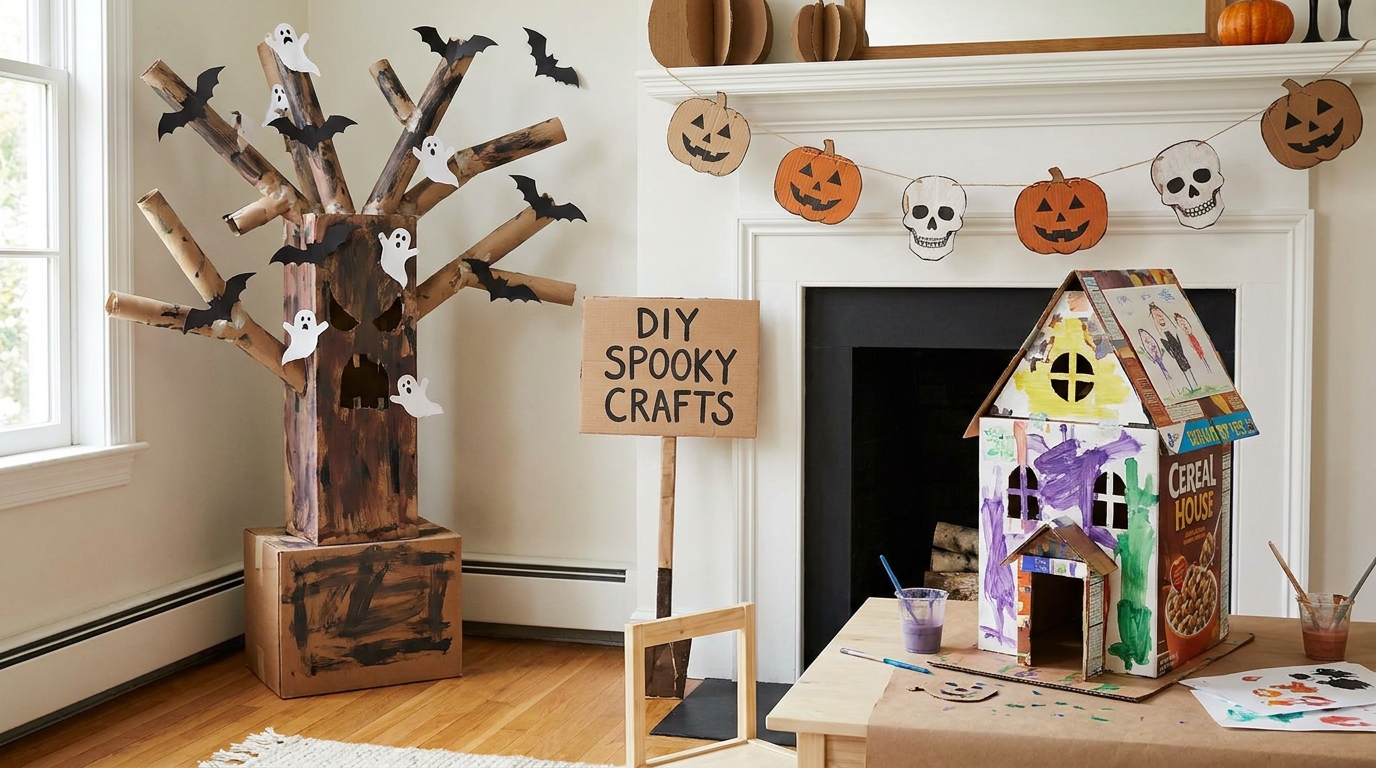
Halloween decorating doesn’t have to be expensive to look spooky and creative. I love using cardboard because it’s affordable, easy to work with, and perfect for turning everyday items like shipping boxes, packaging, and toilet paper tubes into fun Halloween decorations. With a little paint, glue, and imagination, I can create everything from creepy spiders to charming ghosts without spending a fortune.
If I were decorating my home for Halloween, I’d combine simple DIY crafts with a few eye-catching statement pieces. Cardboard bats on the walls, a haunted house by the entrance, creepy spiders tucked into corners, and a ghost family portrait can instantly create a festive atmosphere. These 31+ easy DIY cardboard Halloween decorations offer plenty of inspiration for decorating a porch, living room, hallway, or party space on a budget.
These DIY cardboard Halloween decorations make it easy to create a spooky atmosphere using inexpensive, recycled materials. From cardboard spiders, bats, and mummies to haunted houses, graveyards, floating ghosts, skeletons, witches, and Halloween garlands, there’s an idea for almost every decorating style.
Save this for later

Table of Contents
Use large cardboard boxes for statement pieces and smaller scraps for signs, ornaments, and wall art. With basic craft supplies, simple step-by-step techniques, and a few safety precautions, you can create affordable Halloween decorations for indoor spaces, covered porches, and family-friendly Halloween parties.
Key Takeaways
- Save money with recycled materials: I can reuse shipping boxes, cereal boxes, and toilet paper tubes instead of buying new craft materials.
- Choose a Halloween theme: I can combine ghosts, bats, spiders, and skeletons for a classic spooky look.
- Make the entrance stand out: A cardboard haunted house, creepy welcome sign, or Halloween archway can create an inviting display.
- Keep the projects simple: I can use scissors, craft glue, paint, markers, and string to complete many decorations.
- Personalize every design: I can change the colors, shapes, expressions, and sizes to match my decorating style.
- Decorate safely: I keep cardboard away from candles, heaters, and other heat sources, and I secure outdoor decorations against wind and rain.
Related article: 27+ Spooky Backyard Halloween Party Ideas To Go With!
Spiders

I would start with cardboard spiders because they are simple to make and instantly add a creepy touch to a Halloween display. I can cut an oval or round body, create eight long legs, and paint everything black for a classic spider appearance.
For extra character, I might add large white eyes, red markings, or textured paint. Smaller spiders work well on doors and walls, while oversized versions can become the main attraction in a Halloween corner.
Pro Tip: I use a pencil to draw the spider shape before cutting. For children, I prepare the pieces in advance and let them handle the painting and decorating.
Bats

Cardboard bats are an easy way to fill empty wall space and create the feeling of a spooky night. I can draw several bat silhouettes in different sizes, cut them out, and paint them black.
I like the idea of arranging the bats as though they are flying across a wall toward a doorway or window. Slightly folding the wings forward can also give the flat shapes more dimension.
Pro Tip: I make a reusable bat template so I can cut multiple matching shapes quickly. Lightweight cardboard is easier to attach to walls with removable adhesive strips.
Mummy

A cardboard mummy gives me a classic Halloween decoration that I can customize in several ways. I can cut a simple mummy silhouette from a box, paint the base dark, and wrap it with strips of white paper or fabric.
I would leave small gaps between the strips to create an aged, wrapped appearance. Two glowing-looking yellow or red eyes can make the finished mummy feel much more mysterious without requiring complicated details.
Pro Tip: I use torn paper strips instead of perfectly straight ones for a more realistic effect. A little gray or brown paint around the edges can make the wrapping look weathered.
Ghost Family Portrait

I think a ghost family portrait is a charming way to add personality to Halloween decorations. Instead of using an ordinary picture, I can create a cardboard frame and fill it with several little ghosts, each with a different expression.
I would paint the background black or deep purple and use white cardboard for the ghosts. Funny faces, tiny hats, and different ghost sizes can make the picture look like a playful family portrait.
This project is particularly useful when I want something decorative that does not take up floor space. I can hang it in a hallway, display it on a shelf, or use it as part of a Halloween gallery wall.
Pro Tip: I add small paper name labels beneath the ghosts to turn the portrait into a personalized family craft.
Haunted House

A haunted house is one of the first projects I would consider when planning a Halloween display. I can build one from a large cardboard box, cut out crooked windows and a doorway, and add slanted roof pieces to create an abandoned appearance.
For the finishing touches, I would use dark paint, paper shutters, uneven roof tiles, and small silhouettes in the windows. Orange paper behind the windows can create a warm, eerie glow without needing real flames.
I can make a small tabletop version or a larger house for a porch display, depending on how much space I have available.
Pro Tip: I sketch the windows, doors, and roof before cutting the box. This helps me avoid mistakes and makes the finished structure more stable.
Graveyard

I can create a miniature graveyard with cardboard tombstones, crooked crosses, and spooky lettering. Cutting the tops into rounded, pointed, or irregular shapes helps each headstone look different.
I would paint the pieces gray, add black cracks, and write short inscriptions such as RIP. For a complete scene, I could arrange the tombstones on a dark cloth with paper bats and ghost silhouettes.
This idea works particularly well near an entrance, along a sheltered porch wall, or as a centerpiece for a Halloween party.
Pro Tip: I reinforce larger tombstones with extra cardboard layers. For outdoor use, I choose a sheltered location because ordinary cardboard softens quickly when exposed to rain.
Keep Out!

A homemade KEEP OUT sign is a simple way to make an entrance look mysterious. I can cut a rectangular piece of cardboard, roughen the edges, and paint the background black, gray, or dark brown.
Bold red or white lettering makes the warning easy to read from a distance. I might also add painted cracks, fake scratches, spiderwebs, or a few dangling paper chains for a more dramatic finish.
I would hang the sign on a door, place it beside a haunted house display, or include it in a Halloween party entrance.
Pro Tip: I keep the lettering large and clear. A decoration looks more effective when people can understand it at a glance.
Halloween Entrance

When decorating for Halloween, I like to give the entrance special attention because it sets the mood before anyone steps inside. Cardboard lets me create a coordinated display with pumpkins, bats, ghosts, and a welcome sign.
I can cut large silhouettes from shipping boxes, paint them in Halloween colors, and arrange them around the doorway. A few layered shapes create depth, while a matching sign helps bring everything together.
For a smaller home, I would focus on the door itself and the wall beside it rather than filling the entire walkway.
Pro Tip: I leave the doorway and walking path clear. Decorations should look inviting without becoming a tripping hazard or blocking an exit.
Stacked Pumpkins

Stacked pumpkins are a good choice when I want a traditional Halloween look without using heavy decorations. I can cut several pumpkin shapes from cardboard, paint them orange, and add green stems and black facial details.
To create a stacked effect, I can arrange three pumpkins from largest to smallest. I could also build hollow cardboard boxes into pumpkin shapes for a freestanding display.
Different expressions make the arrangement more interesting. One pumpkin could smile, another could look surprised, and the third could have a classic jack-o’-lantern grin.
Pro Tip: I use a flat cardboard base and secure each layer with suitable craft adhesive. This helps prevent the stack from leaning or falling over.
Floating Ghost

hugolescargot.journaldesfemmes.fr
A floating ghost can make an ordinary room feel like a haunted space. I would cut a ghost-shaped face or body from lightweight cardboard, add dark eyes and a mouth, and attach white fabric or tissue paper to create a flowing appearance.
To give the decoration a floating effect, I can suspend it from a secure ceiling hook using suitable thread or fishing line. Several ghosts placed at different heights can create a playful scene in a hallway or party room.
I prefer lightweight materials for hanging crafts because they are easier to position and place less strain on their supports.
Pro Tip: I check the hanging point before installing the ghost and keep it away from ceiling fans, lights, and other moving or hot objects.
Spider Web

A cardboard spiderweb is a useful decoration for filling an empty corner or creating a backdrop for other Halloween crafts. I can draw a large web with a central point and several connecting rings, then carefully cut away the spaces between the lines.
Black cardboard gives the web a dramatic appearance against a light wall, while white or silver paint can make the details stand out against a darker background.
I would pair the web with a cardboard spider to create a more complete display. A few small bats nearby can help tie the decorations together.
Pro Tip: I leave the connecting lines wide enough to keep the web from breaking during cutting. A craft knife can help with detailed sections, but I use it carefully on a cutting mat.
Frightening Spider

If I want something more dramatic than a small wall spider, I would make an oversized version with long legs and a textured body. A few cardboard layers can give the body extra thickness, while bent strips or folded pieces can create more interesting legs.
I would use black paint as the base and add red eyes or gray markings for contrast. Placing the spider beside a doorway, on a wall, or near a homemade web can make it look like part of a larger Halloween scene.
The best part is that I can adjust the size to fit my available space and use leftover cardboard for the smaller details.
Pro Tip: I test the leg arrangement on the floor before attaching everything. This makes it easier to balance the design and avoid awkward proportions.
Fun Archway

A Halloween archway can turn a simple entrance into a themed display. I can use sturdy cardboard panels to create an arch shape, then decorate it with bats, ghosts, pumpkins, or spiderweb cutouts.
For a playful style, I would use orange, purple, and black. For a haunted-house look, I would stick to darker shades and add crooked shapes, cracks, and ghost silhouettes.
I would build the arch in manageable sections so I can position and secure each part more easily.
Pro Tip: I avoid relying on thin cardboard alone for a large freestanding arch. A stable support structure is important, and the decoration should never obstruct a doorway or emergency exit.
Also read: 15 Easy Halloween Crafts for Preschoolers That Actually Work (2026 Guide)
Coffin

A cardboard coffin is a classic addition to a spooky Halloween setup. I can draw an elongated coffin shape with angled shoulders and a narrower base, then cut two matching pieces for the front and back.
I would connect the pieces with cardboard strips to create depth and paint the exterior black, charcoal gray, or weathered brown. Small painted nails, cracks, and decorative lettering can make the finished prop look more convincing.
A miniature coffin can sit on a table, while a larger lightweight version can become part of a haunted-house display.
Pro Tip: I use a template for both sides so they match. If I want a three-dimensional prop, I reinforce the corners and allow the paint and glue to dry completely before moving it.
Amazing Garland

I like garlands because they add Halloween color without taking up much room. I can cut small pumpkins, bats, stars, and ghosts from thin cardboard and string them together to make a decorative chain.
I would alternate black and orange shapes for a traditional look, or use white and purple for something different. Painting each piece before assembly makes the process easier and keeps the finished garland neat.
I can hang the garland across a mantel, above a window, along a shelf, or around a party table.
Pro Tip: I punch small holes near the top of each shape and thread them onto string. I leave a little space between pieces so they do not bunch together.
Halloween House

A small Halloween house is a fun project if I want a detailed decoration for a shelf or tabletop. I can use a small cardboard box as the main structure and add separate pieces for the roof, windows, door, and chimney.
I would make the roof slightly uneven and paint the windows in bright orange or yellow. Tiny paper ghosts, bats, or pumpkins around the base can help turn the house into a miniature Halloween scene.
I could even create several houses in different sizes to build a small haunted village.
Pro Tip: I keep the basic structure simple and add details gradually. It is easier to decorate a sturdy house than to repair a complicated structure that has started to collapse.
Spooky Witch

A cardboard witch gives me plenty of room to experiment with different Halloween styles. I can cut a full-body silhouette featuring a pointed hat, flowing clothes, and a broom, or make a smaller witch face for a wall display.
For a traditional look, I would use black clothing, a green face, and a crooked nose. Purple accents or orange details can make the decoration more colorful.
I can place the witch beside a haunted house, near the entrance, or against a wall with paper bats flying around her.
Pro Tip: I draw the silhouette with broad, recognizable shapes. A pointed hat and broom are often enough to make the design instantly recognizable.
RIP Ghosts

I can combine ghost shapes with graveyard details to make a playful RIP display. I would cut white ghost silhouettes from cardboard, add black eyes and mouths, and place them around gray tombstones marked with RIP.
For a more personalized design, I might give each ghost a different expression or add small paper accessories. A dark background makes the white shapes easier to see and helps the whole display stand out.
This idea works well on a wall, on a covered porch, or as a backdrop for a Halloween party.
Pro Tip: I use thick white paint or a white base coat if the cardboard is brown. This helps the ghosts look bright and makes their facial details easier to see.
Scary Handprints

Scary handprints are an easy craft that I can make with supplies already at home. I trace a hand shape onto cardboard, cut it out, and paint it red, black, gray, or green depending on the effect I want.
I can create several handprints in different sizes and arrange them around a doorway, window, or wall. Adding dark outlines or scratch-like marks can give them a more dramatic appearance.
This is also a good activity for children because the basic shapes are easy to decorate once an adult has handled the cutting.
Pro Tip: I trace around a hand with the fingers spread apart to create a recognizable silhouette. I use child-safe paint for family crafts and supervise cutting tools.
Trick or Treat Ghost

A trick-or-treat ghost combines a familiar Halloween character with a cheerful message. I can cut a ghost shape from cardboard, paint it white, and add a small candy bucket or paper treat bag.
I would write “Trick or Treat” on a separate sign or include the words beneath the ghost. A friendly face makes the decoration suitable for family gatherings, while a more mysterious expression gives it a spookier feel.
I can place it near the front door, beside a candy bowl, or in a display for a Halloween party.
Pro Tip: I use a contrasting background behind the lettering so the message stays easy to read. Orange, black, and purple are good choices.
Creepy Welcome

A creepy welcome sign lets me greet guests while keeping the Halloween atmosphere consistent. I can cut a large sign from cardboard and decorate it with distressed lettering, small bats, spiderwebs, or a ghostly face.
For an aged appearance, I would layer gray and brown paint over a dark base and lightly mark the edges. Alternatively, I could create a cleaner black-and-white design for a more modern look.
I would position the sign where visitors can see it without blocking the entrance or walkway.
Pro Tip: I seal the finished sign with a suitable clear craft coating if it will be displayed in a sheltered outdoor location. I still avoid leaving ordinary cardboard exposed to heavy rain.
Boo Sign

A BOO sign is one of the simplest ways I can add Halloween spirit to a room. I can cut a rectangular, circular, or pumpkin-shaped piece of cardboard and paint the word in large, bold letters.
I would decorate the edges with little ghost faces, bats, or stars. If I want more dimension, I can cut the letters from separate cardboard pieces and attach them to the background.
The finished sign can sit on a shelf, hang on a door, or become part of a larger Halloween display.
Pro Tip: I sketch the lettering before painting and keep the design uncluttered. A short message looks best when it is easy to read from across the room.
Colorful Skeletons

I can give the traditional skeleton a fresh look by using bright colors instead of the usual black and white. I would cut out a skull, ribs, arms, and legs, then paint each section in a different shade.
Bright pink, green, orange, blue, and purple can create a playful design for a party or family craft display. I could also use a single color palette if I prefer a more coordinated appearance.
For a moving skeleton, I would connect the cardboard bones with paper fasteners so the arms and legs can bend.
Pro Tip: I make the joints slightly wider than the connecting holes to allow movement without tearing the cardboard. I test the pieces before painting the final design.
Creepy Garland

For a darker take on the traditional garland, I would use skulls, spiders, bats, and creepy eyes instead of friendly pumpkins. I can cut matching shapes from thin cardboard and paint them in black, white, and deep red.
I would string the pieces along a mantel, across a wall, or around a Halloween party table. Repeating a few shapes creates a consistent look, while occasional larger pieces keep the garland interesting.
This is a practical project when I want to decorate a large area using a small amount of material.
Pro Tip: I arrange all the cutouts on the floor before threading them together. This helps me balance the colors and avoid placing similar shapes too close to one another.
Witch

A witch decoration is a versatile choice because I can make it funny, friendly, or frightening. I would start with a cardboard silhouette and add a pointed hat, long dress, broom, and a distinctive facial profile.
Black is a reliable base color, but green, purple, and orange details can make the design stand out. I could also create a witch riding a broom or standing beside a bubbling-looking paper cauldron.
For a simple project, a flat silhouette is enough. If I want something more elaborate, I can add layered cardboard pieces to give the hat and clothing more depth.
Pro Tip: I use a wide base or a rear support for freestanding witches. This helps keep tall cardboard figures upright on a shelf or table.
Candy Decor

Colorful candy decorations are a good way to balance the darker parts of my Halloween display. I can cut oversized candy shapes from cardboard, paint them in bright colors, and add striped wrappers or polka dots.
I would use orange, purple, pink, yellow, and white to create a playful look. These decorations can sit beside a candy bowl, hang on a wall, or become part of a trick-or-treat display.
For a larger decoration, I could layer two matching candy shapes and connect them with folded cardboard sides to make a lightweight three-dimensional prop.
Pro Tip: I use a consistent color palette across the candy pieces so the display looks coordinated rather than crowded.
Toilet Roll Tube Ghosts

hugolescargot.journaldesfemmes.fr
Toilet paper tubes are useful for small Halloween projects because they are already shaped and easy to work with. I can paint each tube white, add a ghost face, and attach strips of tissue paper to create a flowing lower edge.
I would make several ghosts with different expressions and arrange them on a shelf or windowsill. A few black paper bats or small cardboard pumpkins can complete the display.
This is one of my favorite types of recycled craft because it uses everyday materials and requires very little preparation.
Pro Tip: I flatten the bottom edge slightly or add a small cardboard base if the ghosts keep tipping over. I let the paint dry before adding the facial details.
Bat Mirror

A bat mirror decoration can make an ordinary mirror feel ready for Halloween without permanently changing the room. I would cut a collection of black cardboard bats in different sizes and arrange them around the mirror frame.
I like the idea of having the bats appear to fly outward from one corner. This creates movement and draws attention to the mirror while keeping the rest of the room relatively simple.
I would use removable adhesive suitable for the mirror’s frame or surrounding wall, rather than placing anything where it could damage the reflective surface.
Pro Tip: I arrange the bats before attaching them and check the reflection from different angles. I keep the mirror itself clear so it remains practical to use.
Eerie Entrance

If I want a more dramatic entrance, I would combine several cardboard decorations into one coordinated scene. A haunted-house silhouette, hanging bats, a creepy welcome sign, and a few tombstones can create a complete Halloween display without requiring expensive props.
I would choose two or three main colors and repeat them across the decorations. Black, orange, and gray work well for a traditional haunted look, while purple can add a little extra color.
I would also consider the available space before making anything large. A small entrance can look impressive with just a few well-positioned decorations.
Pro Tip: I start with the largest decoration and add smaller details around it. This creates a clear focal point and prevents the entrance from looking overcrowded.
Skeleton

A cardboard skeleton is a classic Halloween craft that can be as simple or detailed as I want. I can cut out a skull and individual bone shapes, then arrange them over a black background for a strong contrast.
For a more interactive decoration, I would connect the arms, legs, and torso with paper fasteners. This allows me to change the skeleton’s pose and create different arrangements for a party or display.
I could also add a funny hat, colorful bow tie, or other small accessories to make the skeleton less frightening.
Pro Tip: I use a simple skeleton reference to keep the bones in proportion. For a wall display, I attach the pieces to a backing sheet so they stay aligned.
Haunted Castle

A haunted castle is a great choice when I want to create a larger Halloween centerpiece. I can use cardboard boxes and tubes to build towers, walls, battlements, and a central entrance.
I would paint the castle in charcoal gray or black, then add uneven stone patterns, narrow windows, and pointed roofs. Orange paper behind the windows can suggest an eerie glow, while bats and tiny ghosts help complete the scene.
I can build the castle in sections and connect them once the paint and glue have dried. This makes the project easier to manage and allows me to adjust the design as I work.
Pro Tip: I use sturdy boxes for the main walls and lighter cardboard for decorative details. A wide base helps support the towers and keeps the finished castle stable.
write 4 faqs
Frequently Asked Questions
1. What cardboard is best for DIY Halloween decorations?
Corrugated cardboard boxes are ideal for larger decorations, such as haunted houses, coffins, and graveyard displays. Thin cardboard from cereal boxes and packaging works well for bats, ghosts, garlands, and small Halloween signs.
2. How can I make cardboard Halloween decorations look spooky?
I can use black, white, orange, and purple paint to create a classic Halloween look. Adding fake cobwebs, torn edges, creepy lettering, paper bats, and layered cardboard details can make even simple crafts look more realistic and eerie.
3. Are DIY cardboard Halloween decorations suitable for outdoor use?
Yes, cardboard decorations can be used outdoors in covered areas, such as porches and sheltered entrances. Since cardboard absorbs moisture, I recommend keeping it away from rain and damp surfaces and applying a suitable protective sealant if needed.
4. How can I make cheap cardboard Halloween decorations last longer?
To make cardboard decorations last longer, store them in a dry place, reinforce larger pieces with extra cardboard, and use strong craft glue or tape. Carefully packing decorations in a box after Halloween will also help prevent bending and damage so they can be reused next year.
Read this next: 21 Easy Halloween Crafts That Sell Like Crazy (2026 Edition)
Conclusion
I do not need an expensive decorating budget to make my home feel ready for Halloween. With recycled cardboard, a few basic craft supplies, and some planning, I can create everything from simple bats and toilet roll ghosts to elaborate haunted houses and castles.
My approach would be to choose a few decorations that fit my available space, repeat a consistent color palette, and add smaller details only where they improve the overall display. This keeps the project manageable while helping each decoration stand out.
Most importantly, I would treat these ideas as starting points rather than strict instructions. I can change the shapes, colors, sizes, and expressions to suit my home and make each craft my own. By reusing cardboard and building decorations at my own pace, I can create a Halloween setup that feels personal, festive, and fun.



2 Comments