18 Toilet Roll Crafts for Kids (Easy, Cheap, and Actually Fun)
Toilet roll crafts for kids are the rare rainy-day activity that costs almost nothing, keeps little hands busy for a real stretch of time, and ends with something children actually want to keep.
I tested every idea in this list at my own kitchen table with clean craft rolls, washable paint, and the usual odds and ends from our craft box. I picked only the projects that survived a real afternoon with real kids.
Before you start, a few safety ground rules. Use clean craft rolls or fresh paper towel tubes cut to size, never soiled bathroom rolls. An adult should handle the scissors, everyone should wear a smock with washable paint, and small parts like googly eyes and beads are for ages three and up with an adult nearby.
Key Takeaways
- Every project here starts with a free toilet roll, so the whole list costs very little.
- Most ideas take 20 to 45 minutes, which is a perfect after-school or weekend window.
- Washable paint, glue sticks, and blunt-tip scissors keep the mess manageable.
1. Toilet Roll Binoculars
Two rolls taped side by side become a pair of binoculars, and my kids treated theirs like real explorer gear for a full week. We painted the rolls green first, let them dry for about twenty minutes, then wrapped a strip of tape around the middle to hold them together.
I punched a small hole on each outer side and threaded yarn through for a neck strap, which made all the difference because the binoculars stopped getting dropped.
The honest downside is that the tape join loosens if little hands squeeze too hard, so reinforce it with a second strip. Pro Tip: Paint the rolls before joining them, so you do not get paint stuck in the seam.
Cost: Under $1 | Time: 25 minutes | Difficulty: Easy

Image credit: https://www.kidskubby.com/toilet-paper-roll-binocular-craft/
2. Toilet Roll Owl Family
Owls are a perfect first toilet roll project because the shape does the work for you. Fold the top of the roll inward on both sides to make two little ears, then paint the whole thing brown. My daughter painted a whole family in one sitting — a big one, a medium one, and a tiny one — and lined them up on the windowsill like a proper parliament of owls.
We glued on big googly eyes and a small orange triangle beak, and she added feather shapes with a marker. The downside is that the folded ears spring back if the paint is too thick, so press them flat and let them dry upside down. A small clip holds them in place while they dry.
Pro Tip: Use a darker paint for the body and a lighter one for the belly patch to make the owl pop.
Cost: Under $2 | Time: 40 minutes | Difficulty: Easy

Image credit: https://www.momsandcrafters.com/toilet-paper-roll-owl/
3. Toilet Roll Rocket Ship
Every child wants a rocket, and a toilet roll is already rocket-shaped, which makes this one feel like magic. We painted our roll bright red, cut fins from red card, and glued silver foil around the top for the nose cone. A cotton ball glued at the bottom became the exhaust smoke, and my son added star stickers all over the sides.
The honest downside is that card fins bend easily, so use thicker card or double it up. Thin paper fins will droop within an hour of enthusiastic play.
Pro Tip: Glue the fins on before painting, so the paint seals the joins and they hold better.
Cost: Under $2 | Time: 35 minutes | Difficulty: Easy

Image credit: https://frostingandglue.com/toilet-paper-roll-rocket-craft/
4. Toilet Roll Butterfly
A butterfly made from a toilet roll body and paper wings is simple, pretty, and surprisingly sturdy. We painted the roll purple, then cut two large wing shapes from patterned paper and glued them to the back. Pipe cleaners twisted at the top became antennae, and my daughter dotted the wings with paint using the end of a pencil.
She made three in different colours and hung them from the ceiling with thread. The downside is that paper wings tear if they get wet, so keep finished butterflies away from drinks and rainy windowsills. Laminating is overkill, but thicker card wings last longer.
Pro Tip: Fold each wing in half before gluing so the butterfly looks three-dimensional instead of flat.
Cost: Under $2 | Time: 30 minutes | Difficulty: Easy
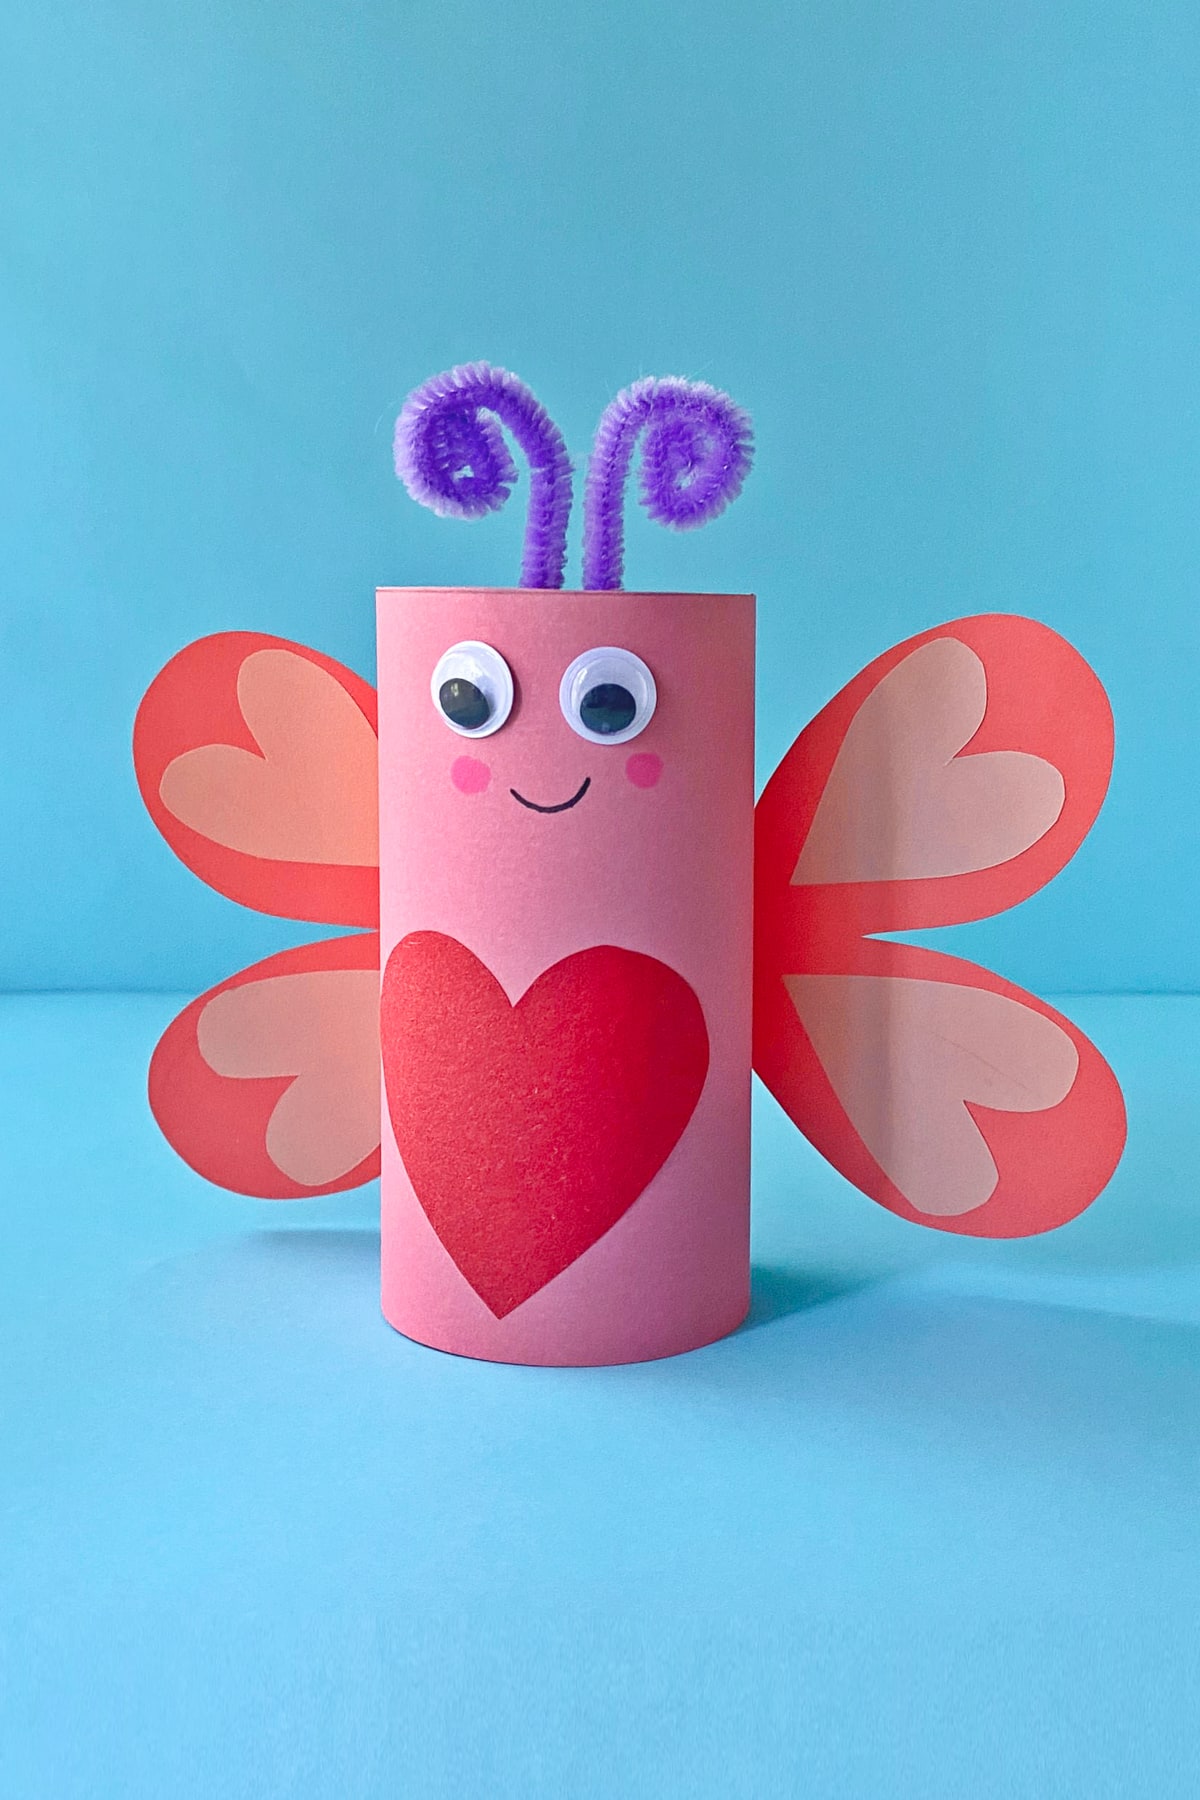
Image credit: https://www.mommymadethat.com/toilet-paper-roll-butterfly-craft/
5. Toilet Roll Lion Face
A lion face is all about the mane, and that is where this craft shines. We painted the roll orange, then glued strips of yellow and brown paper all around one end for the mane. My son cut the strips himself, which took patience, but the shaggy result looked wonderfully wild.
We drew the face with a marker — sleepy eyes, a big nose, and whiskers. The honest downside is that paper manes shed strips if the glue is thin, so use a generous line of craft glue and press each strip for a few seconds.
Pro Tip: Cut the mane strips slightly different lengths for a wilder, more natural look.
Cost: Under $2 | Time: 35 minutes | Difficulty: Easy
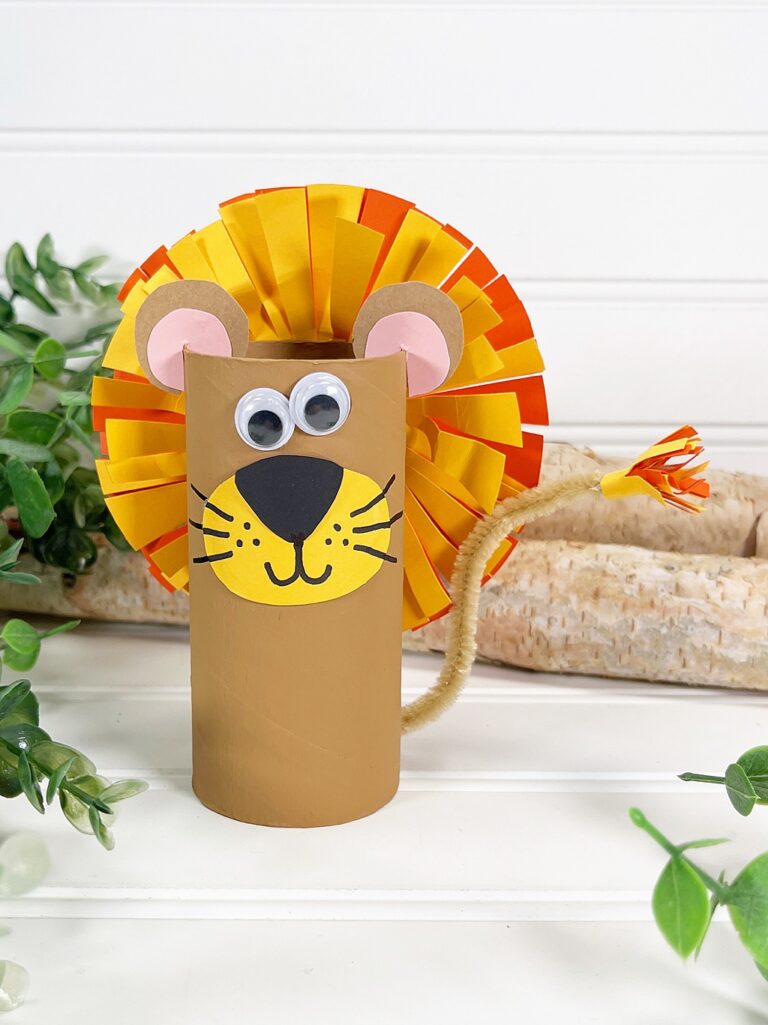
Image credit: https://bigfamilyblessings.com/toilet-paper-roll-lion-craft/
6. Toilet Roll Flower Vase
This one surprised me, because it turned out genuinely pretty enough for the mantel. We cut a roll down to about half height, painted it teal, and wrapped a band of patterned washi tape around the middle. My daughter arranged paper flowers on pipe cleaner stems inside it.
The vase is light, so it tips if the flowers are top-heavy, and we learned to put a few coins inside the base as ballast.
The downside is that a real flower with water is out of the question, since cardboard and water do not mix. Stick to paper or dried flowers, and it will last.
Pro Tip: Cut the roll shorter for a posy vase, or keep it full height for long-stemmed paper flowers.
Cost: Under $2 | Time: 30 minutes | Difficulty: Easy

Image credit: https://www.easypeasyandfun.com/toilet-paper-roll-flower-vase/
7. Toilet Roll Race Car
A race car from a toilet roll is fast to make and even faster to race across the kitchen floor. We painted the roll red, cut a small cockpit opening in the top, and glued on four black bottle-cap wheels with a dot of strong glue. My son added a racing number on the side, and then the competitions began.
The bottle-cap wheels needed a full night to set properly. The first race ended with a wheel flying off because we had only waited an hour, so patience is part of this craft.
The honest downside is that toilet roll cars dent in crashes, and there will be crashes.
Pro Tip: Use a straw axle through the roll with the wheels on the ends for a car that rolls straighter.
Cost: Under $2 | Time: 40 minutes | Difficulty: Medium

Image credit: https://funmoneymom.com/easy-toilet-paper-roll-race-car/
8. Toilet Roll Castle Tower
Stack three or four painted rolls and you have a castle tower, and a whole afternoon of pretend play. We painted ours grey, drew brick lines with a marker, and cut a little arched doorway in the bottom roll. My daughter added a cone roof made from purple card, and a flag on a toothpick at the very top.
The downside is that a tall stack is wobbly, so glue the rolls together rather than just balancing them. A cardboard base underneath adds a lot of stability too.
Pro Tip: Cut battlements (the little square notches) into the top edge for an instantly castle-like silhouette.
Cost: Under $3 | Time: 45 minutes | Difficulty: Medium
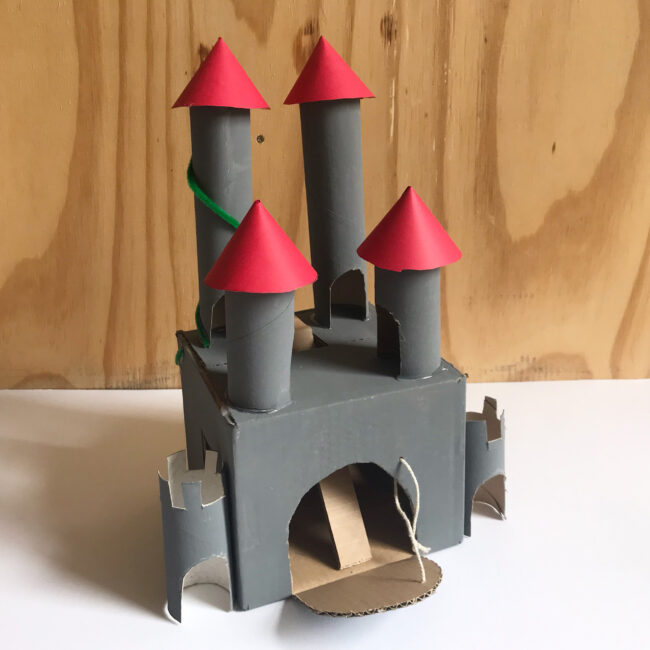
Image credit: https://www.thebearandthefox.com/diy-recycled-toilet-roll-castle/
9. Toilet Roll Penguin
Penguins are a winter favourite in our house, and a toilet roll makes a perfect chubby penguin body. We painted the roll black, glued a white oval on the front for the belly, and added an orange beak and feet cut from card. The painting took two coats to cover the cardboard, so allow drying time between coats or the black looks patchy. The honest downside is that the card feet bend under the roll’s weight, so fold them double or use foam.
Pro Tip: Paint the white belly first, then paint around it in black, for a cleaner edge.
Cost: Under $2 | Time: 40 minutes | Difficulty: Easy

Image credit: https://kidsactivitiesblog.com/223665/how-to-make-a-penguin/
10. Toilet Roll Snake
A snake made from a chain of toilet roll rings is the wiggly star of this list. We cut three rolls into rings, painted each one a different bright colour, and joined them with string threaded through holes in the sides. My son’s snake was red, yellow, and green, and it slithered convincingly when he pulled it along the floor.
We added a forked tongue from red paper and googly eyes on the front ring. The downside is that the string knots slip if they are not tied tightly, so double-knot each join. Younger children will need help with the threading, which is fiddly work.
Pro Tip: Leave a little slack in the string between rings so the snake bends and wiggles properly.
Cost: Under $2 | Time: 45 minutes | Difficulty: Medium

Image credit: https://www.clumsycrafter.com/in-the-wild-vbs-crafts/
11. Toilet Roll Flower
Cutting a roll into a flower is one of those crafts that looks far harder than it is. We flattened the roll slightly, cut slits down from the top to make petals, and bent them outward. My daughter painted each petal pink and glued a yellow pom-pom in the centre, and the result looked like a proper flower.
She made a bunch of five for the vase from idea six. The petal cutting was great practice for careful scissor work.
The honest downside is that uneven petals look lopsided, so draw light guide lines before cutting.
Pro Tip: Paint the inside of the roll too, since the petals show both sides when they bend out.
Cost: Under $1 | Time: 20 minutes | Difficulty: Easy

Image credit: http://jenniemasterson.com/easy-flowers-from-toilet-paper-rolls/
12. Toilet Roll Yellow Robot
A yellow robot is a guaranteed hit, because robots forgive messy painting and still look great. We painted the roll bright yellow, glued on silver foil panels, and added button eyes and a little antenna with a pom-pom on top. My son gave his robot a name, a job, and a full backstory within minutes of finishing it.
The foil panels were the detail that made it look properly robotic instead of just yellow.
The downside is that foil peels at the edges, so seal the edges with a thin line of glue.
Pro Tip: Use a black marker to draw panel lines and a mouth grille for instant robot detail.
Cost: Under $2 | Time: 35 minutes | Difficulty: Easy

Image credit: https://craftsyhacks.com/robot-toilet-paper-craft/
13. Toilet Roll Bird Feeder
A bird feeder from a toilet roll is a craft that keeps giving, because the birds actually come. We spread peanut butter over the outside of a roll, rolled it in birdseed, and threaded string through the top to hang it from a tree branch. We used a roll with no paint or glue on it, since this one goes outside and the birds will peck at it.
The honest downside is that rain turns the roll soggy within a day or two, so hang it somewhere sheltered and treat it as a short-lived treat. Squirrels also love it, which my daughter found hilarious rather than annoying.
Pro Tip: Roll the peanut-butter-covered tube in seed over a tray, so the loose seed is easy to collect and reuse.
Cost: Under $2 | Time: 20 minutes | Difficulty: Easy

Image credit: https://kidsactivitiesblog.com/109515/kids-crafts-diy-bird-feeder/
14. Toilet Roll Marble Run
Cutting rolls in half lengthwise turns them into tracks for a marble run, and this is the engineering project of the list. We taped half-rolls to a big piece of cardboard at different angles, so a marble rolled down one track and dropped into the next. My son spent an hour adjusting angles before he was happy.
The testing phase is genuinely educational — he learned about slopes and speed without realising it was a lesson.
The downside is that tape gives way under repeated marble impacts, so use strong tape or a hot glue gun (adults only for the glue gun).
Pro Tip: Start with gentle slopes and test each section before adding the next one.
Cost: Under $3 | Time: 50 minutes | Difficulty: Medium
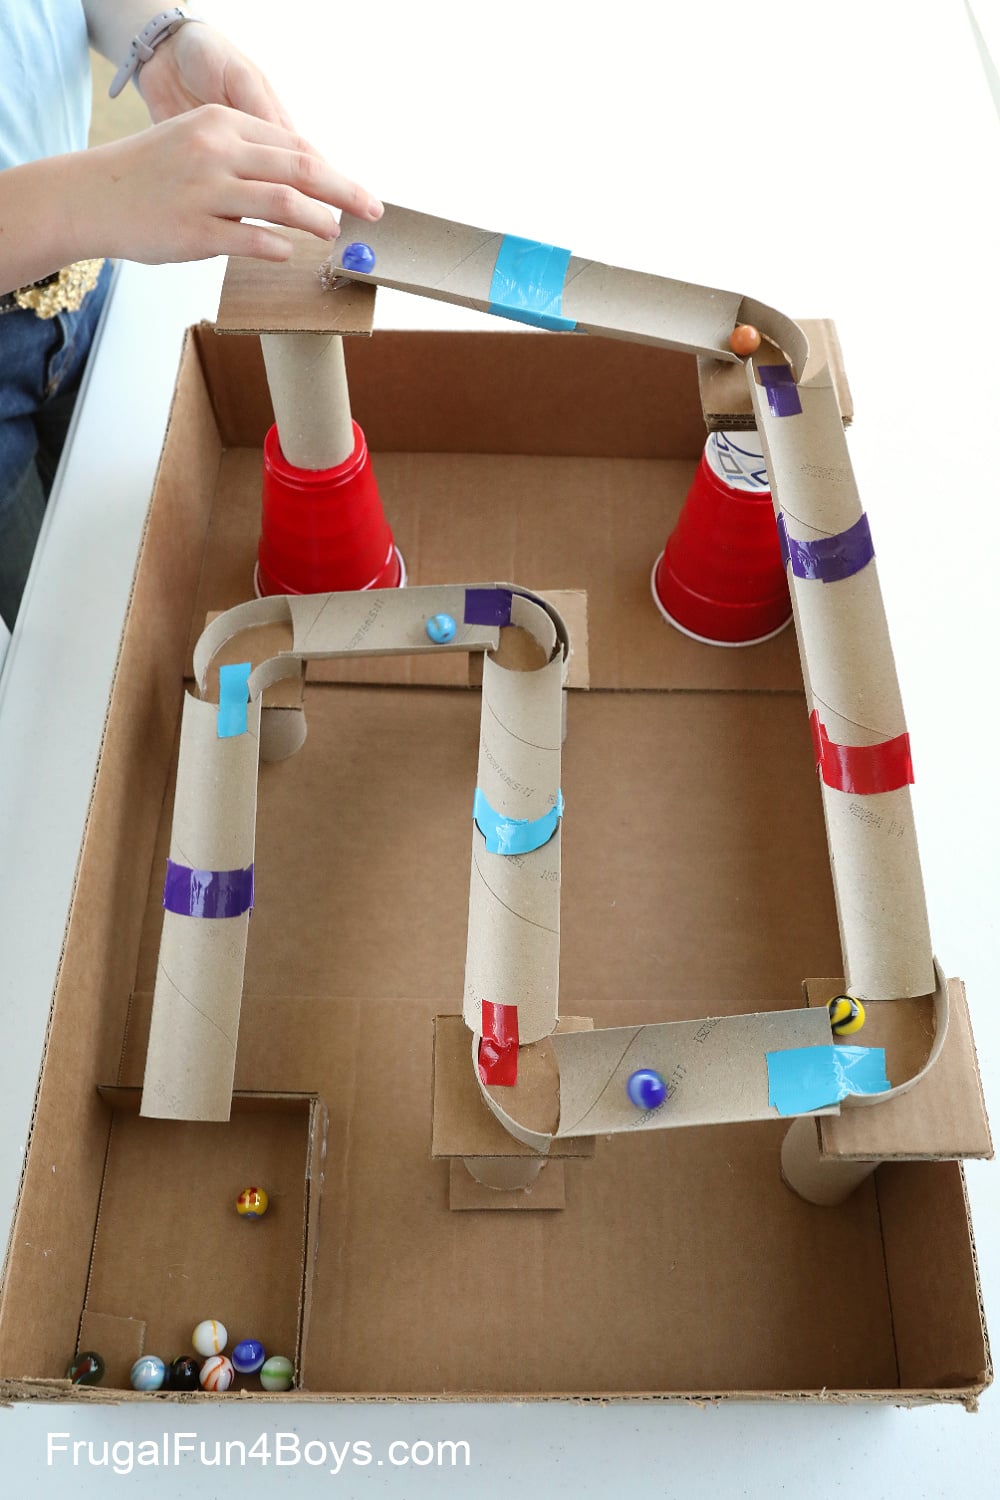
Image credit: https://frugalfun4boys.com/toilet-paper-roll-marble-run/
15. Toilet Roll Tree
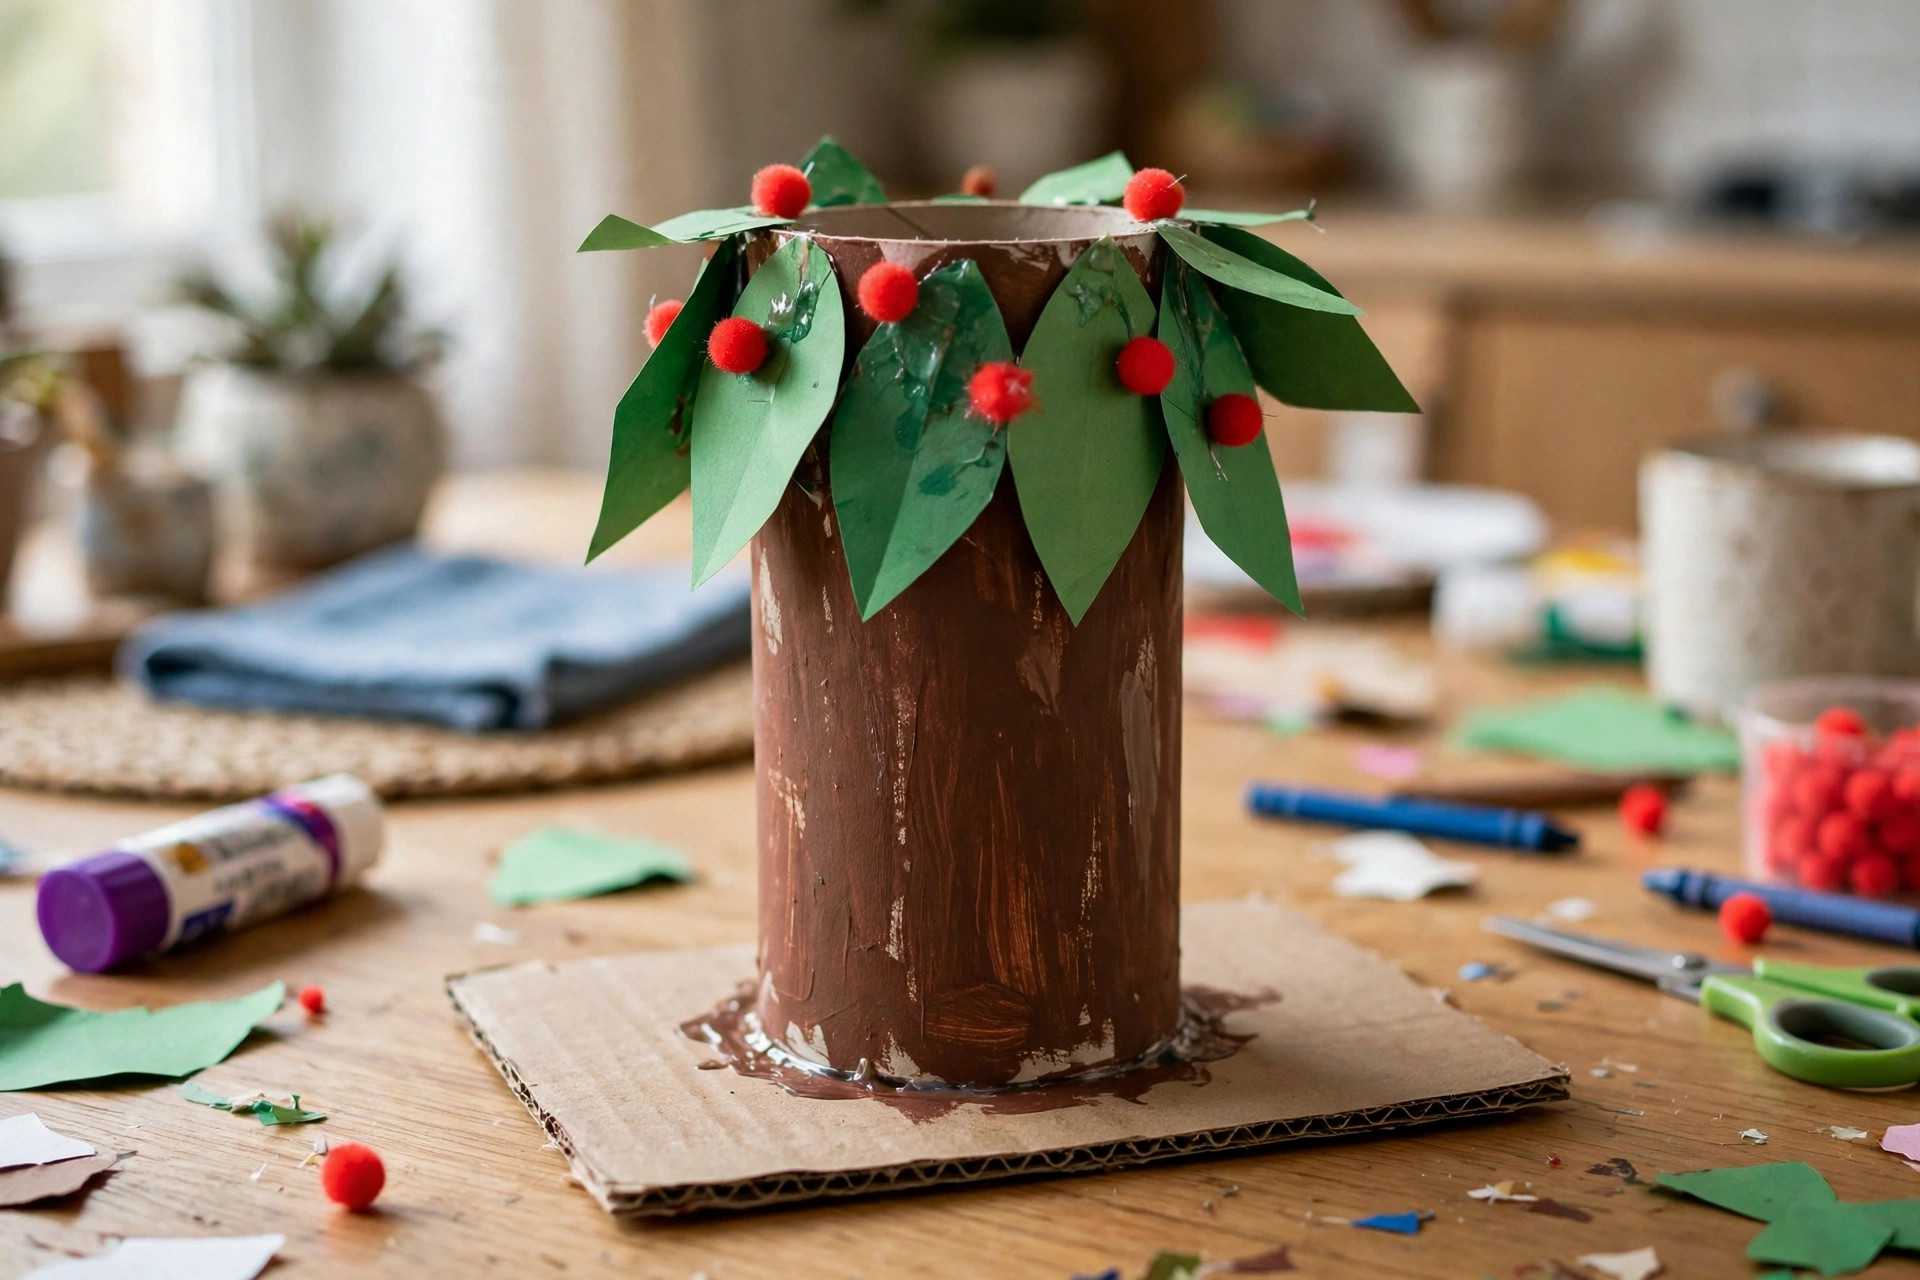
A toilet roll tree is a lovely seasonal craft that works for autumn, Christmas, or just a nature week. We painted the roll brown for the trunk, then glued on green paper leaves cut into simple shapes. My daughter added tiny red pom-poms as apples.
The leaf cutting was a nice quiet activity after a busy day. Changing the leaf colours makes it seasonal — orange and yellow for autumn, or green with white dots for a snowy Christmas tree.
The honest downside is that a top-heavy tree tips over, so glue the trunk to a cardboard base. A flat circle of card underneath solves the problem completely.
Pro Tip: Layer the leaves from the bottom up so each row overlaps the one below, like real foliage.
Cost: Under $2 | Time: 30 minutes | Difficulty: Easy
16. Toilet Roll Puppet Theatre
This is the most ambitious project here, and the most rewarding. We cut a rectangular stage opening in the side of a large roll, painted it like a theatre curtain, and made finger puppets from smaller roll pieces and paper. The stage cutting needs adult hands and sharp scissors. The puppets themselves are quick — a painted roll piece, a face, and a bit of imagination — and children can make a whole cast in one session.
The downside is that the stage opening weakens the roll, so use a sturdy roll or reinforce the back with tape. A wobbly theatre is frustrating mid-performance.
Pro Tip: Keep the puppet cast small — three or four characters — so the show stays fun instead of chaotic.
Cost: Under $3 | Time: 60 minutes | Difficulty: Medium

Image credit: https://keepthisrecipe.com/toilet-paper-roll-animal-theater/
17. Toilet Roll Bracelet Cuffs
Cut a roll into short rings, slit each one open, and you have a bracelet cuff ready to decorate. We painted ours in bright colours, then my daughter covered them in stickers, glitter glue, and tiny gems. Glitter glue needs a full hour to dry properly, so make these earlier in the day if they are needed for an outing.
The honest downside is that cuffs sized for a child will not fit an adult wrist, and the cardboard creases if forced open too wide. Measure the wrist first and cut the cuff to match.
Pro Tip: Round the corners of the cuff after cutting, so no sharp cardboard edges scratch little wrists.
Cost: Under $2 | Time: 20 minutes | Difficulty: Easy

Image credit: https://www.ahappymum.com/2014/05/diy-cuff-bracelets-toilet-rolls.html
18. Toilet Roll Pencil Holder
A pencil holder is the most useful craft on this list, and the one most likely to still be in use months later. We painted a roll navy blue, wrapped a strip of patterned paper around it, and glued it to a cardboard base so it stands upright. The base is the key detail — without it, the holder tips over the first time a pencil is pulled out.
The downside is that a single roll only holds a few pens, so make two or three and glue them together in a cluster for a bigger desk tidy.
Pro Tip: Cut one roll shorter than the others in a cluster, so short items like erasers are easy to reach.
Cost: Under $2 | Time: 25 minutes | Difficulty: Easy

Image credit: https://nontoygifts.com/diy-pencil-crayon-holders/
Comparison Table: Toilet Roll Crafts for Kids at a Glance
| Project | Best For | Cost | Time | Difficulty |
|---|---|---|---|---|
| Binoculars | Pretend play and nature walks | Under $1 | 25 min | Easy |
| Owl Family | Younger crafters and display | Under $2 | 40 min | Easy |
| Rocket Ship | Space fans and active play | Under $2 | 35 min | Easy |
| Butterfly | Pretty displays and gentle crafting | Under $2 | 30 min | Easy |
| Lion Face | Scissor practice and roaring | Under $2 | 35 min | Easy |
| Flower Vase | A gift or mantel display | Under $2 | 30 min | Easy |
| Race Car | Competitive kids and floor races | Under $2 | 40 min | Medium |
| Castle Tower | Imaginative play and building | Under $3 | 45 min | Medium |
| Penguin | Winter crafting and shelves | Under $2 | 40 min | Easy |
| Snake | Wiggly fun and colour mixing | Under $2 | 45 min | Medium |
| Flower | Quick wins and bouquets | Under $1 | 20 min | Easy |
| Yellow Robot | Robot fans and shelf display | Under $2 | 35 min | Easy |
| Bird Feeder | Garden watching and nature | Under $2 | 20 min | Easy |
| Marble Run | Older kids and problem solving | Under $3 | 50 min | Medium |
| Tree | Seasonal displays and quiet time | Under $2 | 30 min | Easy |
| Puppet Theatre | Storytelling and shows | Under $3 | 60 min | Medium |
| Bracelet Cuffs | Gifts and dress-up | Under $2 | 20 min | Easy |
| Pencil Holder | Desk tidying and daily use | Under $2 | 25 min | Easy |
If you are short on time, start with the flower, the bird feeder, or the bracelet cuffs.
Mistakes I Made (So You Don’t Have To)
First, I used a soiled bathroom roll exactly once, early on, and the smell of paint never quite covered it. Now I keep a bag of clean craft rolls and throw away any roll that looks stained or damp.
Second, I let the kids paint before the glue had dried on the owl ears, and the whole thing slid apart. Now we always glue first, wait ten minutes, and then paint.
Third, I skipped the base on the first pencil holder, and it fell over every single day until I finally glued it down. Any toilet roll craft that needs to stand up needs a base, and I check that before decorating now.
Fourth, I bought glitter glue without checking the drying time, and a bracelet cuff went to school still tacky. Now I plan the craft around the drying time.
Frequently Asked Questions
Are toilet roll crafts for kids safe for toddlers?
For toddlers, keep it simple and supervised. Use clean rolls, washable paint, and glue sticks, skip small parts like googly eyes and beads for children under three, and let an adult handle all cutting.
How long do toilet roll crafts actually last?
In my house, display crafts like the owl family and the pencil holder last for months, while play crafts like the race car last a week or two of hard use. Keep finished crafts dry and they will last much longer.
What paint works best on toilet rolls?
Washable poster paint or acrylic craft paint both work well. Poster paint is easier to wash off, while acrylic gives a brighter, tougher finish. Two thin coats always look better than one thick coat.
Can I use paper towel rolls instead?
Yes, and I often do. A paper towel roll cuts into two or three toilet-roll-sized pieces, and the cardboard is usually sturdier. Just check it is clean and dry first.
What would you do differently next time?
I would stock up on clean rolls before a craft day instead of hunting for them mid-project, and I would always put newspaper on the table first.
Related article: if your kids love animal crafts, you will enjoy our unicorn crafts for kids — and for another rainy-day favourite, also read our dinosaur crafts for kids.
Read this next: our paper plate crafts for kids are a perfect follow-up once you have used up your roll stash.
Final Thoughts
Toilet roll crafts for kids prove that the best craft supplies are often the ones headed for the recycling bin. Every idea here was tested at my kitchen table, and every one of them earned its place by surviving real children, real paint, and real play.
Start with one or two favourites, keep a bag of clean rolls ready, and let the kids lead.


One Comment