20 Winter Wreath Craft Ideas to Make Your Door Feel Like December
There is a moment every December when I open my front door, look at the bare wood, and think: this needs something warm. That is how these winter wreath craft ideas began — at my kitchen table, with pine needles on the floor and a glue gun that was always too hot.
How I picked and tested these: I actually made all twenty wreaths myself, over three weekends, using one 14-inch grapevine or foam base at a time. I hung each one on my own door for at least two days, in cold air and rain, before I kept it on this list. If it shed everywhere, slid off its hook, or looked tired by day two, it did not make the cut.
Below you will find evergreen, dried orange, felt, pinecone and more, with honest materials, real measurements, and the downsides I found. Related article if you want a lighter seasonal version for warmer months.
Key Takeaways
- Start with a sturdy 14-inch base; most door wreaths fail because the base is too light, not because the decorations are wrong.
- Glue in layers — greenery first, bulky pieces second, small details last — and step back after every layer.
- Fresh greenery smells wonderful but drops needles; faux greenery lasts all season with almost no mess.
- Hang with an over-door hook rated for the finished weight, especially for pinecone and ornament wreaths.
- Keep one spare bundle of greenery and a few extra berries; touch-ups take five minutes and save the whole look.
1. Classic Evergreen Door Wreath

I started with a 14-inch grapevine base and three bunches of fresh fir, each cut into 6-inch sprigs. I wired the sprigs in one direction, overlapping each by about half, until the base disappeared completely. A simple red velvet bow at the bottom finished it, with no other decoration at all.
I hung this one first, and it was the wreath my neighbours commented on most. The fir smelled like a Christmas tree every time I opened the door, and it stayed full for two weeks. The downside is real, though: it dropped needles on my porch daily, and I swept them up every morning.
Pro Tip: Mist fresh fir lightly every three days to slow needle drop.
Cost/Time/Difficulty: About $18 / 45 minutes / Easy.
2. Dried Orange Slice Wreath

I sliced four navel oranges about 1/4 inch thick and dried them in a 200°F oven for three hours, flipping them halfway through. Once cool, I glued eight slices around a 14-inch evergreen base, tucking small pinecones between them. The orange colour glowed against the dark green, and the whole kitchen smelled like Christmas while they dried.
My favourite detail was how the slices caught the porch light at night. The honest downside is patience: rush the drying and the slices curl and go sticky. One of my first batch did exactly that. Make a few extra slices, just in case.
Pro Tip: Blot slices dry before baking to cut drying time.
Cost/Time/Difficulty: About $14 / 90 minutes plus drying / Easy to moderate.
3. Pinecone and Holly Wreath

I used a 14-inch foam base wrapped in burlap, then glued twelve medium pinecones around it in a loose ring, leaving small gaps. Into those gaps I tucked faux holly sprigs with red berries, three sprigs per gap, so the red dotted through the brown. A thin gold ribbon loop at the top kept the rustic look from feeling heavy.
This wreath survived a windy weekend without losing a cone, which surprised me. The downside is weight: twelve real pinecones add up fast, and my first hook bent slightly. Use a strong hook, and glue each cone at two points so nothing twists loose.
Pro Tip: Bake gathered pinecones at 200°F for 30 minutes first to open them and remove sap.
Cost/Time/Difficulty: About $16 / 60 minutes / Easy.
4. Red Berry and Bow Wreath

I wrapped a 12-inch foam ring in dark green ribbon, then wired on six faux berry picks, each about 10 inches long, fanning them outward. A large red grosgrain bow, made from 2-inch ribbon, went at the bottom centre. I kept the greenery minimal on purpose, so the berries did all the talking.
I loved how this one photographed — bright, simple, and readable from the street. The downside is that cheap berry picks shed tiny red beads; I found three on my doormat on day one. Spend a little more on good picks, and shake them over a bin before hanging.
Pro Tip: Add one berry pick pointing upward for height and balance.
Cost/Time/Difficulty: About $20 / 35 minutes / Easy.
5. Cinnamon Stick and Star Anise Wreath

I bundled cinnamon sticks in groups of three with thin twine, making ten bundles in total, and glued them around a 14-inch grapevine base. Between bundles I placed star anise and two dried orange slices, keeping the spacing even. The result smelled warm and spicy, like a bakery, every time the door opened.
My kids loved sniffing this one, which is both a compliment and a warning: small spice pieces tempt little hands. The downside is fragility — star anise cracks if pressed too hard. Place it gently, glue around the edges, and keep this wreath above toddler height.
Pro Tip: Use low-temperature glue for star anise to avoid scorch marks.
Cost/Time/Difficulty: About $15 / 50 minutes / Easy.
6. Eucalyptus and Snow Wreath

I used preserved eucalyptus, four bunches cut into 8-inch stems, wired onto a 14-inch gold wire frame. I layered silver-dollar and seeded eucalyptus together, then dusted the tips lightly with faux snow spray from about 12 inches away. A thin white ribbon bow kept the whole thing pale and calm.
This was the quietest wreath on my door, and I mean that as praise — it suited snowy mornings perfectly. The downside is that preserved eucalyptus is brittle; two stems snapped while I wired them, so work slowly and buy one extra bunch. It also fades in strong sun.
Pro Tip: Spray faux snow outdoors, in short bursts, to avoid clumps.
Cost/Time/Difficulty: About $22 / 40 minutes / Easy.
7. Frosted Pinecone and Mini House Wreath

I started with a faux fir base, then glued nine frosted pinecones around it, three at the top, three at each side. Between them I tucked three tiny wooden houses, each about 2 inches tall, and a scattering of faux snow. The little village scene made my porch feel like a storybook, especially under the porch light.
I will admit I over-glued the first house and it leaned like a tipsy cottage, so I redid it with less glue and a toothpick brace while it dried. The downside is dust: faux snow collects dust quickly indoors, and outdoors it can look grey after rain. Brush it gently, and do not over-spray.
Pro Tip: Glue houses on flat pinecone scales for a level seat.
Cost/Time/Difficulty: About $24 / 55 minutes / Moderate.
8. Gold and White Poinsettia Wreath

I used a white-and-gold faux greenery base and added five large white poinsettia heads, each about 5 inches across, spaced evenly around the ring. Small gold berries and a gold mesh bow filled the gaps. The whole wreath glowed warmly against my dark door, and it needed no other colour at all.
This was my most elegant wreath, and also the one I worried about most in rain. The downside is that white faux flowers show dirt fast — one muddy splash from the driveway marked a petal. Keep it under a covered porch, and wipe petals with a dry cloth, never a wet one.
Pro Tip: Angle poinsettias slightly outward so they read from the street.
Cost/Time/Difficulty: About $26 / 45 minutes / Easy.
9. Golden Ornament Ball Wreath

I glued forty small gold baubles, mostly 1.5 to 2 inches wide, onto a 14-inch foam ring, packing them tightly so no foam showed. I mixed shiny, matte, and glitter finishes, then added a gold ribbon hanger. No greenery at all — just a solid ball of gold, which looked far more expensive than it was.
I made this one while watching a film, and the repetitive gluing was genuinely relaxing. The downside is weight and fragility: it is heavy, and one dropped bauble cracked on my kitchen tiles. Hang it securely, keep it away from swinging doors, and store it in a padded box.
Pro Tip: Glue baubles in clusters of three for a fuller, faster build.
Cost/Time/Difficulty: About $25 / 75 minutes / Moderate.
10. Red Bauble Wreath

I wrapped a foam ring in red ribbon, then hot-glued thirty red baubles in mixed sizes, from 1 inch to 3 inches, filling every gap. A few gold baubles, just five, broke up the red so it did not look flat. The finished ring was bold, shiny, and impossible to miss from the pavement.
My honest note: red shows every scratch, and two of my older baubles had tiny scuffs I only noticed in daylight. The downside is that this wreath suits a simple door best — against a busy porch, it can look loud. Pair it with a plain doormat and no other red decorations.
Pro Tip: Place the largest baubles first, then fill gaps with small ones.
Cost/Time/Difficulty: About $23 / 70 minutes / Moderate.
11. Yarn-Wrapped Wreath

I wrapped a 14-inch foam ring tightly in chunky cream yarn, overlapping each pass so no foam showed, which took most of one 100-gram ball. Then I glued on five small pinecones and a felt snowflake at the top. The texture was soft and cosy, like a favourite sweater, and it suited my wooden door beautifully.
Wrapping took longer than I expected, and my hands ached by the end — that is the real downside. Take breaks, and do not pull the yarn too tight or the foam ring will dent. I also learned that yarn outdoors absorbs damp, so this one lives best on a covered porch.
Pro Tip: Dab glue every few wraps to stop the yarn sliding.
Cost/Time/Difficulty: About $13 / 80 minutes / Easy to moderate.
12. Twine, Pinecone and Fairy Light Wreath

I wrapped a grapevine base in natural twine, then glued on eight small pinecones and wrapped a 20-light battery fairy light string around the ring, tucking the battery pack behind the bow. At dusk the lights glowed through the twine, and my porch suddenly felt like a winter evening market.
The downside is the battery pack: it adds weight and bulk at the back, and mine slipped once, pulling the lights crooked. Tape the pack firmly to the base, and use a timer string so you are not climbing up to switch it off. Also, keep spare batteries ready — mine died on Christmas Eve.
Pro Tip: Weave lights under, not over, pinecones to avoid shadows.
Cost/Time/Difficulty: About $19 / 55 minutes / Moderate.
13. Rustic Welcome Wreath
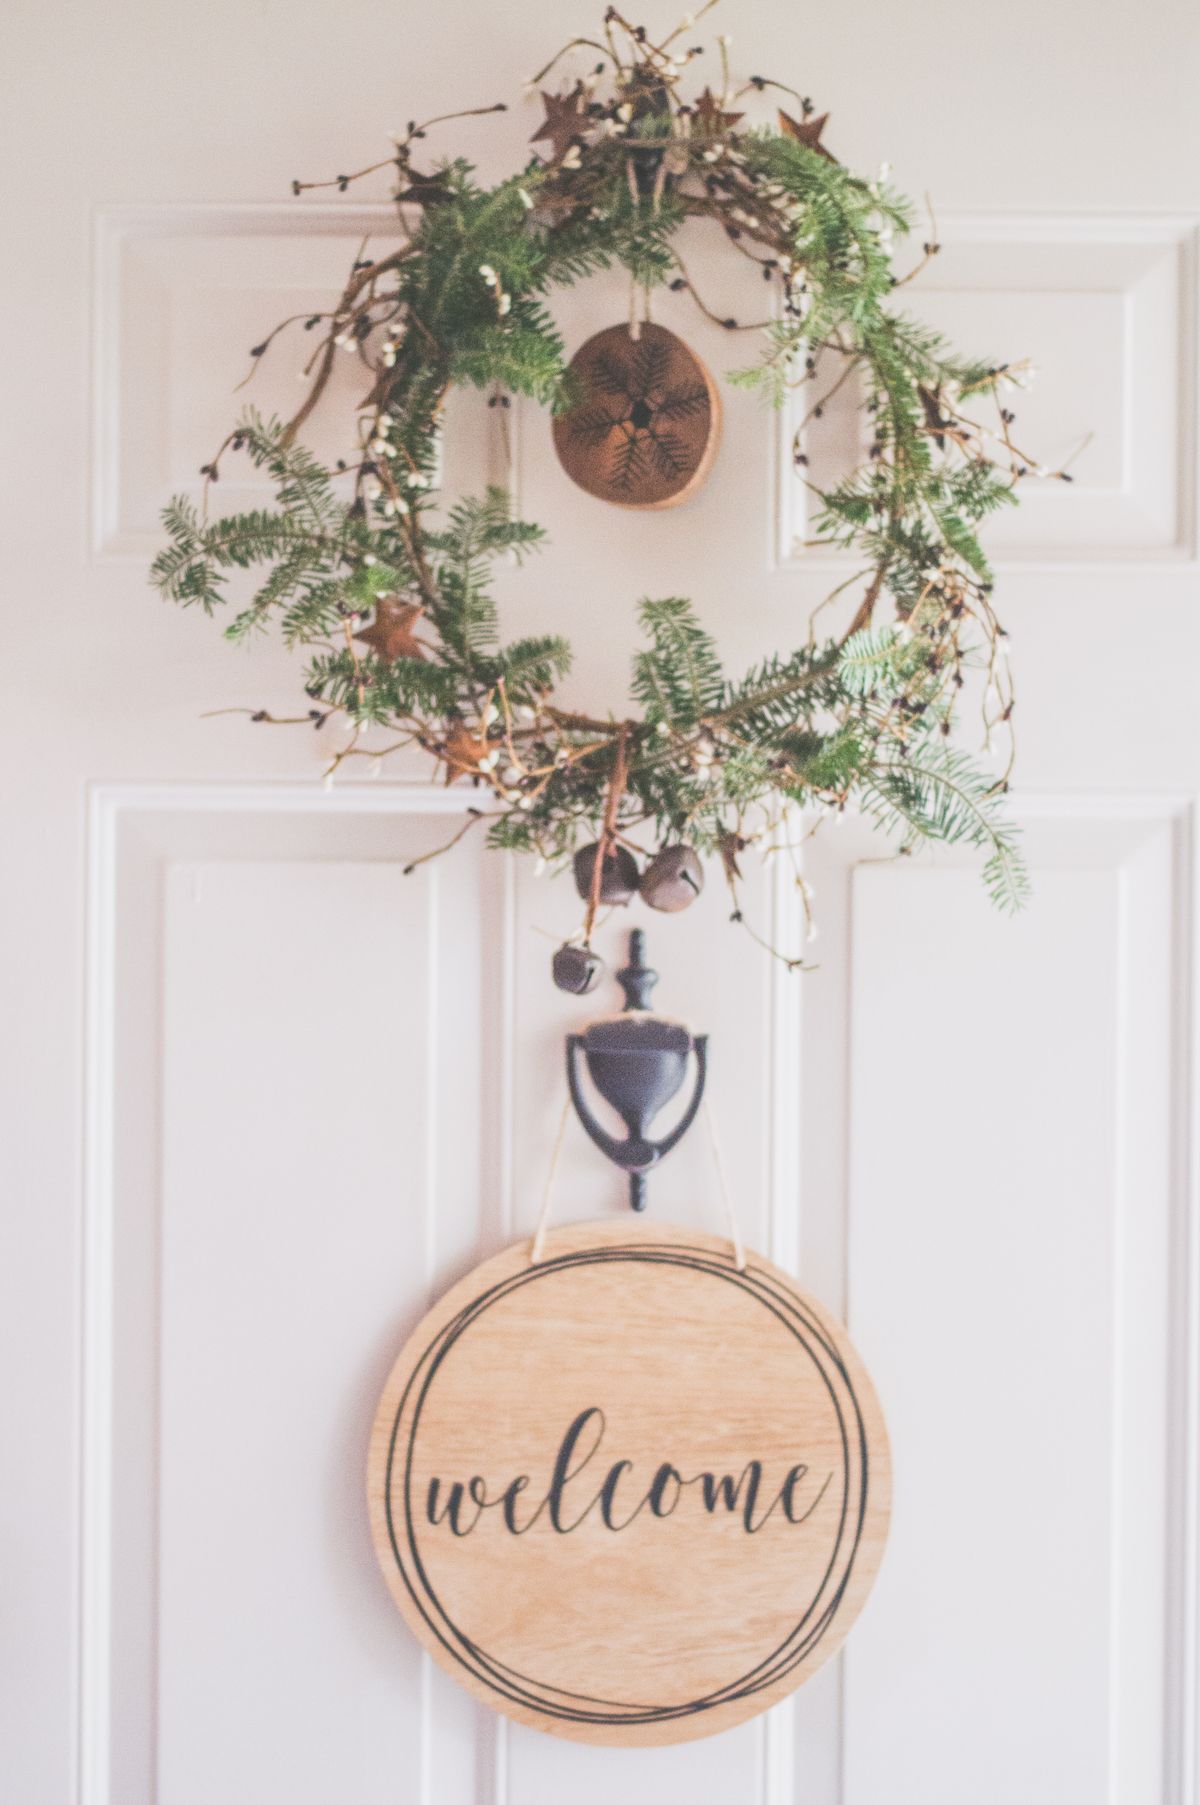
I built this on a twig base, added a small wooden “Welcome” sign, about 8 inches wide, wired to the centre, and surrounded it with faux fir sprigs and red berries. A burlap bow at the top tied the rustic look together. It felt friendly rather than formal, which suited our house perfectly.
I liked this one so much I left it up into January. The downside is balance: the sign pulls the wreath forward, so it can tilt if the hook is weak. Hang it from two points, or add a small felt pad behind the sign. Also, check the sign wording suits your household before you glue it on.
Pro Tip: Wire, do not glue, a heavy centre sign for easy swapping.
Cost/Time/Difficulty: About $21 / 50 minutes / Easy.
14. Felt-Colour Pop Wreath

I glued sixty felt balls, each about 1 inch wide, in rainbow order around a 12-inch foam ring, packing them tightly. I used red, mustard, teal, and cream, with no greenery, so the colour itself was the decoration. It looked cheerful, handmade, and completely different from every other wreath on my street.
My daughter helped with this one, and sorting the colours took longer than gluing them — a lovely afternoon, honestly. The downside is that felt balls collect dust and pet hair, and bright colours fade in direct sun. Keep it on a shaded door, and roll a lint roller over it weekly.
Pro Tip: Lay out the colour order flat before gluing a single ball.
Cost/Time/Difficulty: About $18 / 90 minutes / Moderate.
15. Cranberry and Spice Wreath

I used faux cranberry picks, six stems, wired onto a 14-inch evergreen base, then added cinnamon sticks and star anise between them. The deep red berries against green, with warm spice tones, gave a classic December kitchen-table feel. A simple twine bow finished it without competing for attention.
I chose faux cranberries deliberately after fresh ones shrivelled on my first test wreath within a week — that is the honest downside of the fresh version. Faux berries last all season, but cheap ones can look plastic in bright daylight, so check them in natural light before you buy.
Pro Tip: Cluster berries in threes for a natural, gathered look.
Cost/Time/Difficulty: About $17 / 45 minutes / Easy.
16. Kitchen-Table Workshop Wreath

This is the wreath I made with friends around my table, using a plain grapevine base and whatever we had left: fir sprigs, pinecones, dried oranges, and cinnamon. We worked in a circle, passing the glue gun around, and each section looked slightly different. That uneven, handmade feel is exactly what I loved most.
The downside of a group build is glue-gun chaos — we had strings of glue everywhere, and one pinecone landed in the wrong spot twice. Still, it was my favourite making memory of the season. If you craft with friends, lay newspaper down first and keep a bowl of water nearby for burnt fingers.
Pro Tip: Assign one person to greenery and one to details to avoid bare patches.
Cost/Time/Difficulty: About $15 / 60 minutes / Easy.
17. Scandinavian White-and-Green Wreath

I kept this one deliberately sparse: a thin gold wire ring, a few eucalyptus stems, two fir sprigs, and five red berries, all clustered at the bottom left. The rest of the ring stayed bare. The empty space was the point — calm, minimal, and very Scandinavian, against a white door.
I worried it would look unfinished, but visitors called it the most stylish wreath I made. The downside is that minimal wreaths show every mistake: one crooked stem stands out with nowhere to hide. Wire stems on, step back, adjust, and only glue once you are truly happy.
Pro Tip: Use odd numbers of stems and berries for a natural cluster.
Cost/Time/Difficulty: About $16 / 30 minutes / Easy.
18. Snowy Door Wreath

I used a flocked faux fir base, already dusted white, and added silver berries, white ribbon, and three frosted pinecones. No bright colour at all — just white, silver, and pale green. On a snowy day it blended with the porch in the best way, like it had grown there overnight.
The downside is flocking mess: white fibres came off on my hands and coat for the first few days. Shake it outdoors before hanging, and do not hang it over a dark coat rack. Also, flocked wreaths look flat in dim light, so place this one where porch light hits it.
Pro Tip: Add one silver bow for contrast against all-white flocking.
Cost/Time/Difficulty: About $27 / 35 minutes / Easy.
19. Red Door Statement Wreath

I built a full faux fir wreath, 16 inches wide, and layered it with red and gold ornaments, berries, and a large plaid bow. It was deliberately bold — bigger and brighter than my usual style — because a red door can handle drama. From the street, it was the first thing anyone noticed.
The downside is size: a 16-inch wreath plus ornaments is heavy, and it overwhelmed my narrow porch until I moved a plant pot. Measure your door first — a wreath should leave at least 6 inches of door visible on each side. Bold works best when the rest of the porch stays simple.
Pro Tip: Match the bow to your door hardware, not just the wreath colours.
Cost/Time/Difficulty: About $28 / 60 minutes / Moderate.
20. Elegant Glass-Door Wreath

I chose a slim faux greenery ring with gold accents and a small gold bow, made to hang on glass with a suction hook rated for 5 pounds. The wreath was lighter than my others on purpose, with no pinecones or heavy ornaments. Through the glass, daylight lit it from behind, which looked surprisingly elegant.
The downside is the hook: my first suction cup failed on a cold morning and the wreath slid down the glass. Clean the glass with warm soapy water, dry it fully, and test the hook empty for a day first. Also read for wreath ideas that suit glass doors in autumn too.
Pro Tip: Use a clear suction hook so the hanging hardware disappears.
Cost/Time/Difficulty: About $20 / 30 minutes / Easy.
Winter Wreath Craft Ideas at a Glance: Comparison Table
| Wreath | Best For | Time | Lasts |
|---|---|---|---|
| Classic Evergreen | Traditional doors | 45 min | 2–3 weeks fresh |
| Dried Orange Slice | Warm, scented porches | 90 min | All season |
| Pinecone and Holly | Rustic homes | 60 min | All season |
| Red Berry and Bow | Bright, simple impact | 35 min | All season |
| Scandinavian Minimal | Modern, white doors | 30 min | All season |
| Twine and Fairy Lights | Evening glow | 55 min | All season |
Mistakes I Made / What I Learned the Hard Way
Glue first, look later. On my first winter wreath craft ideas test, I glued every pinecone before stepping back, and the whole ring leaned left. Now I place everything dry, photograph it from the doorway, and only then glue. That one habit fixed most of my lopsided wreaths.
Underestimating weight. A pinecone wreath bent a cheap hook and nearly fell on my doormat. I now weigh heavier wreaths on kitchen scales and buy a hook rated above that weight, with a margin to spare.
Fresh berries indoors. Fresh cranberries looked beautiful on day one and shrivelled by day seven. Faux berries cost a little more, but they save a remake — and a remake always takes longer than the first build.
Forgetting the back. My early wreaths looked great from the front and messy from the side, with wire ends poking out. I now wrap wire ends flat, trim stems short, and check the wreath from the side before hanging it.
Frequently Asked Questions
How long does a fresh evergreen wreath last on a door? For these winter wreath craft ideas, usually two to three weeks in cold weather, less in warm sun or wind. Mist it lightly, keep it out of direct sun, and expect some needle drop — that is normal, not a failure.
Can I reuse a wreath base next year? Yes, grapevine, wire, and foam bases all reuse well. Remove decorations carefully, store the base flat in a box, and replace only the tired greenery or berries next December.
What size wreath suits a standard front door? A 14-inch wreath suits most standard doors, while 16 inches suits wider or double doors. Leave at least 6 inches of door visible on each side so the wreath looks framed, not cramped.
How do I hang a heavy wreath without damaging the door? Use an over-door hook or a suction hook rated above the wreath weight, and avoid nails on finished doors. Test the hook empty first, especially on glass or in cold weather.
Final Thoughts
If I had to pick just one to make again tomorrow, it would be the dried orange wreath — warm, scented, and forgiving to make. But the real joy of this list is that no two wreaths ask for the same afternoon: one is quiet and minimal, another is bold and golden, and one is gloriously messy with friends.
Start with the base you already have, use what is in your kitchen or craft box, and let the first of these winter wreath craft ideas be imperfect. Mine certainly were, and they still made my door feel like December. Read this next if you want to plan your next seasonal wreath early.