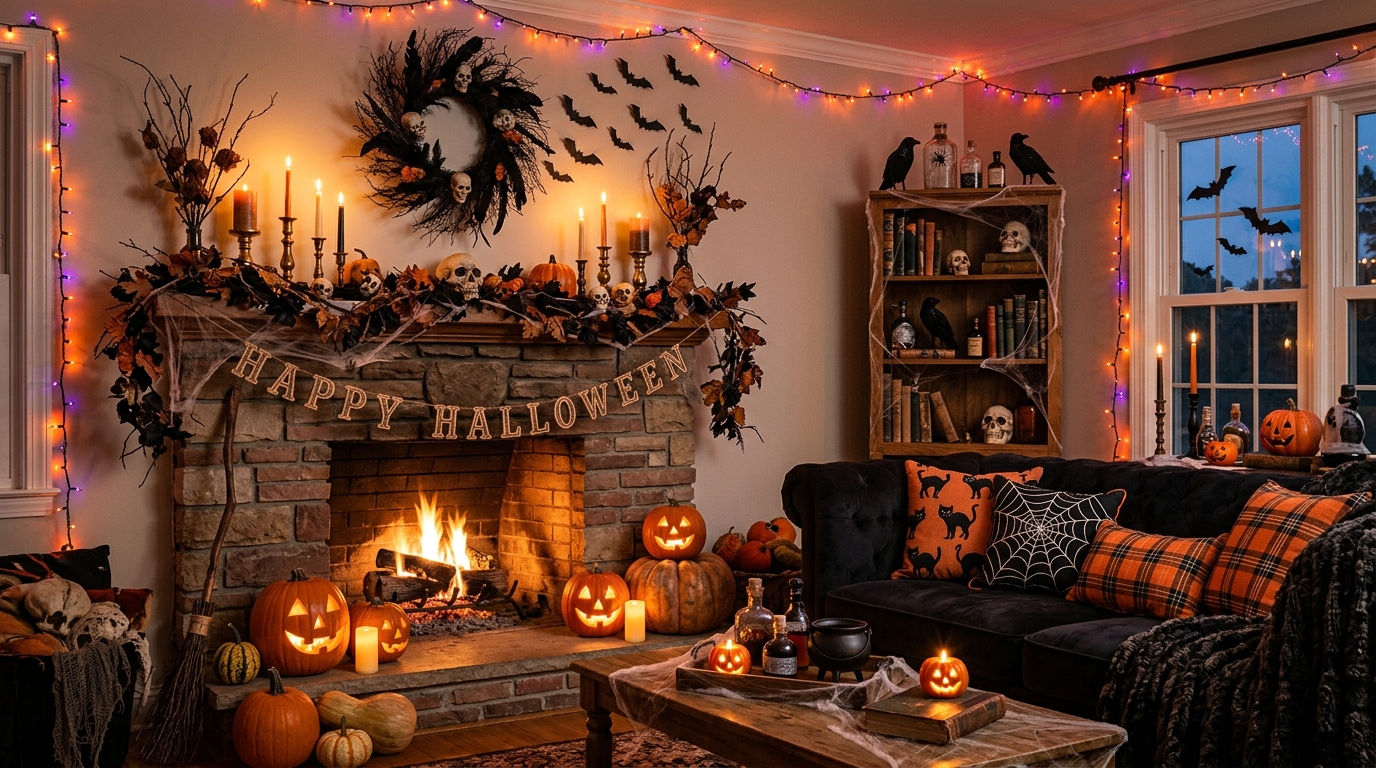
15 Indoor Halloween Decoration Ideas That Actually Create Atmosphere (2026)
I like Halloween decorations that make a room feel different without filling every corner with plastic pumpkins and spooky signs. A few floating witch hats, a collection of potion bottles, or soft amber lighting can give an ordinary living room a Halloween makeover without requiring a complete room redesign.
When I plan indoor Halloween decor, I consider the room’s size, existing furniture, budget, and the atmosphere I want to create. A gothic dining table calls for different decorations than a playful family living room, and a small apartment may need only a decorated window and a few glowing accents.
These 15 indoor Halloween decoration ideas cover everything from floating witch hats and homemade potion bottles to ghost luminaries, haunted bookshelves, glowing pumpkins, and gothic dining table settings. Each idea includes practical styling guidance, approximate costs, setup times, and DIY options where suitable.
Save this for later
Table of Contents
Many projects use affordable materials such as recycled glass bottles, paper, cheesecloth, old frames, and battery-operated lights. I can adapt the ideas to different budgets and decorating styles, whether I want a subtle seasonal display, a family-friendly Halloween setup, or a darker look for an evening party.
Key Takeaways
- Choose a few focal points: A decorated mantel, window, or dining table can establish the theme without covering every surface.
- Use lighting and texture: Amber lights, dark fabrics, glass, faux moss, and dried-looking foliage help create visual depth.
- Check the complete cost: Materials, batteries, hanging hardware, printing, and finishing supplies can increase the initial estimate.
- Adapt ideas to the room: Small displays work well in apartments, while larger spaces may accommodate ceiling decorations and elaborate table settings.
- Keep decorations secure: Check hanging attachments, protect glass items, and keep stairs, exits, and walkways clear.
- Plan for reuse: Frames, jars, trays, faux pumpkins, and LED lights can be stored and brought out again next Halloween.
Related article: 29 Halloween Backdrop Ideas for Parties & Photos (DIY Tips Included)
What Makes Indoor Halloween Decorations Feel Atmospheric?
I start by choosing the mood I want rather than buying decorations at random. A vintage haunted-house theme might use old-looking portraits, glass bottles, and dark florals, while a family-friendly display might feature smiling ghosts, friendly black cats, and glowing pumpkins.
Lighting helps establish that mood, but it should still allow people to move around comfortably. I might use amber lights for a warm, old-fashioned appearance or purple accent lighting for a more theatrical effect. Battery-operated candles can add a soft glow to shelves and table displays without introducing an open flame.
Texture is another useful element. Cheesecloth, velvet, glass, paper silhouettes, faux moss, and artificial foliage create variety even when I stick to a limited color palette. Black, deep orange, burgundy, ivory, and antique gold are options, but I don’t need to use all of them together.
I also consider how each decoration fits into the room. A large centerpiece needs enough table space, a hanging display needs suitable ceiling clearance, and a window decoration should not interfere with the window’s normal use.
Pro Tip: Before buying supplies, walk through the room and choose two or three areas to decorate. Take a quick photo of each area so I can plan the size, placement, and colors before spending money.
15 Indoor Halloween Decoration Ideas
The ideas below range from quick decorating projects to more detailed DIY displays. Prices are approximate US-dollar estimates, and actual costs depend on local prices, product quality, and the materials already available at home.
1. Floating Witch Hat Ceiling Display
Best for: Living rooms, entryways, and open-plan spaces
Cost: Approximately $20–$35
Time: About 45 minutes, plus any additional time needed for installation
Difficulty: Easy
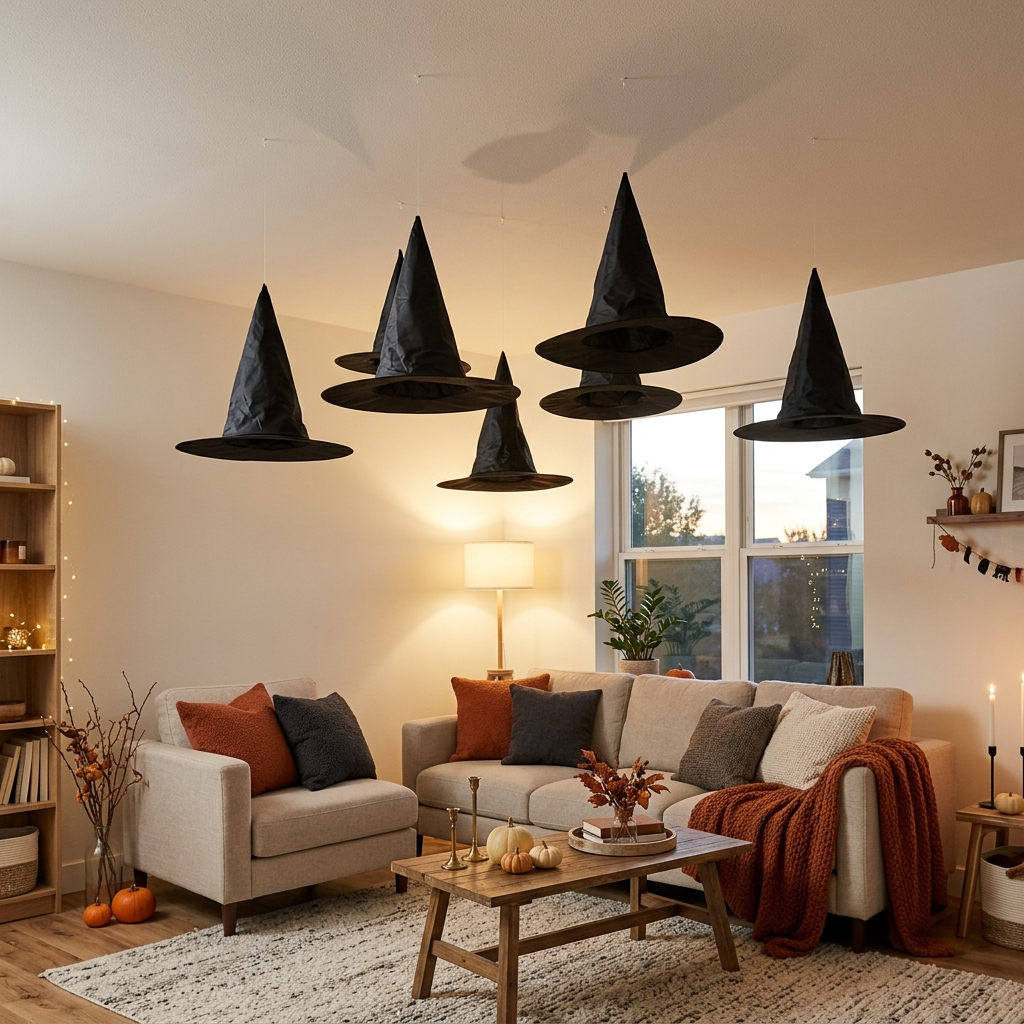
A floating witch hat display adds interest above the furniture instead of taking up space on tables or shelves. Several hats suspended at different heights can create the appearance of a group drifting through the room.
For a display with five to seven hats, I need:
- Five to seven witch hats in mixed sizes: approximately $12–$20
- Clear fishing line: approximately $3–$5
- Suitable removable ceiling hooks: approximately $5–$8
- Optional battery-operated fairy lights: approximately $6–$10
These estimates may exceed the lower end of the budget if I buy every item new, so I check what I already have before shopping.
I attach the line securely to each hat and arrange the lengths so some hats hang higher than others. Before installing the display, I check the ceiling surface and the attachment manufacturer’s instructions. I keep the hats away from ceiling fans, sprinklers, smoke alarms, lights, and exits, and never suspend them where they could fall onto people.
Pro Tip: I arrange the hats in a loose cluster rather than a perfectly even grid. If ceiling installation is unsuitable, I can suspend lightweight hats from a freestanding frame instead.
2. Apothecary / Potion Vignette
Best for: Console tables, kitchen counters, and sideboards
Cost: Approximately $5–$10 DIY with reused supplies, or $20–$40 for a purchased display
Time: About 1 hour
Difficulty: Easy to medium
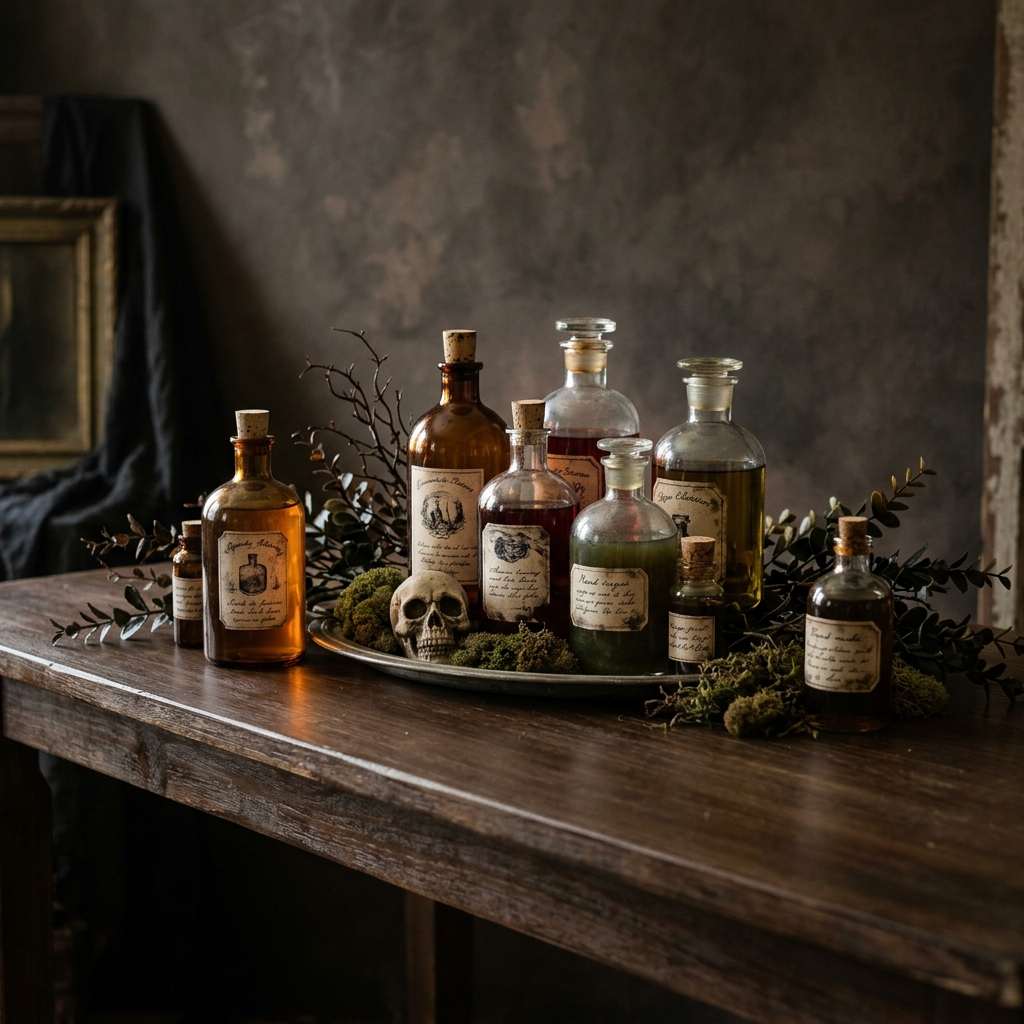
A potion vignette turns ordinary glass bottles into a decorative display inspired by an old-fashioned apothecary. Different bottle shapes, handwritten-looking labels, and colored water give the arrangement character without requiring expensive accessories.
For a DIY version, I gather:
- Six to nine clean, empty glass bottles
- Food coloring and water
- Printed or handwritten labels
- A tray or shallow serving platter
- Optional decorative skull, faux moss, or artificial foliage
- Battery-operated accent lights, if desired
Reusing bottles and a tray keeps the cost low. If I need to buy decorative bottles or additional accessories, the total will be higher.
I fill the bottles with colored water, close them securely, and attach labels with names such as “Essence of Midnight” or “Dragon’s Blood.” Then I group them on the tray, mixing tall and short bottles rather than arranging them in a straight line.
I keep the bottles out of children’s reach and label them clearly as decorations so nobody mistakes them for drinks. If the display is near a kitchen sink, I place it away from splashes and food preparation.
Pro Tip: I choose bottles with different necks, shapes, and glass colors. The variety helps create an old collection rather than a set of identical containers.
3. Creepy Victorian Portrait Gallery
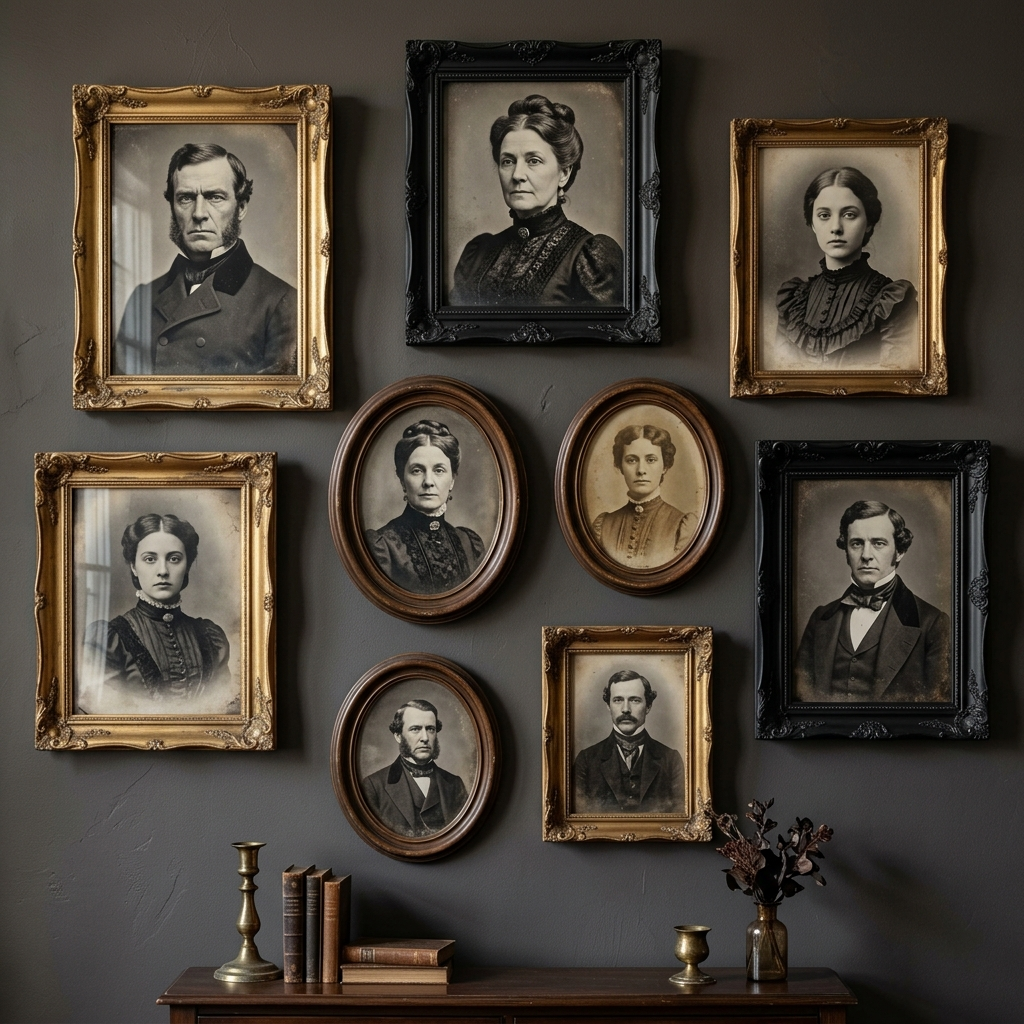
Best for: Hallways, dining room walls, and staircases
Cost: Approximately $15–$25 DIY or $25–$55 for purchased decorations
Time: About 2 hours, plus printing and hanging time
Difficulty: Medium
Vintage-style portraits can give a hallway or dining room the look of a haunted old house. I use black-and-white portraits in dark frames, choosing images with a historical appearance to suit the theme.
For a budget version, I need:
- Six to ten suitable portrait images
- Printing supplies or an inexpensive print service
- Reused or budget picture frames
- Optional photo-editing software for subtle effects
- Appropriate picture-hanging hardware
The lower DIY estimate assumes that I reuse some frames and have access to inexpensive printing. Buying all the frames new can increase the total.
I arrange the frames on the floor first, testing different combinations before hanging them. A mix of sizes and a slightly irregular arrangement can create a collected look. If I want glowing eyes, I edit copies of the images rather than altering the originals.
For a rented home, I choose a hanging method suitable for the wall surface and frame weight. I also check the image licensing terms before printing portraits from online archives.
Pro Tip: I keep the strongest images near the center of the arrangement and leave some space around the edges. This gives the gallery a clear visual focus without making the wall feel overcrowded.
4. Cheesecloth Ghost Luminaries
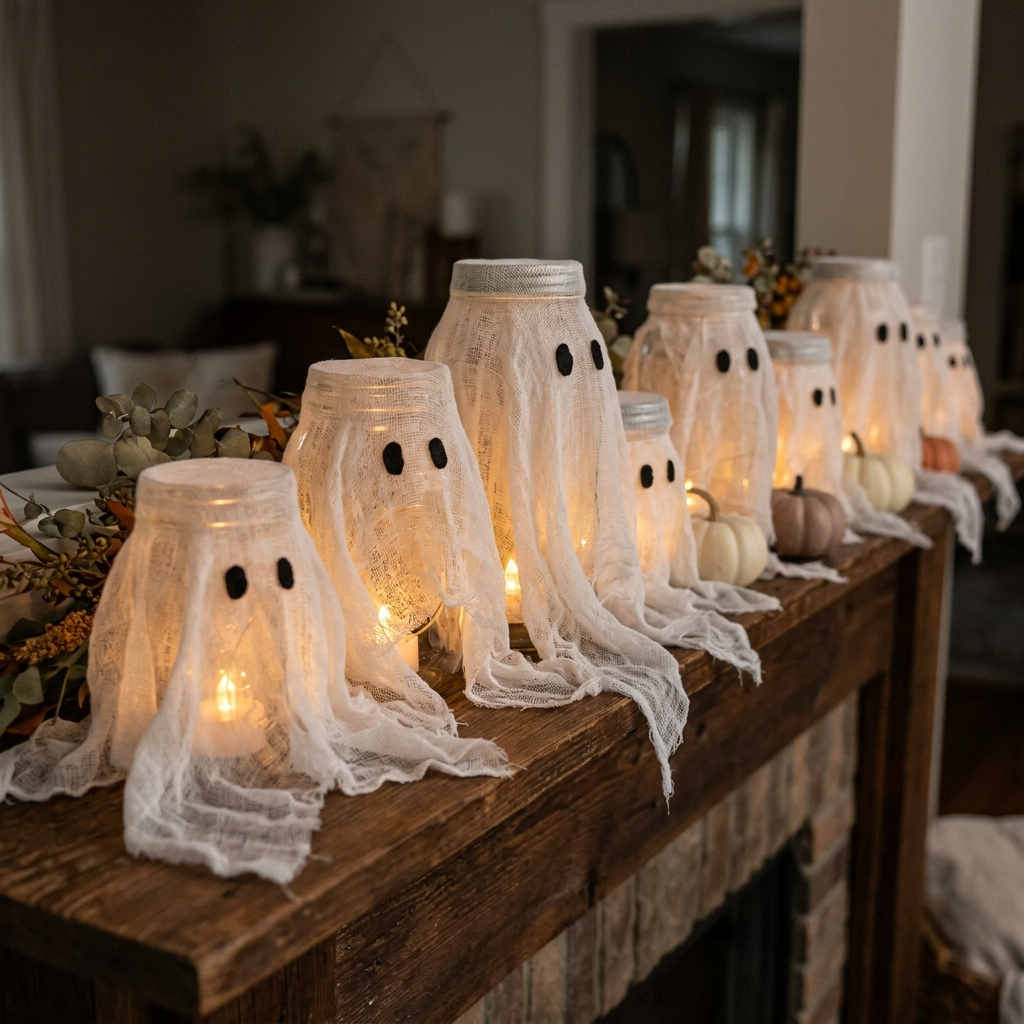
Best for: Mantels, windowsills, side tables, and shelves
Cost: Approximately $5–$10 DIY with reused jars, or $15–$25 for purchased versions
Time: About 1 hour
Difficulty: Easy
Cheesecloth ghost luminaries combine a simple ghost shape with a soft glow. I use clean glass jars, loosely draped cheesecloth, and small battery-operated tea lights to make a group of glowing figures.
For eight to ten ghosts, I gather:
- Reused glass jars
- Cheesecloth
- String or another suitable way to secure the fabric
- Small black paper circles or a suitable marker for the eyes
- Eight to ten battery-operated tea lights
The DIY estimate assumes I already have the jars and that the tea lights and fabric can be purchased within the stated budget. Buying every component new may cost more.
I drape the cheesecloth over each jar, adjust the folds, and add two eyes. I place a battery tea light inside each jar and check that the fabric stays clear of the light and battery compartment.
I never use real candles with cheesecloth. I also keep the finished luminaries away from hot bulbs and other heat sources.
Pro Tip: I vary the amount of fabric on each jar instead of making every ghost identical. A few uneven folds create a more interesting display, especially when several ghosts are grouped together.
5. Gothic Candelabra Centerpiece
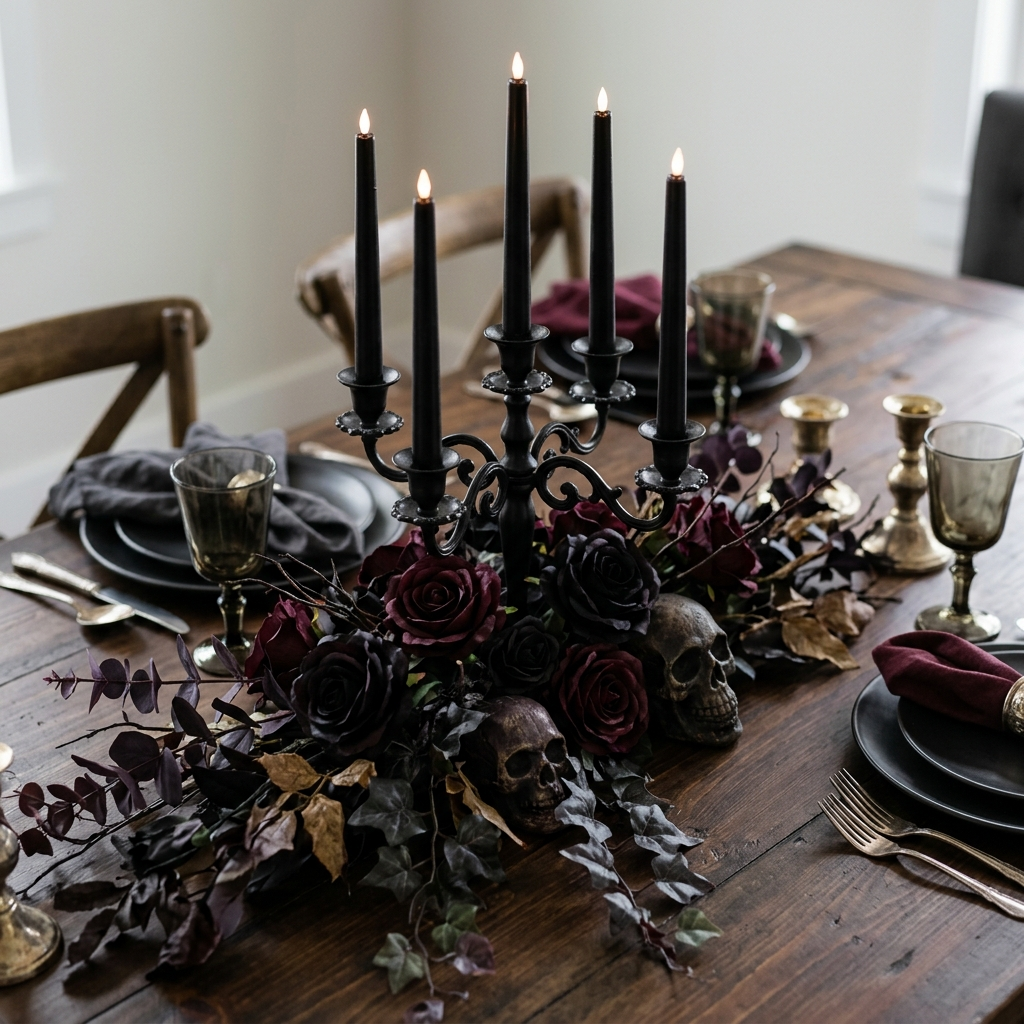
Best for: Dining tables, buffets, and mantels
Cost: Approximately $40–$65, depending on the centerpiece and accessories
Time: About 45 minutes
Difficulty: Medium
A gothic candelabra can serve as the main decoration for a Halloween dinner or a dark, dramatic mantel. I pair a black or antique-silver candelabra with deep-colored flowers and a few carefully chosen ornaments.
For a more complete arrangement, I may need:
- Candelabra: approximately $15–$25
- Decorative drip-effect candles: approximately $8–$12
- Faux black or burgundy flowers: approximately $8–$12
- One or two decorative skulls: approximately $8–$12
- Optional dried-looking artificial foliage: approximately $5–$10
Buying every item can bring the total above $55, so I treat the price as a guide rather than a fixed package. I can save money by reusing a candlestick holder, skipping the skulls, or choosing fewer flowers.
I arrange the candelabra first, then position the flowers and ornaments around the base. For the lighting, I prefer battery-operated taper candles, especially when the centerpiece includes artificial flowers or fabric. Commercially made drip-effect candles provide an aged appearance without needing to heat or melt wax by hand.
If I use real candles, I place them in stable holders and keep them away from florals, fabric, pets, children, and anything that could catch fire. I never leave burning candles unattended.
Pro Tip: I choose one main centerpiece and keep smaller decorations low enough that guests can see one another across the table.
6. Cobweb Fireplace Mantel
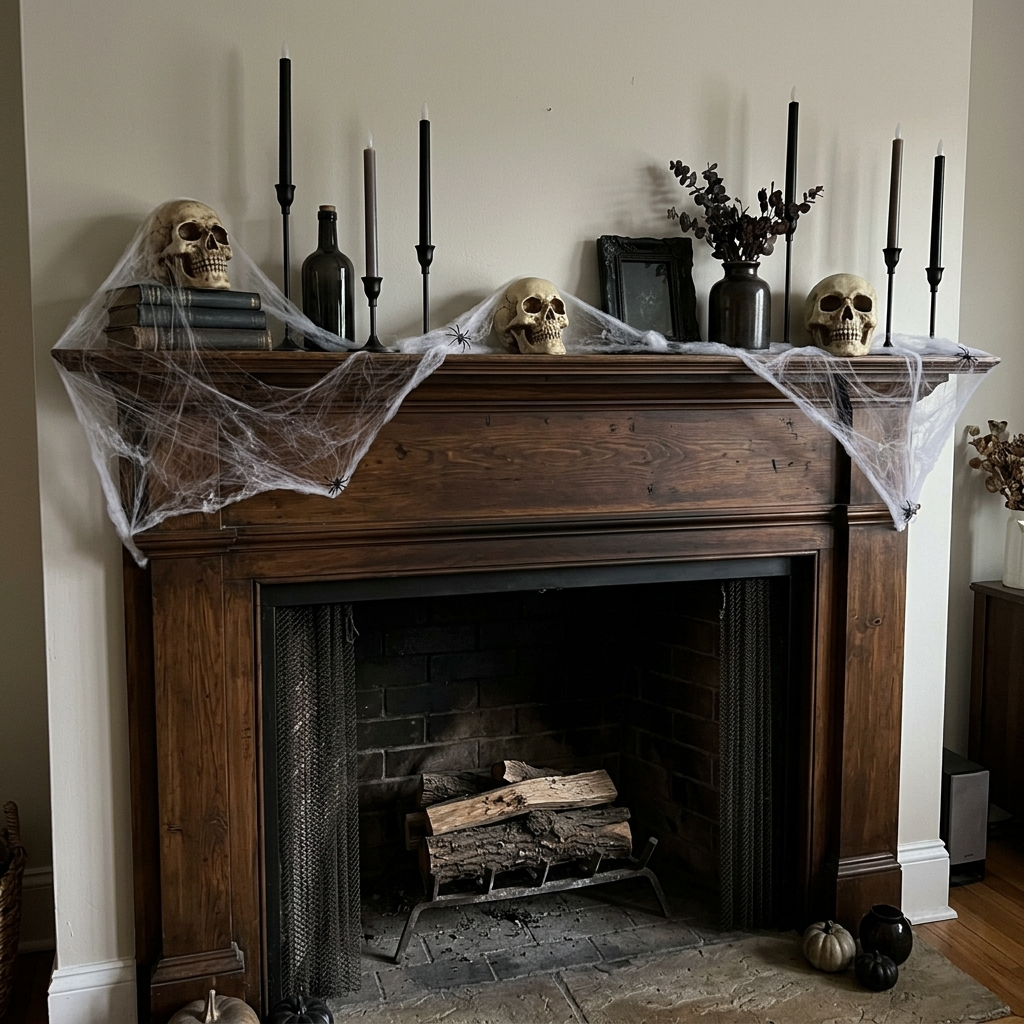
Best for: Living rooms with fireplaces or large shelving units
Cost: Approximately $15–$25
Time: About 20–30 minutes
Difficulty: Easy
A mantel provides a natural place for a Halloween display. I use stretchable faux cobweb material, a few decorative spiders, and dark accessories to create a haunted look without covering the entire surface.
For this project, I may need:
- Stretchable faux cobweb material: approximately $4–$6
- Eight to twelve plastic spiders: approximately $3–$5
- Decorative skull votives or similar ornaments: approximately $8–$15
- Optional black candlesticks or other small accessories
The final cost depends on the accessories I choose. If I already have suitable ornaments, the display can cost less.
I stretch the webbing loosely across selected sections of the mantel, placing some strands closer to the wall and others farther forward. Then I add a few spiders at different points to give the display depth.
Important: I never place artificial webs, fabric, paper, or other flammable decorations near an active fireplace or hot surfaces. Decorations must not obstruct the firebox, ventilation, safety equipment, or required clearances. If the fireplace is used regularly, I decorate a nearby shelf or wall instead.
Pro Tip: I leave part of the mantel visible so the original surface and the cobwebs contrast with one another. This also makes the display easier to remove after Halloween.
7. Haunted Bookshelf Styling
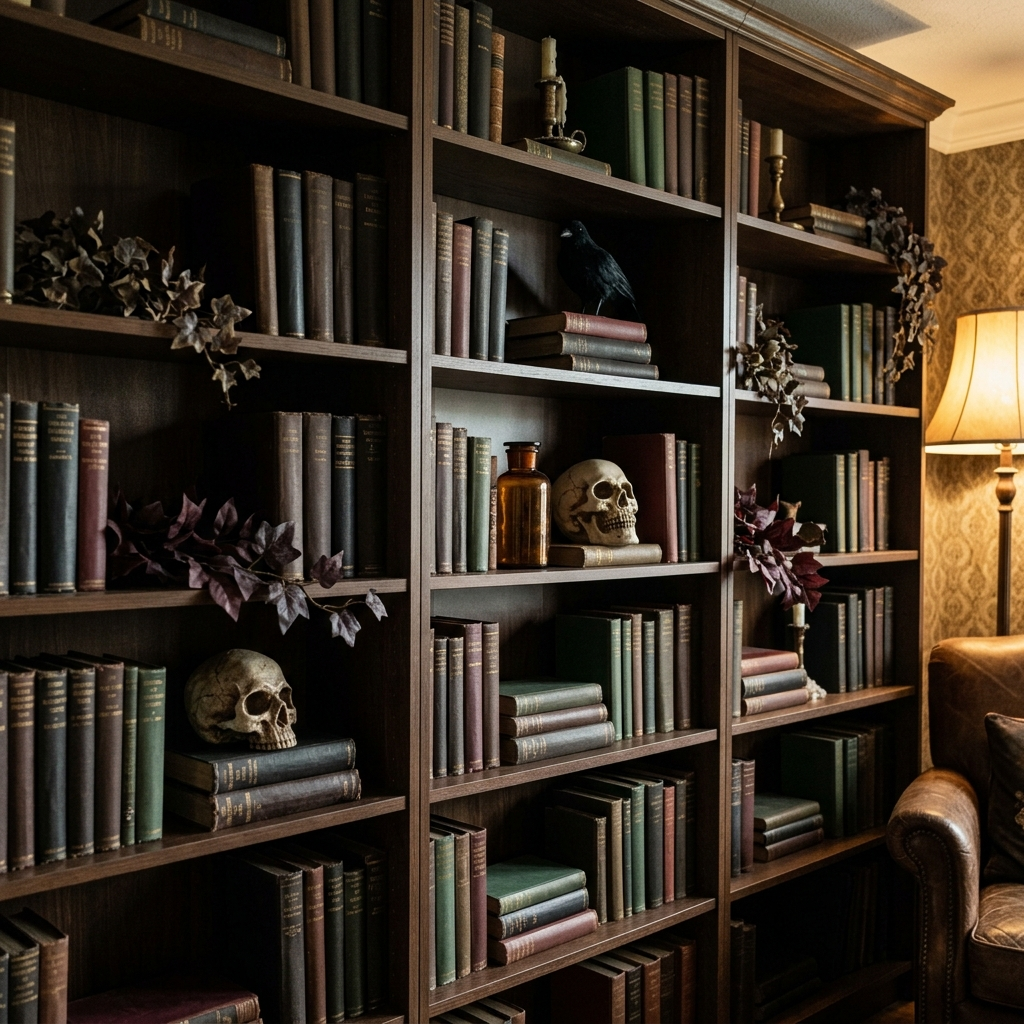
Best for: Living rooms, offices, and dens
Cost: Approximately $10–$20 DIY with reused books and accessories, or $25–$45 for purchased decorations
Time: About 30 minutes
Difficulty: Easy
I can give an ordinary bookshelf a Halloween makeover without replacing the books or emptying every shelf. A few dark accessories tucked between familiar objects can create a haunted-library look.
I gather two or three decorative skulls, faux ravens, an old-looking bottle, artificial foliage, and optional paper covers for a few books. I arrange the accessories among the books, leaving some sections untouched so the original collection remains visible.
I use lightweight ornaments on higher shelves and keep heavier pieces lower down. If I add paper covers, I attach them in a way that won’t damage the book covers when removed.
The cost stays low when I reuse existing books, jars, and decorative objects. Buying resin ornaments or multiple accessories can increase the budget.
Pro Tip: I choose one or two larger pieces and use smaller accessories around them. This creates a clear arrangement without requiring every shelf to have the same decorations.
8. Black Cat Window Silhouettes
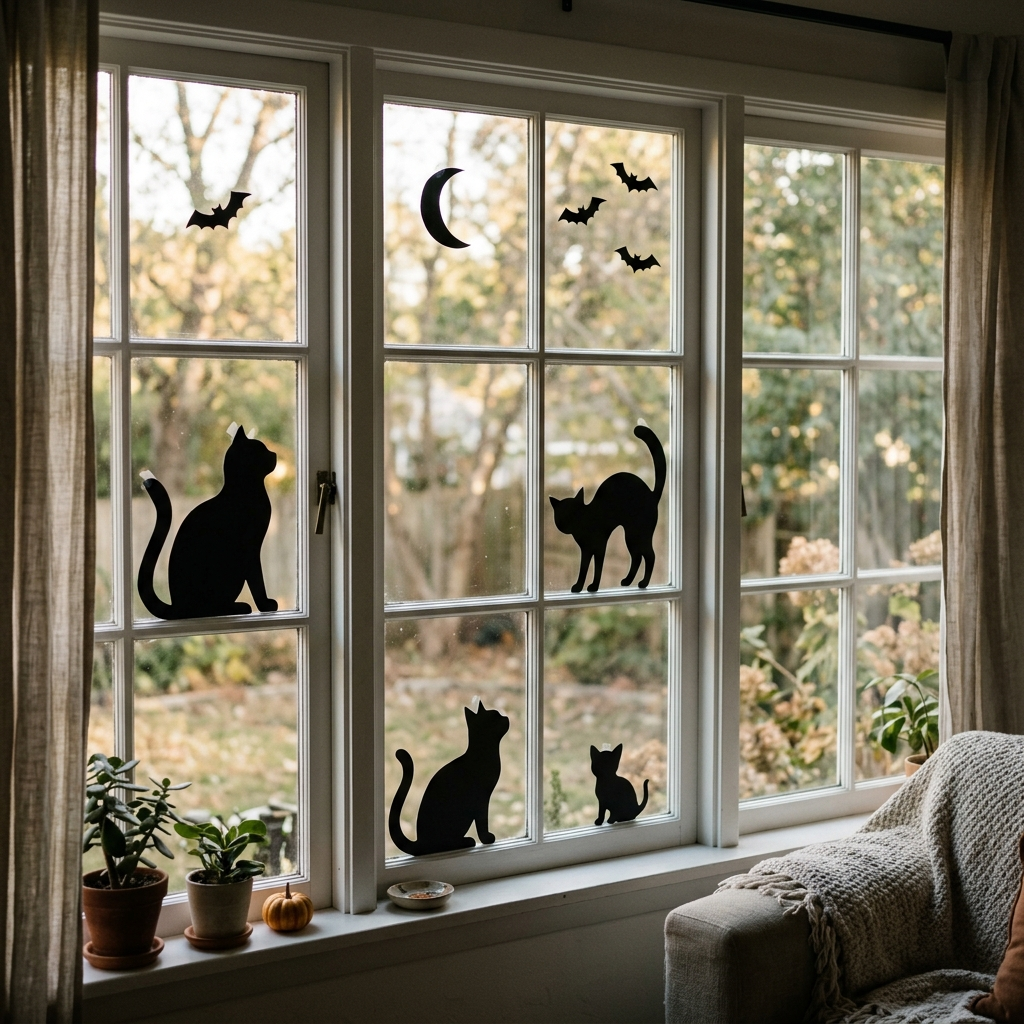
Best for: Windows, French doors, and glass-panel doors
Cost: Approximately $5–$15 DIY
Time: About 20–30 minutes
Difficulty: Easy
Black cat silhouettes are a useful option when I want Halloween decorations without taking up table or floor space. I cut cat shapes from black cardstock or removable window-safe material and arrange them on the inside of a clean window.
I can add a few bats, a crescent moon, or a small haunted-house silhouette to create a complete scene. Different sizes and positions help the display look more natural.
I test any adhesive on a small area first and check that it is suitable for the glass. I also avoid blocking important views or interfering with the window’s normal operation.
If I add string lights, I use products intended for the location and follow the manufacturer’s instructions. Electrical connections must be kept away from moisture, and I don’t place paper decorations against hot bulbs.
Pro Tip: I position a few cats as though they are looking toward the moon or watching a group of bats. This gives the scene a simple visual story without needing many additional decorations.
9. Graveyard Staircase Runner
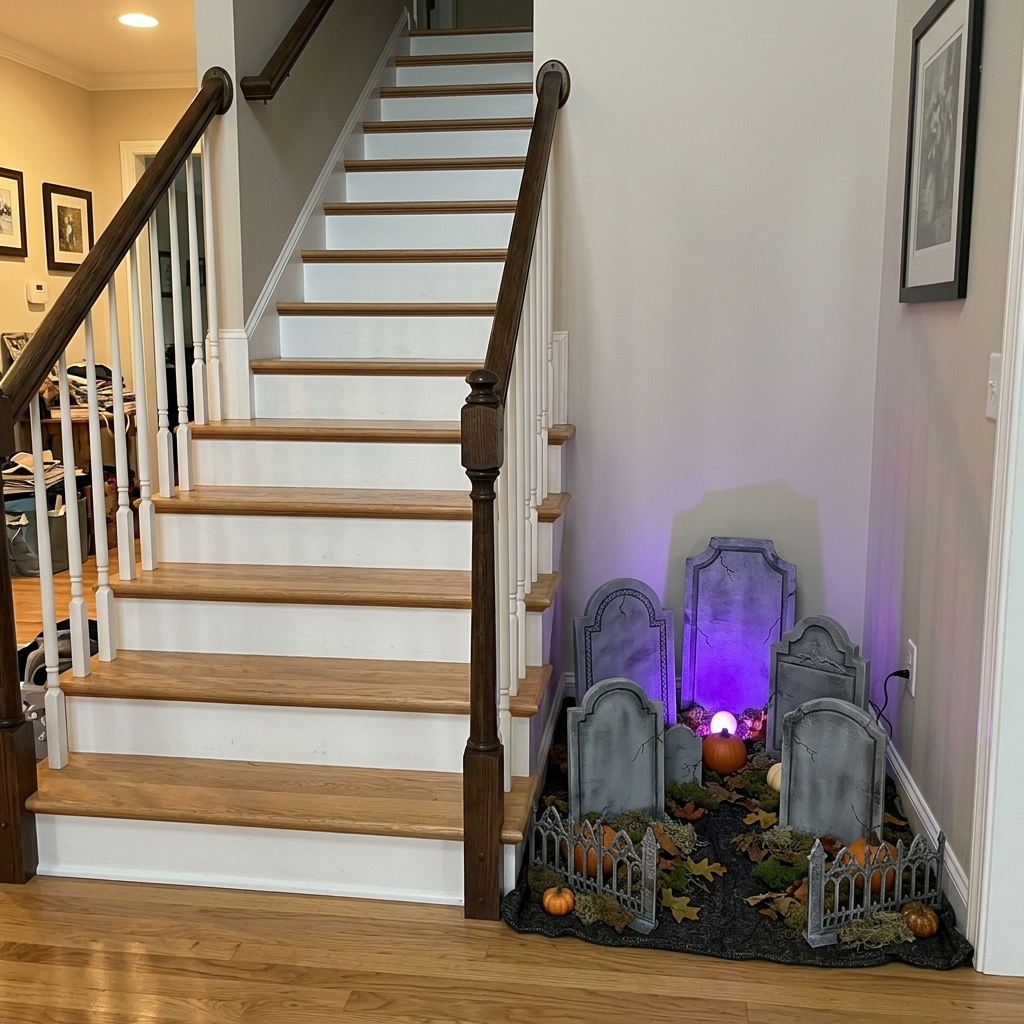
Best for: Homes with staircases
Cost: Approximately $30–$45 for a DIY wall-side display, depending on lighting
Time: About 1 hour, plus paint-drying and installation time
Difficulty: Medium
A staircase can become part of the Halloween theme without placing decorations where people walk. I create a small graveyard scene along the wall or beside a staircase landing using lightweight tombstone shapes and colored accent lighting.
For a DIY version, I may need:
- Foam board: approximately $8–$12
- Gray paint: approximately $5
- Black acrylic paint for lettering: approximately $2–$3
- Battery-operated accent lights: approximately $12–$18
- Optional faux cobweb material: approximately $4–$6
The basic materials total around $27–$44, depending on the quantities and products chosen. The cost may be higher if I need extra supplies or mounting hardware.
I cut the foam board into tombstone shapes, paint them gray, and add simple lettering after the paint dries. I then attach the lightweight pieces securely along a suitable wall or place them on a stable landing where they cannot fall into the walking path.
I keep all stair treads clear, leave the handrail accessible, and avoid loose fabric, cords, or decorations that could catch on clothing. Any lighting must be installed according to its instructions without creating a trip hazard.
Pro Tip: I position the tombstones at different heights along the wall and direct suitable accent lights upward. The shadows create a graveyard effect without placing objects under people’s feet.
Also read: 16 Scary Good Halloween Outdoor Decoration Ideas
10. Spider Web Chandelier Drape
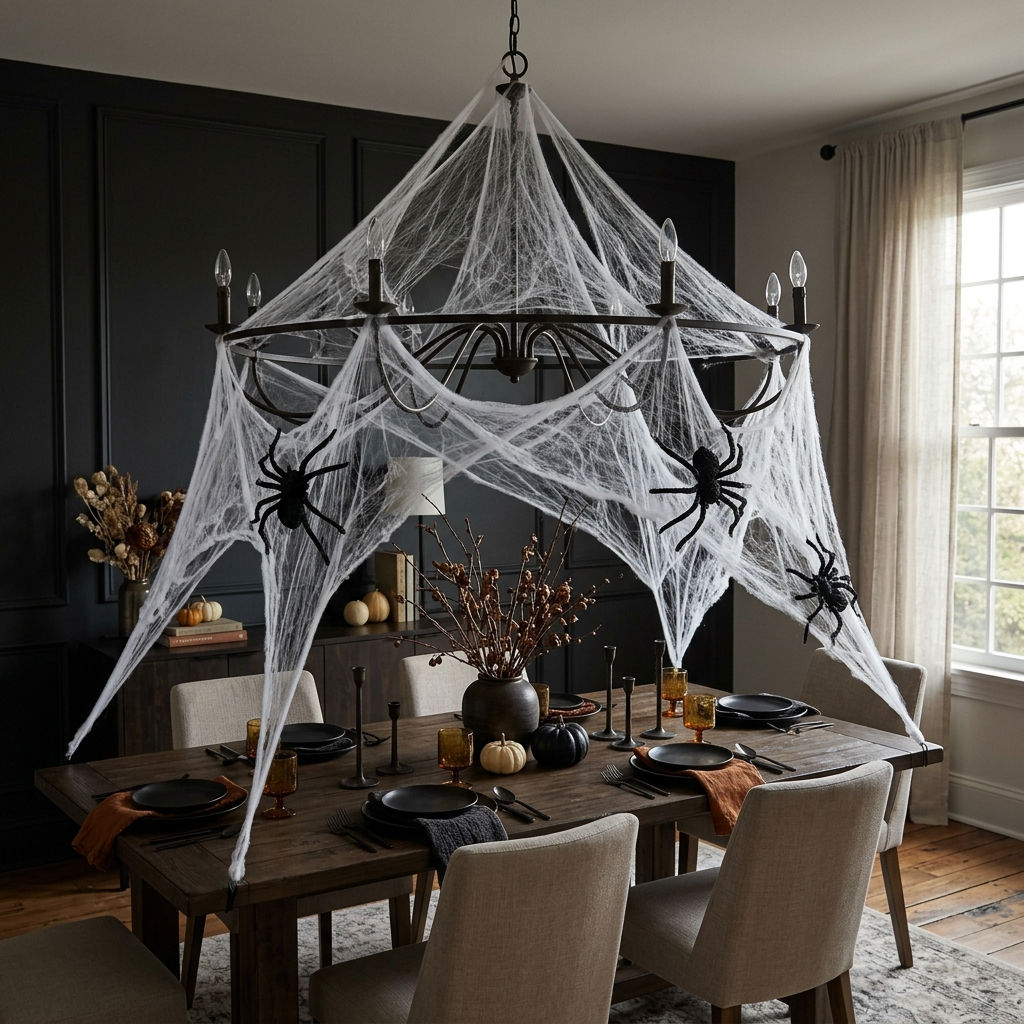
Best for: Dining rooms, foyers, and suitable overhead fixtures
Cost: Approximately $10–$20
Time: About 15–30 minutes, depending on the setup
Difficulty: Easy
A spiderweb display can draw attention to a dining area or entryway. I use lightweight faux webbing and a few oversized decorative spiders to create a web-inspired arrangement above the room.
Before attaching anything, I check the light fixture’s instructions and make sure it is switched off and cool. I never cover bulbs, ventilation openings, or other components that must remain clear. I also avoid placing flammable webbing near hot bulbs or other heat sources.
If the fixture’s design, heat output, or instructions make this setup unsuitable, I hang a web decoration on a nearby wall or doorway instead. That gives me a similar visual effect without interfering with the fixture’s operation.
Pro Tip: I use a small amount of webbing rather than wrapping the entire fixture. A few strands and two or three spiders can create a recognizable Halloween display without obscuring the light.
11. DIY Ghost Curtain Garland
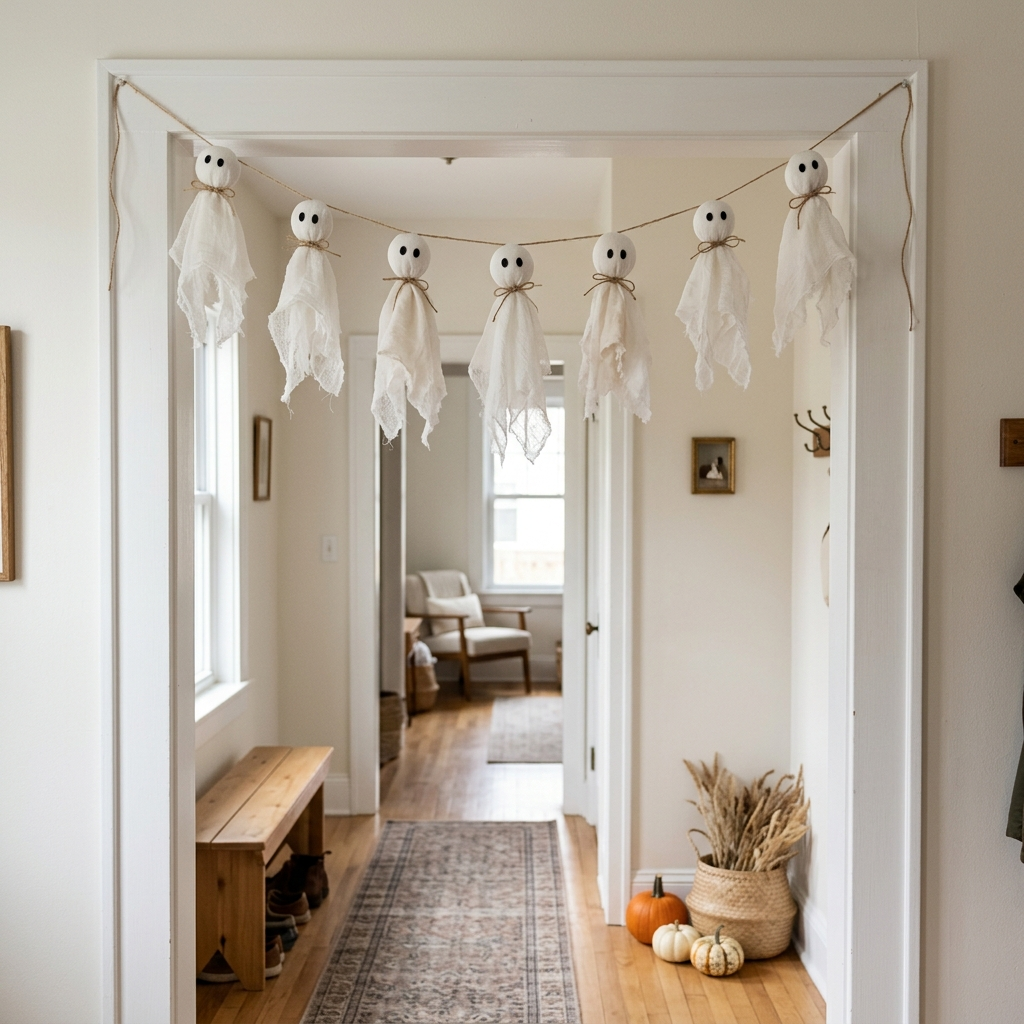
Best for: Doorways, archways, and windows
Cost: Approximately $6–$10 DIY with basic supplies, or $10–$20 for purchased decorations
Time: About 30–45 minutes
Difficulty: Easy
A ghost garland adds a playful touch to an entryway or window. I make small ghosts using cheesecloth or lightweight white fabric, soft stuffing for the heads, and string for hanging.
For each ghost, I place a small ball of stuffing in the center of a fabric square, gather the fabric underneath it, and secure it with string. I add simple eyes and attach the finished ghosts to a length of twine.
I vary the sizes and spacing so the garland looks less uniform. Before hanging it, I check the doorway height and make sure the ghosts won’t brush against people’s faces or block the passage.
In homes with young children or pets, I keep loose strings and small attachments out of reach. For a simpler alternative, I can cut ghost shapes from paper and attach them to a wall or window instead.
Pro Tip: I leave a little space between the ghosts so their shapes remain visible. A crowded garland can look like a strip of white fabric rather than a group of separate figures.
12. Bloody Mirror Vignette
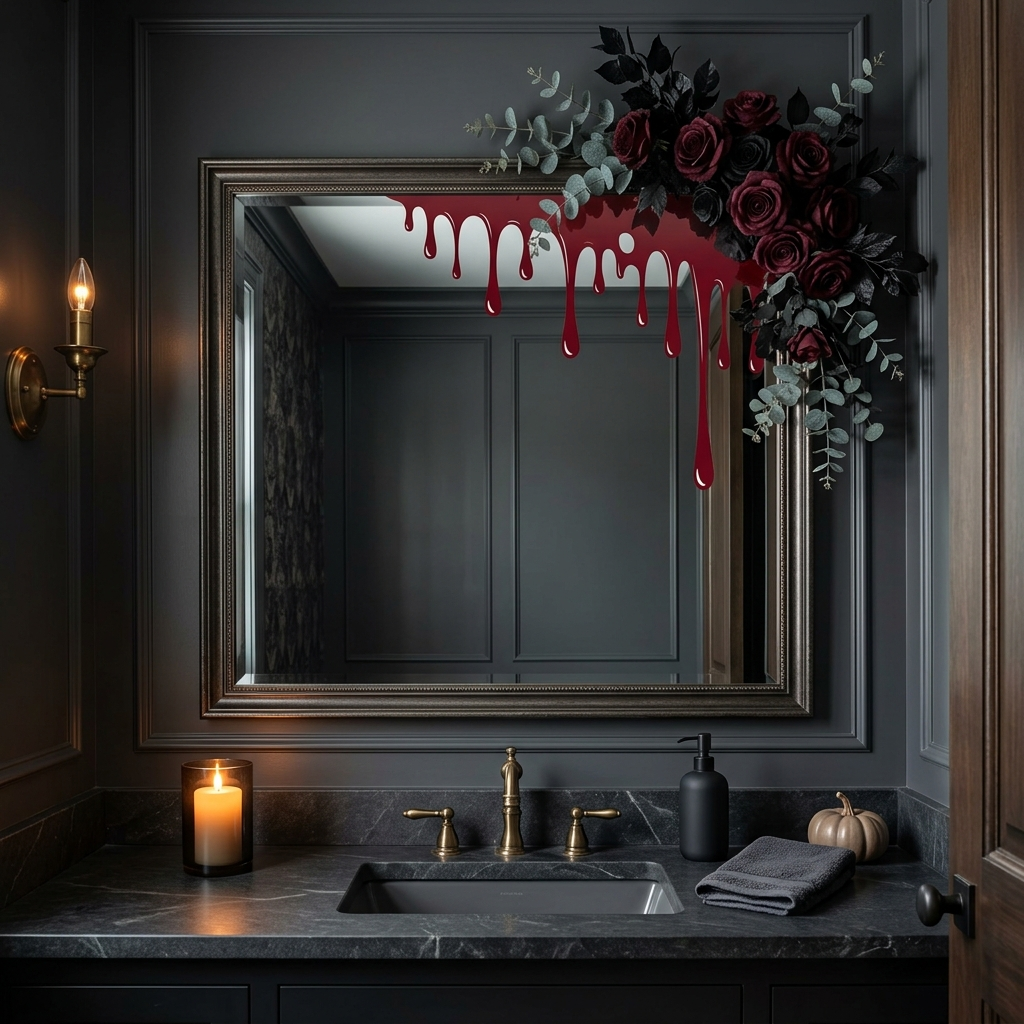
Best for: Bathrooms, powder rooms, and entryways
Cost: Approximately $15–$30
Time: About 45 minutes
Difficulty: Medium
A mirror with red drip details can add a dramatic Halloween accent to a small room. I combine removable blood-drip decals with dark faux flowers and a little low-level lighting to create a themed display.
I clean and dry the mirror before applying decals designed for glass. Then I position the flowers around the frame, keeping the reflective surface and surrounding counter usable.
For lighting, I use battery-operated candles on a stable surface rather than placing open flames near flowers or other decorations. I also keep the display away from water splashes and avoid covering essential bathroom fixtures.
The cost depends on whether I already own the mirror and whether I buy new florals or reuse decorations from previous seasons.
Pro Tip: I concentrate the red drips along one edge or corner of the mirror. This keeps the effect visible without covering too much of the glass.
13. Spooky Terrarium / Cloche Display
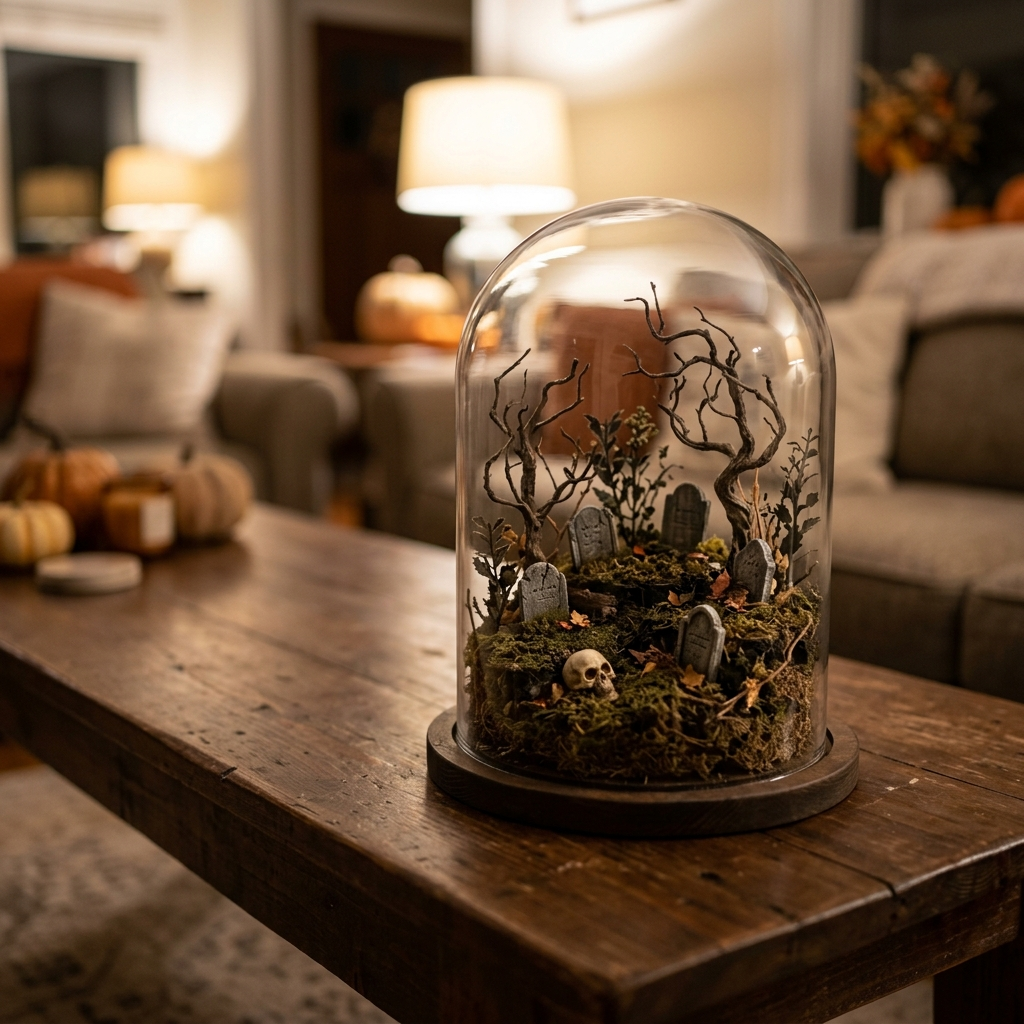
Best for: Coffee tables, nightstands, and bookshelves
Cost: Approximately $25–$50
Time: About 45 minutes
Difficulty: Medium
A glass cloche can turn a miniature Halloween scene into a decorative centerpiece. I create a small graveyard using faux moss, miniature tombstones, a decorative skull, and dark artificial foliage.
For the display, I need:
- A glass cloche or dome: approximately $15–$25
- Faux moss or suitable decorative ground cover
- A miniature skull: approximately $5–$8
- Miniature tombstones and artificial foliage
- An optional battery-operated mini pumpkin or suitable LED light
The estimate depends on how many accessories I purchase. Reusing small decorations can reduce the total.
I place the ground cover first, position the tombstones and skull, and fill the gaps with foliage. I then lower the cloche carefully over the arrangement and check that it rests securely on a stable base.
I keep the glass away from table edges and places where children or pets might knock it over. If I include a light, I follow the manufacturer’s instructions and make sure it is suitable for use inside the display.
Pro Tip: I use dark moss and a few small branches to create depth rather than filling every gap with decorations. The open spaces help the miniature scene remain easy to see through the glass.
14. Jack-o’-Lantern Battery Light Cluster
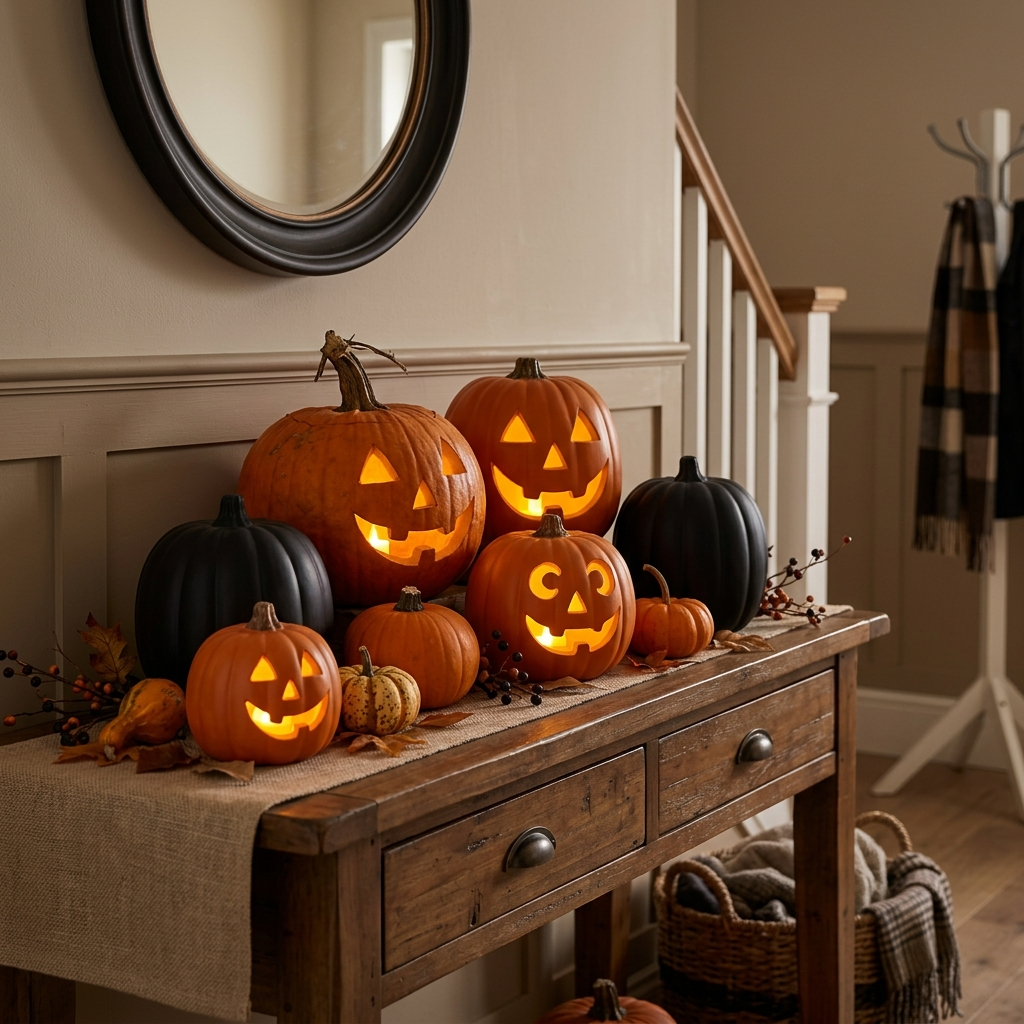
Best for: Entryways, mantels, and other stable display surfaces
Cost: Approximately $30–$65 for a mixed pumpkin display with battery lights
Time: About 20–30 minutes
Difficulty: Easy
A cluster of glowing pumpkins is a straightforward way to decorate a home for Halloween. I combine real pumpkins with reusable faux versions so I can vary the sizes and avoid buying every pumpkin new each year.
For a display of six to ten pumpkins, I might use:
- Three to five real pumpkins: approximately $6–$20 total
- Three to five faux carved pumpkins: approximately $15–$35 total
- Battery-operated tea lights or suitable pumpkin lights: approximately $5–$12, depending on quantity
These estimates put a mixed display at roughly $26–$67 before any extra risers or accessories. I check the battery-light quantity and the number of pumpkins before shopping so the budget matches the display size.
I arrange the larger pumpkins at the back and smaller ones in front. If I need extra height, I use stable risers hidden behind the display and make sure nothing can slide or tip over.
For real pumpkins, I inspect the surface regularly and remove any that become soft or moldy. I use battery-operated lights rather than open flames, especially when the pumpkins sit near fabric, paper, or other decorations.
Pro Tip: I vary the height of the pumpkins rather than placing them in one flat row. Even a small arrangement looks more interesting when the shapes overlap slightly without blocking one another.
15. Vampire Dining Table Setting
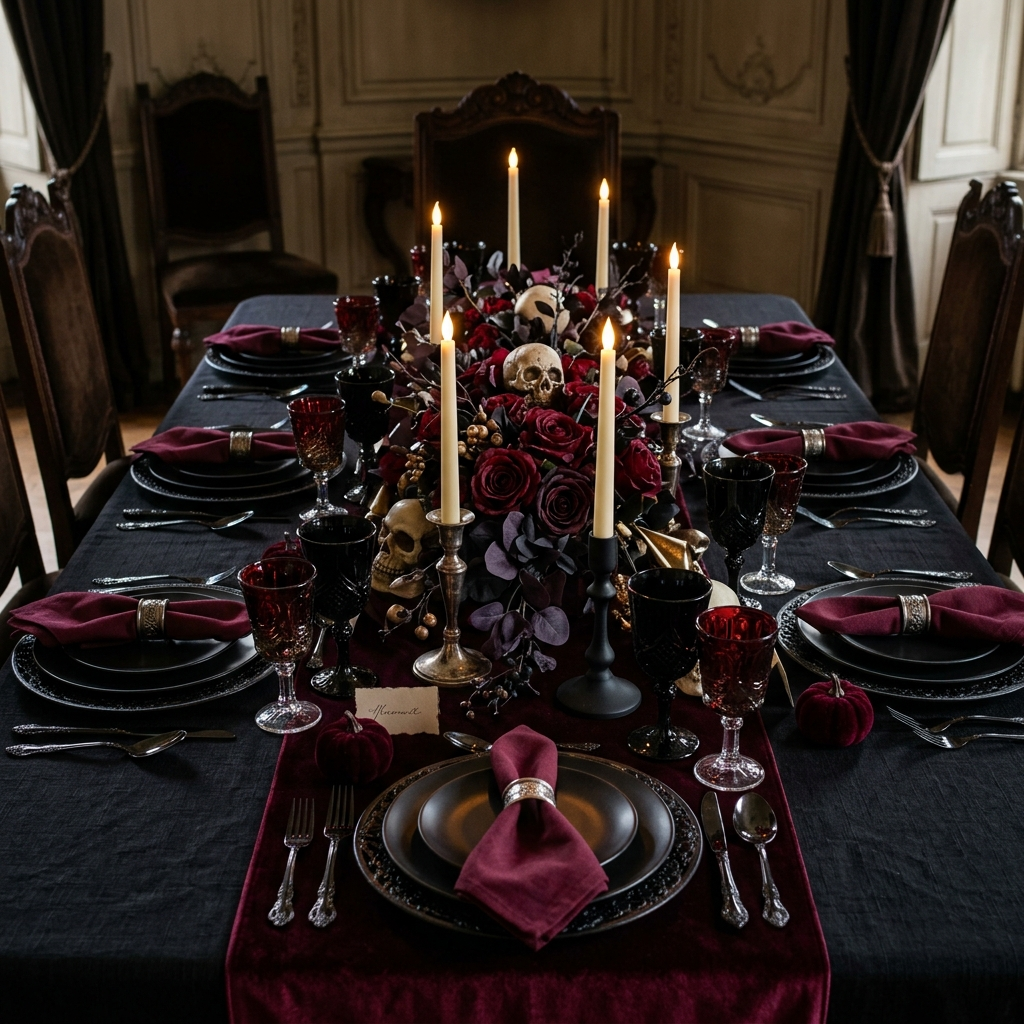
Best for: Halloween dinner parties with 6–12 guests
Cost: Approximately $40–$80 for a simple coordinated setting, depending on what I already own
Time: About 1 hour
Difficulty: Medium
A vampire-inspired table setting works well for a Halloween dinner when I want the food and table arrangement to feel connected to the theme. I use a black or deep-red tablecloth, dark plates, decorative goblets, and a centerpiece of dark flowers.
The materials might include:
- Black or burgundy tablecloth: approximately $12–$20
- Black charger plates: approximately $15–$25
- Decorative skull place-card holders: approximately $8–$12
- Dark artificial flowers: approximately $8–$15
- Decorative taper candles or battery-operated alternatives: additional cost depending on the set
Buying every item new may put the total above $80. To keep the budget manageable, I reuse dinnerware, choose a simple tablecloth, and use only a few themed accessories.
I arrange the centerpiece so guests can see each other across the table. Place cards, napkins, and small ornaments can reinforce the theme without taking up too much space.
Battery-operated taper candles are a practical choice around artificial flowers and fabric. If I use real candles, I keep them in stable holders away from napkins, sleeves, florals, and other flammable materials, and never leave them burning unattended.
Pro Tip: I set the table before the party and check each place from a seated position. This helps me spot decorations that block views or leave too little room for plates and serving dishes.
What’s Overrated in Indoor Halloween Décor?
I don’t think inexpensive or colorful decorations are automatically a poor choice. The key is choosing pieces that work with the space and the look I want to create.
- Buying too many similar plastic skulls: A dozen identical skulls can make a display look repetitive. I might choose one detailed piece as the main decoration and use smaller items only where they add something different.
- Covering every surface with cobwebs: Faux webs can be effective on a mantel or doorway, but using them everywhere may make individual displays harder to notice. I choose locations where the material can be attached safely and removed easily.
- Using a complete matching set without editing it: Matching banners, tablecloths, napkins, and garlands can suit a playful party theme. If I want a more collected appearance, I mix a few pieces with plain household items.
- Oversized indoor inflatables: These can work in a large room with plenty of floor space, but they may obstruct smaller living areas. I check the available space and walking paths before bringing one indoors.
- Adding decorations without considering lighting: A display can look different under bright white lights than it does in the evening. I check the arrangement in the lighting conditions in which it will be used.
- Spending more than necessary on one-time decorations: I consider whether an item can be reused, stored easily, or adapted for another season before paying extra for it.
I don’t follow a fixed rule about how many surfaces can be decorated. A large living room can accommodate more seasonal displays than a small apartment, and a colorful family party may call for a different look from an intimate gothic dinner.
Budget vs. Splurge: Indoor Halloween Decorations Compared
I decide where to spend money based on the size of the display, how often I’ll reuse it, and whether I already own suitable supplies. A reusable candelabra or a set of quality faux pumpkins may be worth buying, while paper silhouettes and simple potion labels are easy to make at home.
The following prices are approximate examples in US dollars. They are intended to help with planning rather than represent verified current retail prices.
| Element | Budget Option | Approximate Budget Cost | Higher-Cost Option | Approximate Higher Cost | Is It Worth Spending More? |
|---|---|---|---|---|---|
| Room focal point | DIY potion vignette using reused bottles | $5–$15 | Decorative gothic candelabra with accessories | $40–$65 or more | Potentially, if reused for several seasons |
| Lighting | Battery-operated tea lights | $3–$8 for a small set | Smart colored bulbs | $40–$60 for a compatible setup | Useful if I will reuse them and the fixtures support them |
| Skull decorations | Basic plastic skull | $1–$2 each | Resin decorative skull | $8–$12 each | One detailed ornament may be enough |
| Table setting | Reused dinnerware and inexpensive cloth | $15–$25 if new items are needed | Coordinated gothic charger set | $50–$80 or more | Most useful for frequent hosts |
| Wall décor | DIY portrait gallery with reused frames | $15–$25 | Framed vintage-style art prints | $40–$100 | DIY can work well if the prints and frames suit the room |
| Pumpkins | Real grocery-store pumpkins | $2–$4 each, depending on size and location | Detailed faux carved pumpkins | $12–$25 each | A mixture can balance initial cost and reuse |
I also account for supplies that are easy to overlook, including batteries, hanging hardware, adhesives, printing, paint, and tools. These smaller purchases can make a noticeable difference when I am decorating several rooms.
Safety Tips for Indoor Halloween Decorations
Before I finish decorating, I walk through the room as if I were a guest. This helps me spot anything that could fall, block a walkway, or interfere with everyday use.
- Secure overhead decorations: Use hooks and attachments suited to the ceiling surface and the weight of the decorations. Keep hanging items away from fans, sprinklers, smoke alarms, lights, and exits.
- Keep stairs and walkways clear: Don’t place tombstones, pumpkins, cords, or other decorations on stair treads or where people need to walk. Keep handrails accessible.
- Use battery-operated lights around fabric: Cheesecloth, artificial cobwebs, paper, and dried botanicals can catch fire. Keep them away from open flames and hot bulbs.
- Place candles carefully: If using real candles, keep them in stable holders, away from children, pets, sleeves, curtains, and flammable decorations. Never leave burning candles unattended.
- Check electrical products: Follow the manufacturer’s instructions for bulbs, string lights, and other electrical decorations. Keep connections away from moisture and avoid overloading outlets.
- Protect glass and small items: Place glass bottles and cloches on stable surfaces away from edges. Keep small decorations, detachable eyes, batteries, and loose parts out of reach of young children and pets.
- Use suitable adhesives: Check the product’s weight rating and surface compatibility before hanging anything. Test removable adhesives first and allow paint or adhesives to dry as directed.
- Maintain usable lighting: A dark atmosphere should not make stairs, doorways, or food-serving areas difficult to navigate. Use accent lighting while maintaining safe visibility.
Indoor Halloween Decoration FAQs
What Are Easy Indoor Halloween Decorations for Beginners?
I recommend starting with black cat window silhouettes, cheesecloth ghosts with battery-operated lights, a simple potion display, or a small pumpkin cluster. These projects use accessible materials and don’t require advanced crafting skills.
I check the materials before starting and set aside enough time to arrange the finished pieces. Reusing jars, frames, and household decorations can make the projects more affordable.
How Can I Make My House Look Haunted on a Budget?
I begin with one or two areas that are easy to decorate, such as a mantel, bookshelf, or windowsill. Reused glass bottles, homemade labels, paper silhouettes, and battery-operated lights can create a Halloween look without requiring a large collection of purchased accessories.
Before shopping, I make a list of what I already own and calculate the cost of any additional supplies. This helps me avoid buying duplicates or spending money on decorations that won’t fit the room.
What Indoor Halloween Decorations Are Safer for Young Children and Pets?
I choose lightweight decorations, battery-operated lights, and secure mounting methods. I keep small plastic spiders, detachable eyes, batteries, strings, and other swallowable pieces out of reach.
I also avoid open flames in accessible areas and keep stairs and doorways free from loose decorations. If a pet tends to chew fabric or paper, I place those materials somewhere the pet cannot reach.
When Should I Put Up Indoor Halloween Decorations?
I usually suggest planning decorations for early October if I want to enjoy them throughout the month. For a Halloween party, setting everything up several days beforehand gives me time to check the lighting, replace batteries, and fix any loose attachments.
Projects involving paint or adhesives may need extra drying time, so I follow the product instructions rather than relying only on the estimated decorating time.
What Lighting Creates the Best Indoor Halloween Atmosphere?
Amber lighting works well for a warm, vintage-inspired look, while purple accent lighting can create a more dramatic effect. Battery-operated tea lights are useful for lanterns, shelves, and pumpkin displays.
I check that the lighting is suitable for the fixture and placement, and I maintain enough brightness for people to move safely around the room. The best choice depends on the decorating style and the lighting already available.
How Do I Decorate a Small Apartment for Halloween Without Clutter?
I use compact displays that don’t take up valuable floor space. A decorated window, a small potion vignette, and a few ghost luminaries can create a clear theme without crowding the room.
I also prefer removable decorations that can be stored flat or packed into a small box. Before installing anything, I check that windows and doors remain usable and that walkways are clear.
How Do I Create a Cohesive Indoor Halloween Look?
I choose a decorating style and a small group of colors before shopping. For example, black, burgundy, and ivory suit a gothic theme, while orange, black, and purple can work well for a more traditional Halloween display.
I repeat those colors in a few places, such as the mantel, windows, and dining table. The decorations don’t need to match exactly; using related colors and textures is enough to help the room feel connected.
Read this next: 25 DIY Halloween Decoration Ideas (Easy, Cheap & Spooky for 2026)
Conclusion
I don’t need to decorate every corner of my home to create a memorable Halloween atmosphere. A floating witch hat display, a homemade potion vignette, or a group of glowing pumpkins can make a strong visual impression when the size, placement, and lighting suit the room.
I would start with two or three ideas that fit my budget, check the full materials list, and set everything up several days before a gathering. I would also make sure overhead decorations are secure, lighting is appropriate, and stairs and walkways remain clear.
For more seasonal inspiration, I can pair these displays with Halloween backdrop ideas or try a few DIY Halloween decorations that suit the same color palette. The aim is to create a space that feels festive and personal while remaining practical to use.


One Comment