41 Unique Pumpkin Carving Ideas for a Standout Display (2026)
I love pumpkin carving because it gives me an easy way to personalize Halloween decorating without buying a porch full of ready-made decorations. A plain pumpkin can become funny, spooky, elegant, or completely unexpected with the right pattern and a little planning.
When I put together a display, I don’t try to make every pumpkin equally complicated. One detailed carving can become the centerpiece while two or three simpler pumpkins give it some balance. Mixing carving, etching, different pumpkin shapes, and varied heights usually gives me more visual interest than making several identical faces.
I also think about the pumpkin’s final location before I cut it. A detailed design that looks great up close may disappear from the sidewalk, while a simple face can be much more effective from several feet away. Lighting, pumpkin size, viewing angle, and outdoor weather all affect how the finished design looks and how long it stays in good condition.
This collection includes 41 unique pumpkin carving ideas ranging from easy jack-o’-lantern alternatives to advanced geometric and relief-carved designs. The ideas include traditional carving, etching, relief work, animals, nature, characters, spooky designs, funny pumpkins, artistic techniques, and themed sets.
Some designs can be completed fairly quickly, while others need a larger pumpkin, a template, and several hours of patient work. I’ve included practical notes to help with pumpkin selection, tools, carving methods, lighting, display arrangement, safety, and pumpkin care.
Save this for later

Table of Contents
Whether I’m carving my first pumpkin or looking for something more detailed than a traditional face, I find it helps to choose the design based on my available time, the pumpkin’s shape, and where I plan to display it.
Key Takeaways
- I get a balanced display by making one pumpkin the statement piece and using simpler designs around it.
- Firm pumpkins without soft spots are my starting point for any carving project.
- Traditional carving cuts through the pumpkin wall, while etching removes only part of the outer skin.
- Relief carving uses different depths to create lighter and darker areas without cutting every section completely through.
- Battery-powered LED lights are my practical choice for most indoor and outdoor displays.
- I carve closer to Halloween when possible so the pumpkin has less time to deteriorate before the holiday.
- Templates make detailed patterns much easier to plan and transfer.
- Adults should handle knives and carving saws. Children can still participate by choosing designs, marking templates, helping with appropriate scooping under supervision, and decorating finished pumpkins.
- Pumpkin condition, temperature, moisture, sunlight, and handling all affect how long a carved pumpkin remains usable.
Related article: 17 Halloween Balloon Garland Ideas (Color Combos, Counts & Costs)
What Are the Best Pumpkin Carving Tools for Beginners?
I don’t think a beginner needs a large professional carving kit. A small collection of dependable tools is enough for most of the ideas here, and I would rather have a few tools that feel comfortable than a box full of pieces I rarely use.
My basic setup includes:
- A small serrated pumpkin-carving saw for cutting through the pumpkin wall
- A sturdy spoon or scoop for removing seeds and pulp
- A washable marker for drawing or marking the design
- Fine carving or clay tools for etching and relief work
- A toothpick or suitable transfer tool for marking a printed template
- Newspaper or a washable work mat for catching pulp and protecting the surface
- Battery-powered LED tea lights for illuminating finished pumpkins
A serrated pumpkin saw gives me better control for basic cutouts than trying to force a large kitchen knife through a thick pumpkin wall. For etching, smaller carving or clay tools let me remove the outer skin gradually.
I also check my pumpkin before I start. If it rocks around on the table, I reposition it until it sits securely. I never hold a pumpkin in my lap while cutting, and I keep my free hand away from the path of the blade.
If a tool catches, I don’t push harder. I stop, move the pumpkin into a better position, and approach the cut again from a safer angle.
Pro Tip: I do most of my messy prep on a washable surface or several layers of newspaper. It makes the cleanup much easier, especially when I’m carving more than one pumpkin.
What Makes a Pumpkin Carving Display Actually Stand Out?
For me, the display matters almost as much as the carving. A beautiful pumpkin can get lost if it is surrounded by too many decorations or placed where nobody can see the details.
My starting point is usually one larger statement pumpkin. Then I add smaller pumpkins with simpler faces or patterns, varying the heights so the display doesn’t look like a straight row.
What it IS:
- One main pumpkin that gets the most attention
- Smaller supporting pumpkins with simpler designs
- A mix of pumpkin sizes and heights
- Consistent lighting across the display
- One clear decorating direction, such as spooky, funny, fall-inspired, or whimsical
- Enough space around detailed carvings for people to see them
What it ISN’T:
- Several identical pumpkins lined up without variation
- Every pumpkin competing for attention
- Too many unrelated colors, patterns, and decorations
- A crowded arrangement where the carvings can’t be seen from a normal viewing distance
I always step back several feet before I decide that a display is finished. From that distance, I can tell whether the eyes, lettering, silhouettes, and other details are actually visible.
Pro Tip: If a detailed pumpkin is going on the front step, I test its placement after dark. A small change in height or lighting direction can make the carving much easier to see.
The 41 Pumpkin Carving Ideas
Classic Reimagined
1. Triple-Threat Jack-o’-Lantern
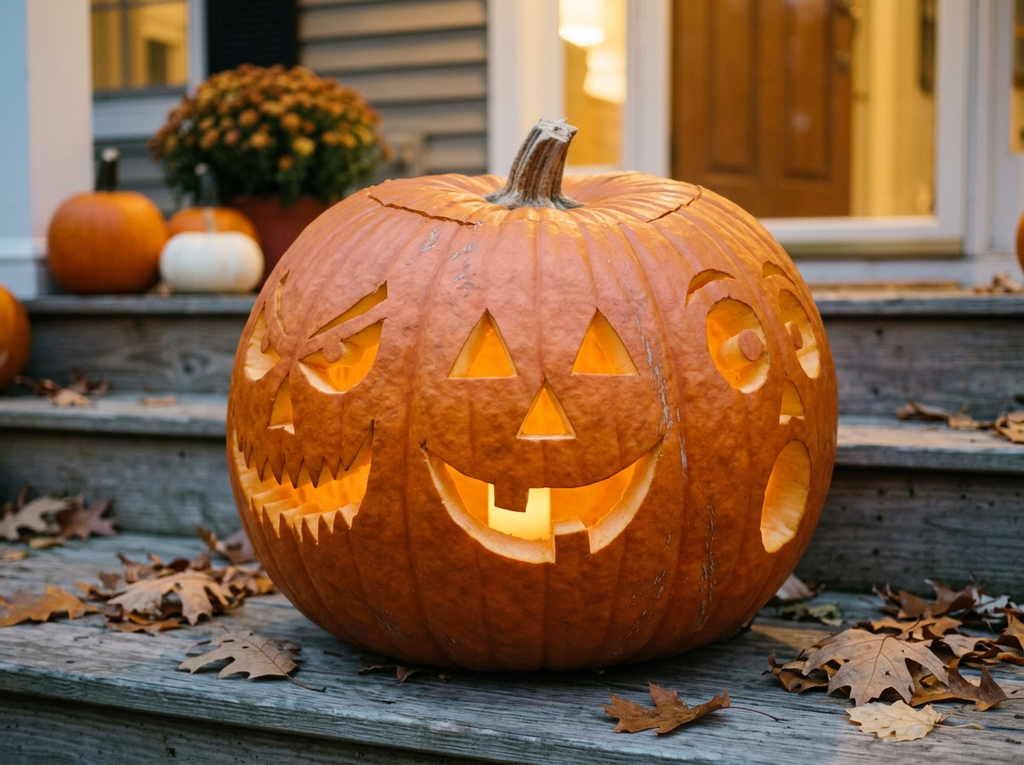
Best for: Statement front porch display | Difficulty: Medium | Time: About 60 minutes | Cost: Low to moderate
Instead of giving one pumpkin a single face, I create three different expressions around it. A happy face, surprised face, and spooky face make the pumpkin change as someone walks around the display.
A large, round pumpkin gives me enough room to space the faces apart. Before cutting, I rotate the pumpkin and mark where each expression will sit so the features don’t run into each other.
I make the major cuts first and save the smaller details for last. A battery-powered LED light in the center helps illuminate all three sides without needing an open flame.
2. Toothy Skull Grin

Best for: Beginners | Difficulty: Easy | Time: About 20 minutes | Cost: Low
For a quick spooky pumpkin, I skip the traditional eyes and focus on a large uneven grin. I make the center teeth slightly longer and let them become shorter toward the sides.
A tall pumpkin works well because its shape gives the mouth plenty of vertical space. I keep the openings broad enough that the remaining pumpkin wall doesn’t become unnecessarily fragile.
This is one of my easier choices when I want something more unusual than the standard triangle-eyed face.
3. Stacked Jack
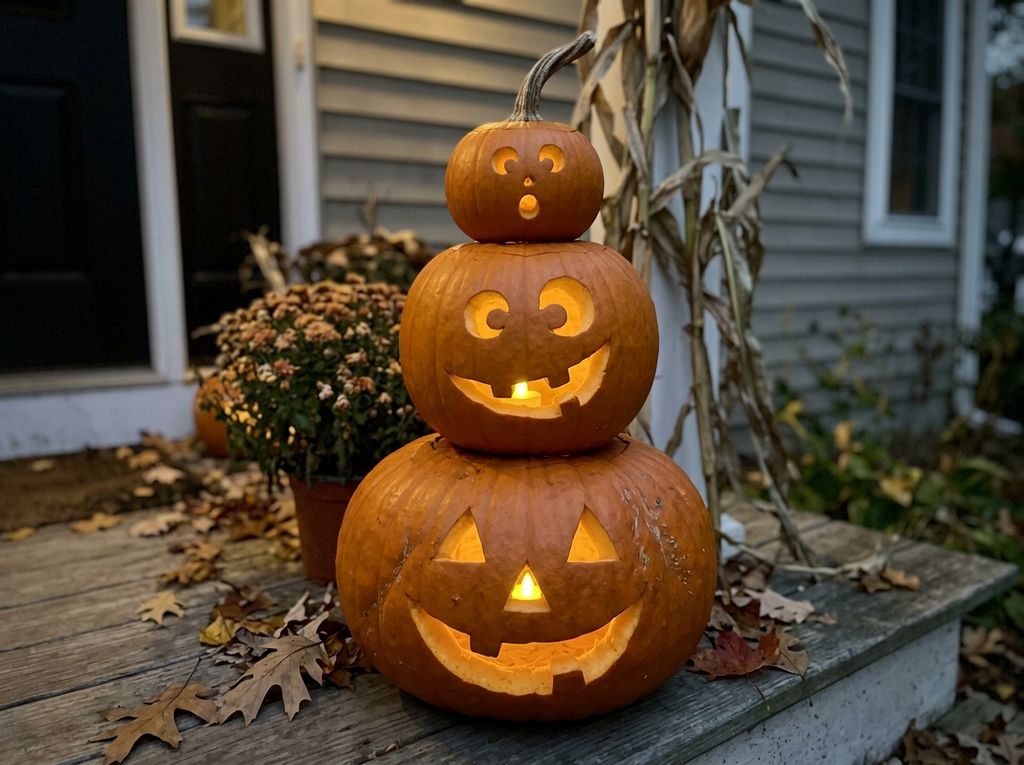
Best for: Porch centerpiece | Difficulty: Easy | Time: About 45 minutes | Cost: Low to moderate
Three pumpkins in graduated sizes become a simple stacked display. I give each one a different expression so the arrangement has some personality instead of looking like three copies of the same face.
I make sure each pumpkin sits securely before adding the next one. For outdoor displays, I avoid placing sharp supports where children could reach them and choose a stable arrangement that won’t easily tip.
Battery-powered tea lights work especially well here because I can light each pumpkin individually without placing an open flame inside a stacked display.
4. Crescent Moon + Bats
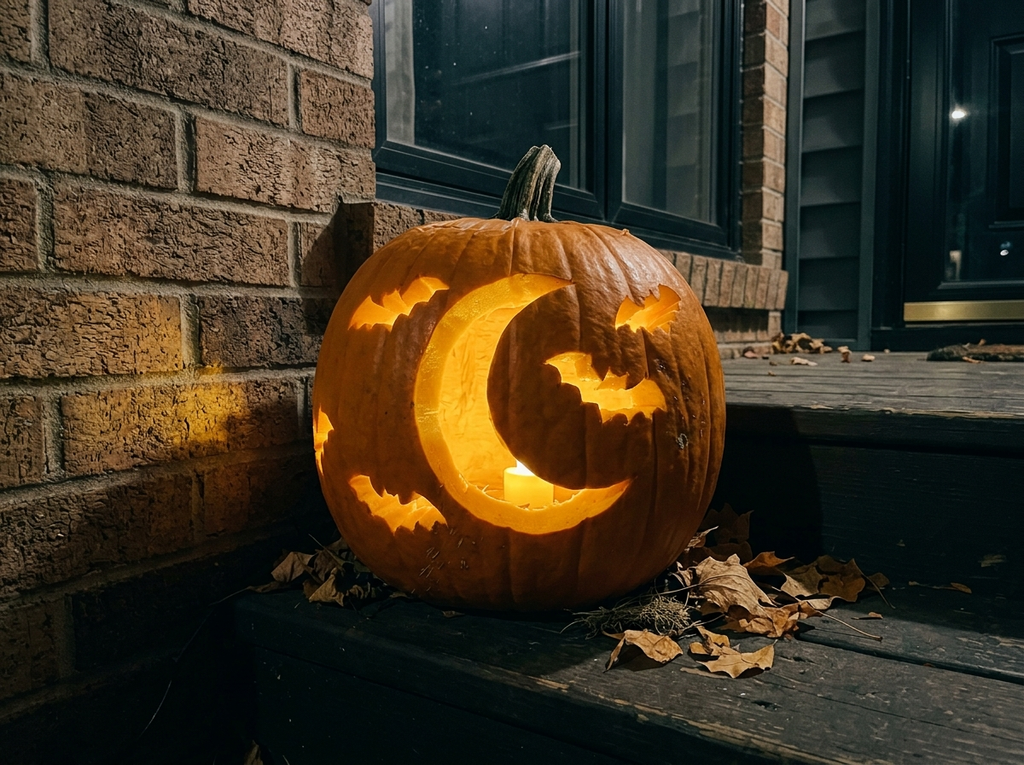
Best for: Window display | Difficulty: Medium | Time: About 40 minutes | Cost: Low
I use negative space to create a crescent moon and add a few small bat silhouettes around it. The goal is to remove selected areas so the remaining pumpkin forms the main shape.
For the cleanest layout, I transfer a printed pattern rather than drawing the bats freehand. I mark the outline first and leave enough pumpkin between small shapes to keep the wall strong.
Placed near a wall or window after dark, the openings can create interesting shadow patterns.
5. Classic + Glam
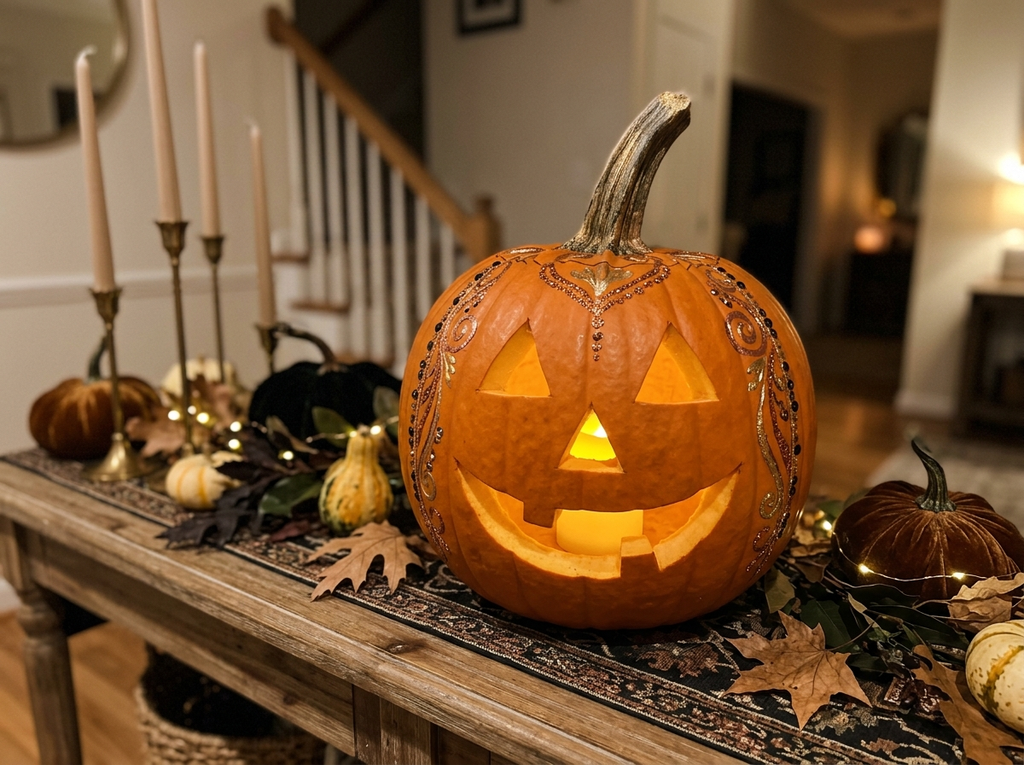
Best for: Indoor table display | Difficulty: Easy | Time: About 30 minutes | Cost: Low
This one starts with a familiar jack-o’-lantern face, but I add a decorative finish to the outside before carving. For an indoor display, I can use a suitable craft adhesive and decorative material, keeping the cut edges clear.
Once the exterior finish is completely dry, I carve the face. The contrast between the decorated surface and warm light inside gives the traditional design a different look.
I keep decorative materials away from the interior and use an LED light rather than an open flame, particularly when the pumpkin is sitting on a table with other decorations.
What Are the Best Modern and Geometric Pumpkin Carving Designs?
6. Honeycomb Lattice

Best for: Design enthusiasts | Difficulty: Advanced | Time: About 90 minutes | Cost: Low to moderate
A honeycomb pattern gives me a clean geometric alternative to a traditional face. I use a ruler or printed hexagon template to lay out the pattern before making any cuts.
I alternate the sections I remove so some hexagons remain solid while others become openings. The remaining sections need to stay wide enough to support the pumpkin wall.
Because there are many repeated cuts, I work slowly and check the pattern as I go. An LED light inside makes the repeating openings especially easy to see.
7. Diamond Facets

Best for: Modern displays | Difficulty: Medium | Time: About 50 minutes | Cost: Low
I cover the front of the pumpkin with large diamonds and triangles using straight lines rather than curves. The angular shapes give the naturally round pumpkin a more structured appearance.
A ruler helps me establish the main lines, but I don’t worry about making every mark perfectly identical. Small handmade variations are fine as long as the overall pattern remains clear.
I avoid placing narrow strips between the cuts because those sections can break while I work.
8. Chevron Stripes
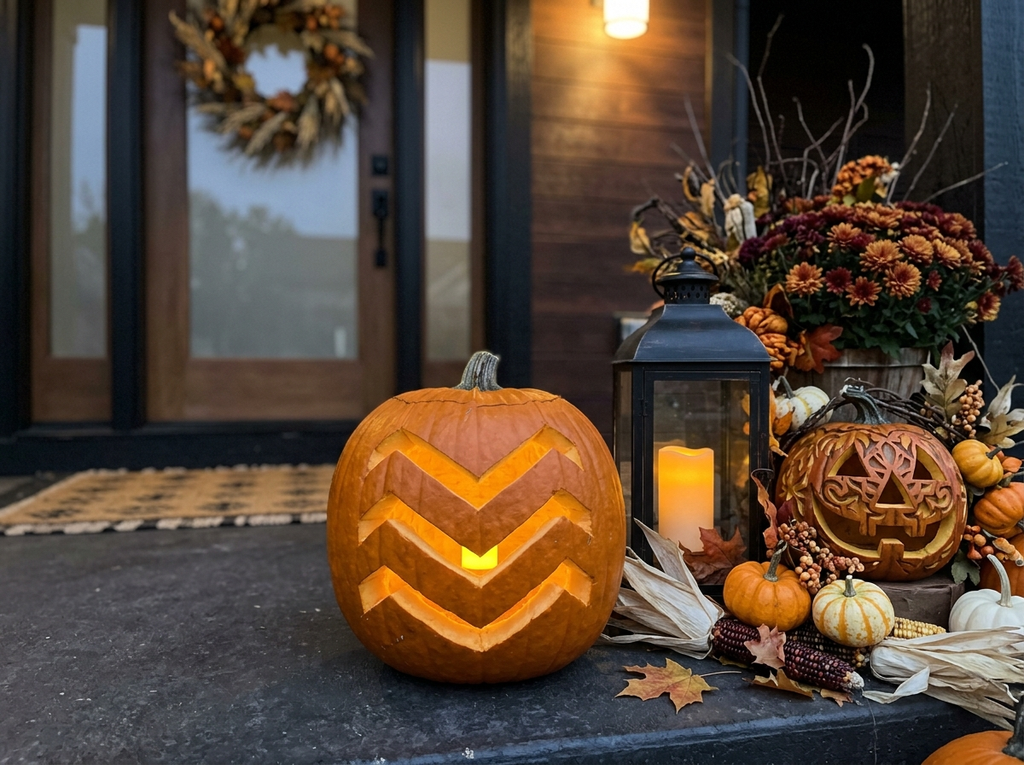
Best for: Minimalist displays | Difficulty: Easy to Medium | Time: About 30 minutes | Cost: Low
Chevron stripes are a straightforward way to create a modern pumpkin without transferring a complicated image.
I draw three or four large V-shaped bands across the front and choose which sections will be cut through. Keeping the lines broad makes the design easier for a beginner to handle.
When the pumpkin is illuminated, the open stripes create a simple pattern of light. It works well as a supporting pumpkin beside a more detailed centerpiece.
9. Mandala Circle
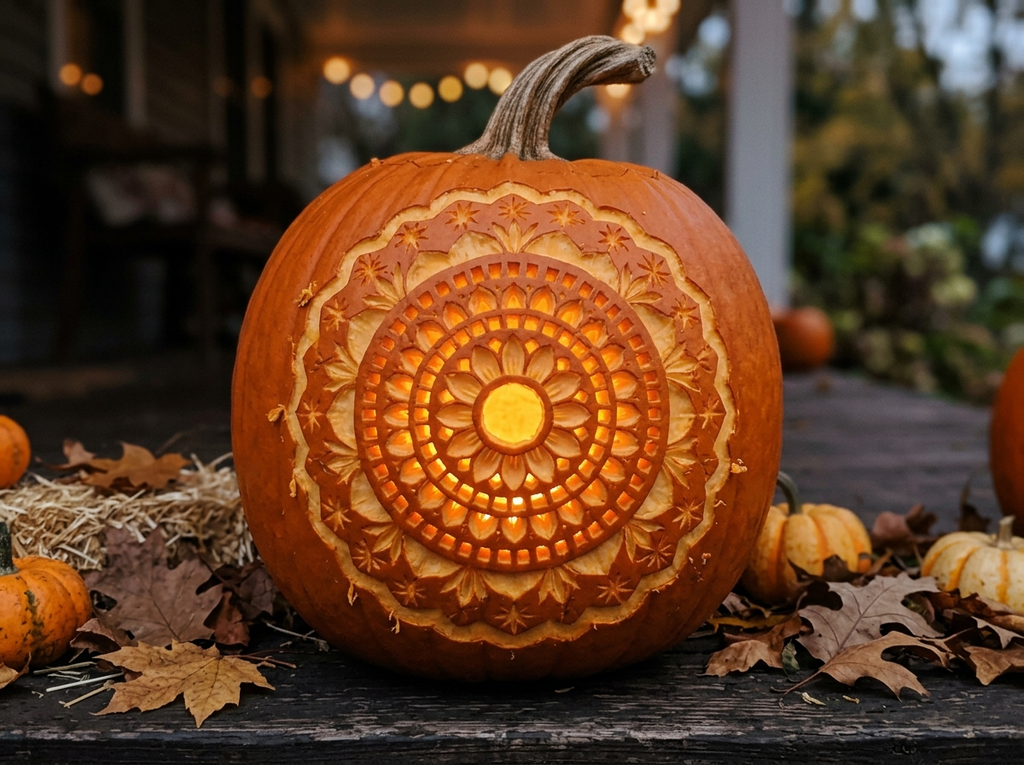
Best for: Detailed displays | Difficulty: Advanced | Time: About 2 hours | Cost: Moderate
A mandala is one of the designs where a template really helps. I transfer the main circular pattern first, then work outward from the center so I don’t lose the symmetry.
This design can combine traditional cutouts with shallow etched details. I don’t remove too much pumpkin wall at once because the inner rings can become fragile.
The first time I work on a detailed pattern, I give myself more time than the simple time estimate suggests. The pumpkin’s thickness and my carving speed can change the process considerably.
Pro Tip: When I reach a delicate inner section, I switch to a smaller detail tool and make lighter cuts rather than trying to remove a large section in one pass.
10. Moroccan Lattice
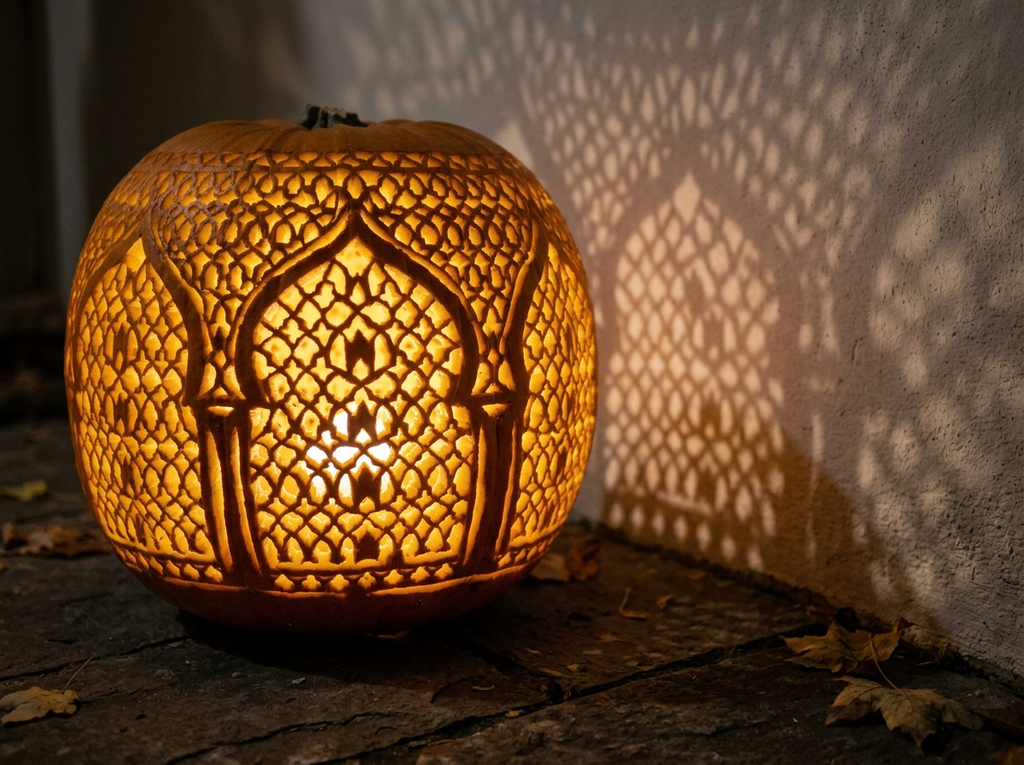
Best for: Lit night display | Difficulty: Advanced | Time: About 2½ hours | Cost: Moderate
I create repeating arches and openings across the pumpkin to mimic the look of a decorative lantern. The repeated pattern takes patience because uneven spacing becomes noticeable once the pumpkin is lit.
A printed pattern can help me keep the design consistent. I transfer the major shapes first, then carve one small section at a time.
This is a good choice when the pumpkin will sit near a wall because the openings can create shadows as well as light.
Animals & Nature
11. Owl Face
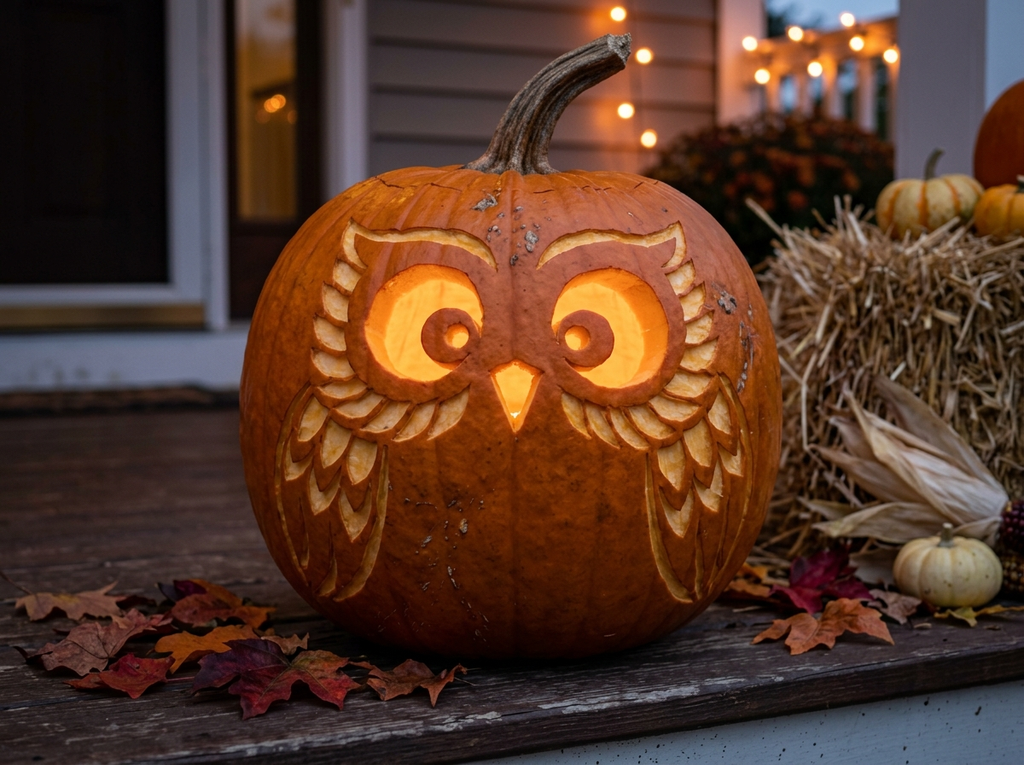
Best for: Kids’ displays | Difficulty: Medium | Time: About 45 minutes | Cost: Low
I use large circular eyes, a simple V-shaped beak, and shallow feather details to create an owl face that feels seasonal without being overly scary.
A round pumpkin gives me plenty of room for the large eyes. For the feather texture, I use shallow etching rather than cutting through every line.
If I’m making this with children, the kids can help choose the expression and mark the feather pattern, while an adult handles all sharp-tool work.
12. Fox Silhouette (Relief Carve)
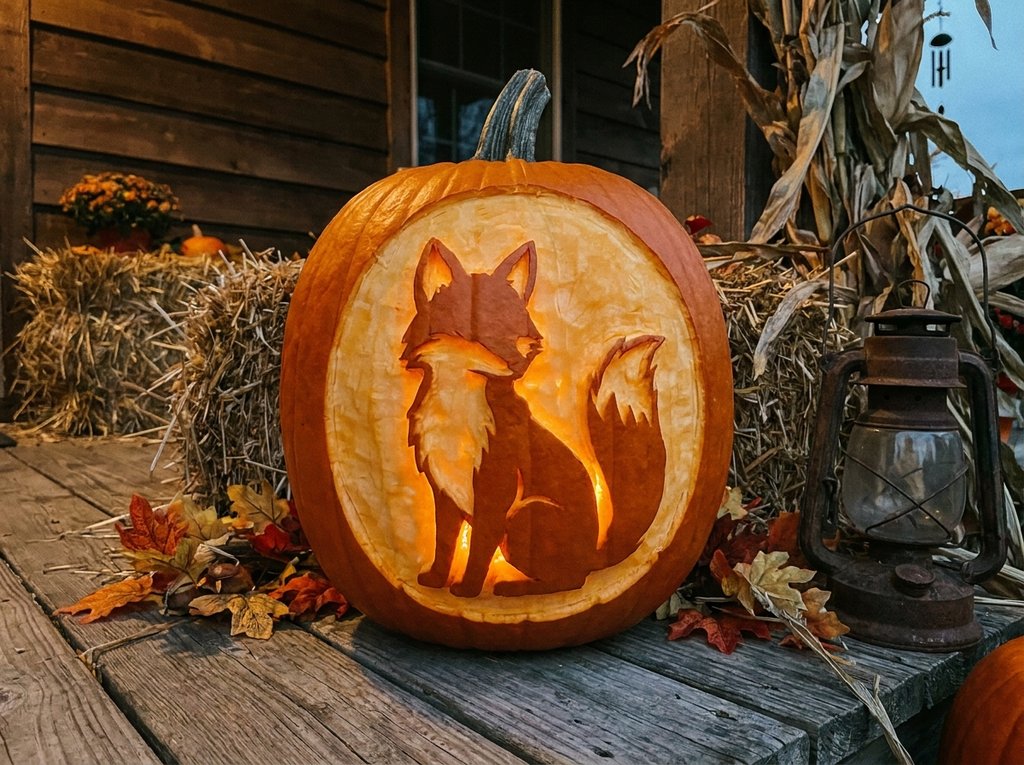
Best for: Fall-themed porch | Difficulty: Medium | Time: About 60 minutes | Cost: Low to moderate
For this relief carving, I remove only the orange outer skin in the shape of a sitting fox. I leave the inner pumpkin wall intact so the thinner areas allow a softer amount of light through.
I transfer the fox outline first and then work around the silhouette with a small detail tool. The depth doesn’t have to be perfectly uniform; what matters is creating enough contrast for the shape to remain visible.
This is a good option when I want a fall display that can work beyond Halloween.
13. Roaring Cat

Best for: Beginners with personality | Difficulty: Easy | Time: About 25 minutes | Cost: Low
A wide open mouth, narrow eyes, pointed teeth, and a few whisker marks are enough to give this cat plenty of character.
A small or medium pumpkin works well because the simple expression remains easy to recognize. I place it lower on a step when possible so the face sits closer to the viewer’s eye level.
For an even easier version, I leave out the whisker dots and concentrate on the mouth and eyes.
14. Floral Rose
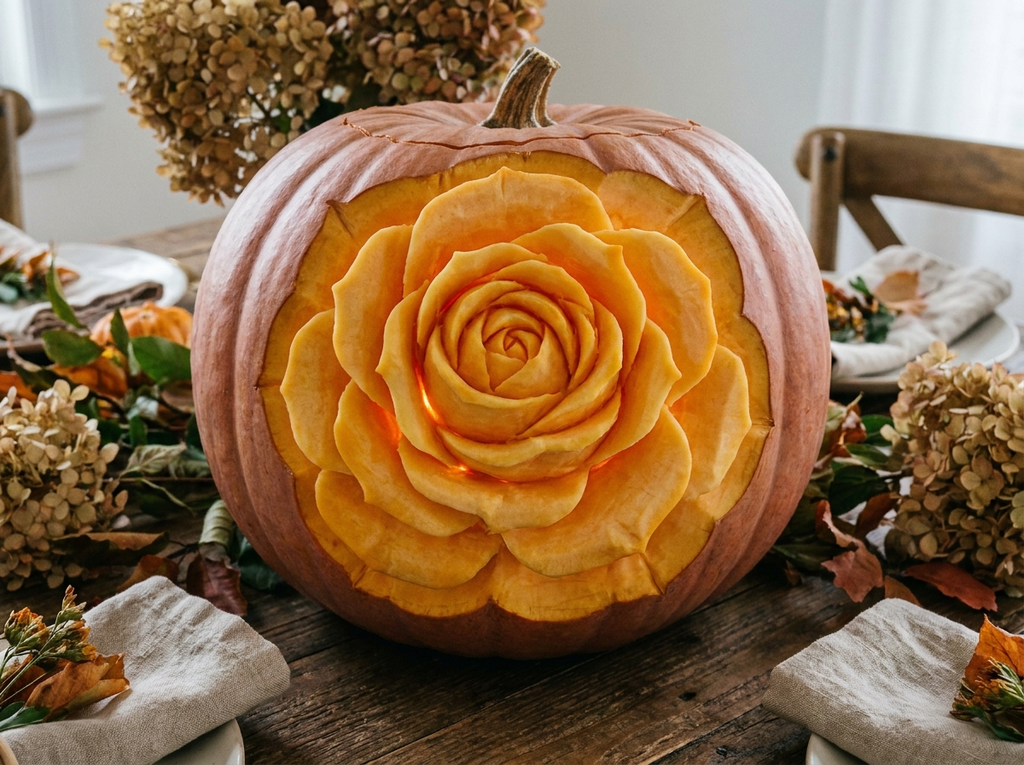
Best for: Elegant display | Difficulty: Advanced | Time: About 90 minutes | Cost: Low to moderate
I create a single rose using relief carving rather than cutting the flower completely through. The petals are built by removing different amounts of the outer skin.
I begin with the largest petal shapes and gradually add the smaller lines. This prevents me from crowding the pumpkin with details before I know how much room I have.
Soft LED lighting works well because the different carving depths create gentle variations in the way light passes through the pumpkin.
15. Mushroom Cluster

Best for: Cottage-inspired or boho displays | Difficulty: Medium | Time: About 60 minutes | Cost: Low
I draw three mushrooms in different sizes and cluster them across the pumpkin. Shallow lines can show the stems, cap texture, and other details, while selected areas can be opened for brighter light.
The design doesn’t depend on perfect symmetry, which makes it forgiving when I’m working freehand.
I like using this as part of a fall arrangement with leaves, small pumpkins, or natural-looking decorations.
16. Haunted Treeline Silhouette

Best for: Outdoor statement piece | Difficulty: Medium | Time: About 45 minutes | Cost: Low
I carve a band of crooked trees around the pumpkin to create the look of a distant haunted forest. The tree shapes don’t need to be identical; irregular branches help the silhouette feel natural.
I keep the trunk sections thick enough to avoid breaking them during carving. A few bats can be added above the trees if there is enough room.
Placed near the ground with an LED light inside, the openings can cast shadows onto the surrounding surface.
Pop Culture & Characters
17. Jack Skellington-Inspired Pumpkin
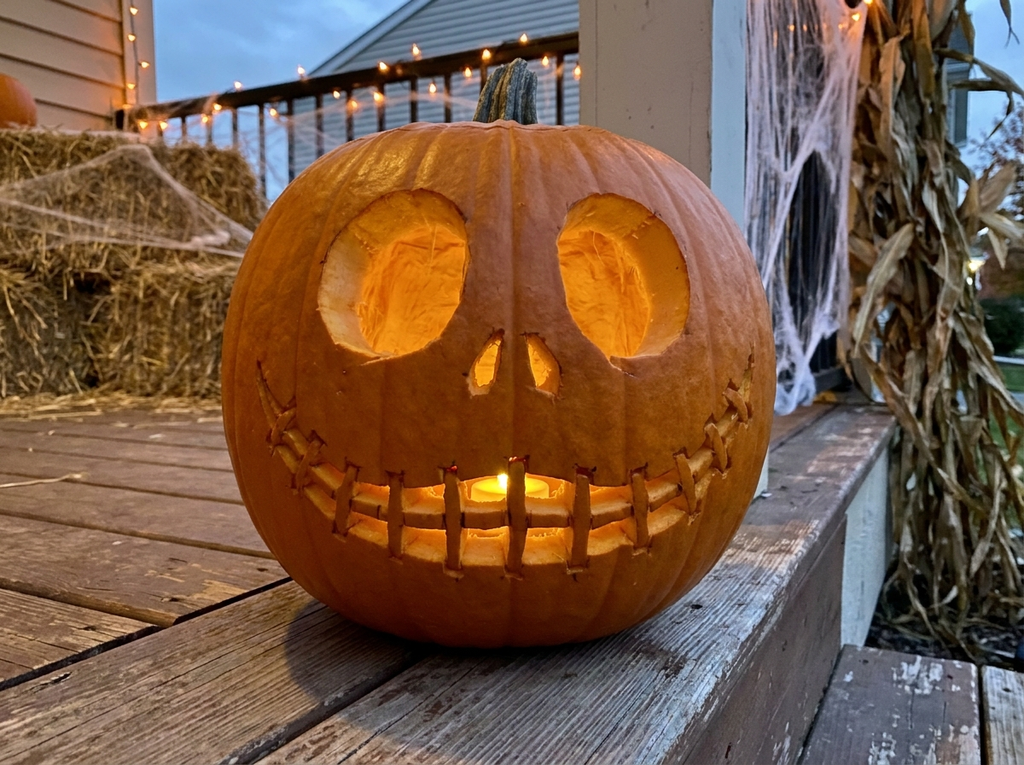
Best for: Nightmare Before Christmas fans | Difficulty: Medium | Time: About 60 minutes | Cost: Low to moderate
For this character-inspired design, I focus on the recognizable oval eyes and stitched-style smile rather than trying to reproduce every tiny facial detail.
A printed reference helps me keep the proportions consistent. I mark the eyes and mouth before cutting and leave enough space between the lines to protect the pumpkin wall.
If the full face feels too difficult, I simplify it to the large eyes and signature-style mouth.
18. Day of the Dead Sugar Skull
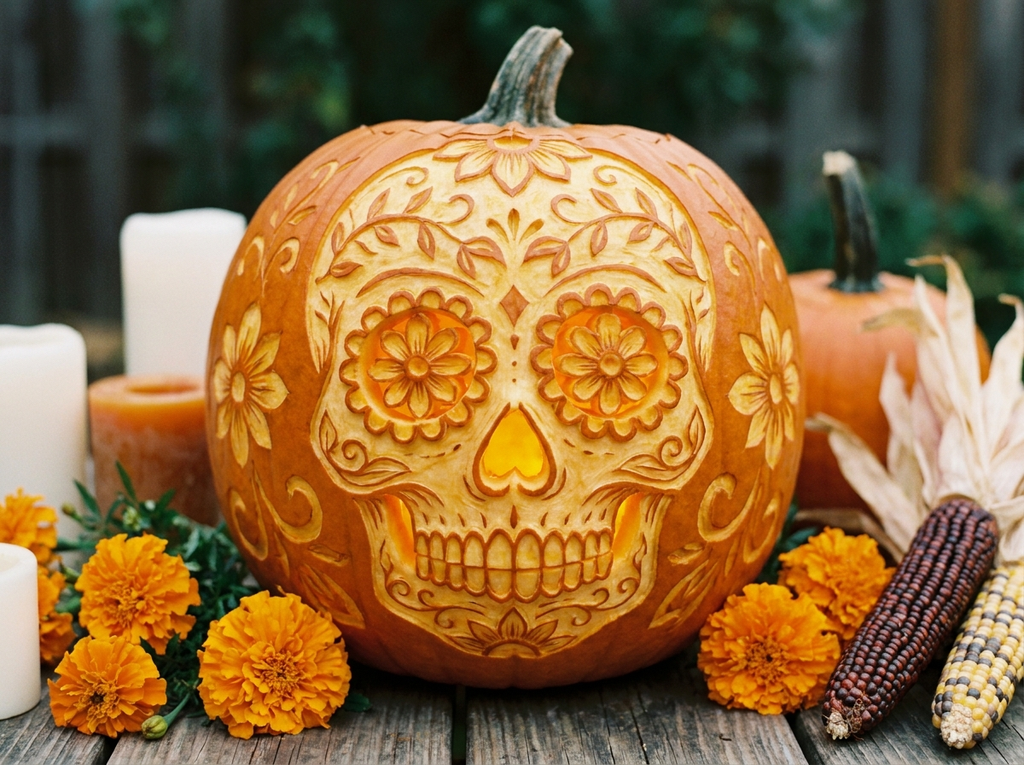
Best for: Elaborate centerpiece | Difficulty: Advanced | Time: About 2 hours | Cost: Moderate
This design combines full cutouts with decorative relief and etching. I use floral shapes around the eye area and add carefully planned details across the forehead and cheeks.
Because Día de los Muertos imagery has cultural meaning, I treat the design thoughtfully rather than using its elements as generic spooky symbols. My focus is on the decorative craft and respectful presentation.
For a beginner, I would simplify the pattern to a few large floral shapes instead of attempting dozens of tiny details.
19. Harry Potter-Inspired Lightning Bolt + Glasses

Best for: Kids ages 6–12 | Difficulty: Easy | Time: About 20 minutes | Cost: Low
I keep this character-inspired design simple with two round glasses and a small lightning-bolt detail.
The shapes are large enough to transfer quickly, making this a practical choice when I don’t want to spend an afternoon carving. A small or medium pumpkin with a broad front works well.
For a group display, I can pair it with other simple character-inspired faces without making every pumpkin equally detailed.
20. Villain Monogram
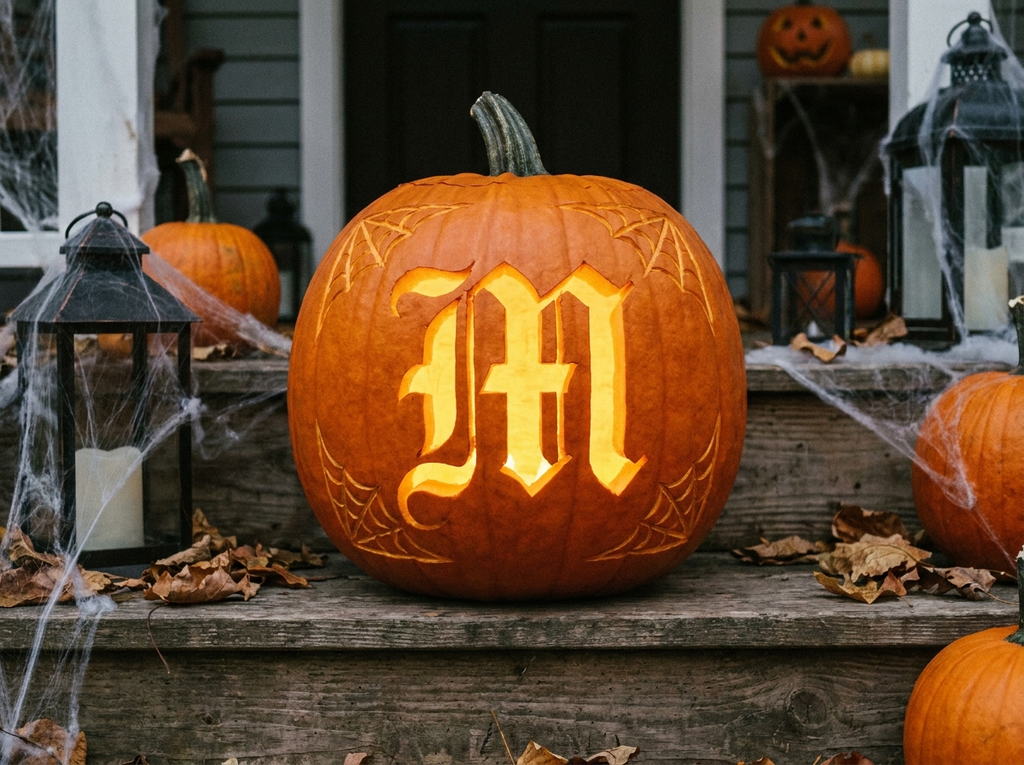
Best for: Personalized porch | Difficulty: Easy | Time: About 25 minutes | Cost: Low
I use one large Gothic-style initial as the main feature and add shallow spider-web lines in the corners.
Printing a large letter gives me a cleaner starting point than trying to draw a complicated font by hand. I transfer the outline and then make the main cuts.
The design is easy to personalize for a family name, first initial, or themed display.
21. Minecraft Creeper-Inspired Pumpkin

Best for: Kids ages 7–13 | Difficulty: Medium | Time: About 45 minutes | Cost: Low
The block-based face makes this easier to plan than a design with lots of curves. I draw a simple grid with a ruler, mark the face, and cut the selected squares.
A pumpkin with a broad, relatively flat front gives me more room for the pattern. I keep the individual openings large enough that the remaining wall isn’t reduced to thin strips.
For a simpler version, I can enlarge the pattern and use fewer internal details.
22. Demogorgon-Inspired Mouth
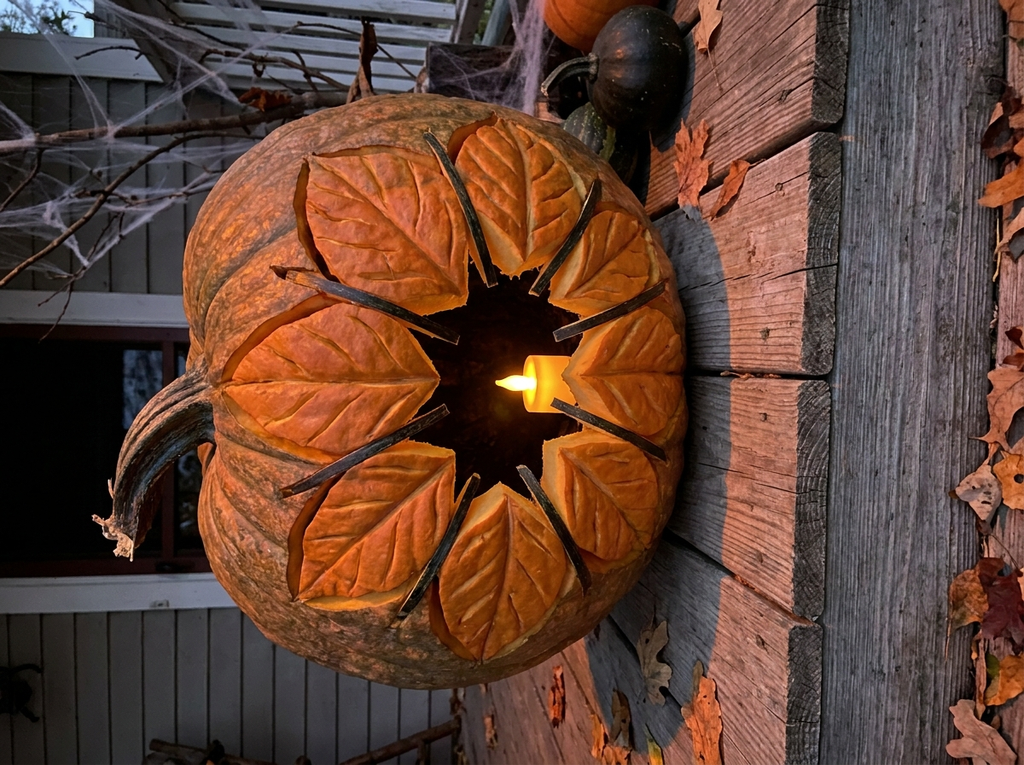
Best for: Stranger Things fans, teens, and adults | Difficulty: Medium to Advanced | Time: About 75 minutes | Cost: Moderate
I create several petal-like sections around a dark central opening to suggest the unusual mouth shape.
A broad, sturdy pumpkin is easier to work with because the design removes a substantial amount of the front surface. I mark the complete layout before cutting so the sections remain balanced.
I take extra care around the narrow spaces between the petals. If they begin to crack, I stop rather than trying to force the blade farther.
Spooky & Gothic
23. Anatomical Heart

Best for: Horror enthusiasts | Difficulty: Advanced | Time: About 90 minutes | Cost: Moderate
For a more detailed anatomical heart, I work from a clear reference image and mark the major structures before carving.
Relief carving is useful here because I can remove some of the outer skin to show vessels and surface details without cutting the entire design through the pumpkin.
I reserve the deepest cuts for the most important parts of the design. Trying to carve every tiny line all the way through can weaken the pumpkin unnecessarily.
24. Celtic Knotwork

Best for: Heritage-inspired displays | Difficulty: Advanced | Time: 2+ hours | Cost: Moderate
I transfer an interlocking knot pattern before I make any cuts. The challenge is keeping the lines connected so the design continues to look woven.
I work through one section at a time and regularly check which areas are meant to remain solid.
For a first attempt, I choose a larger, simpler knot pattern instead of trying to fit an intricate design onto a small pumpkin.
25. Ouija Board-Inspired Face
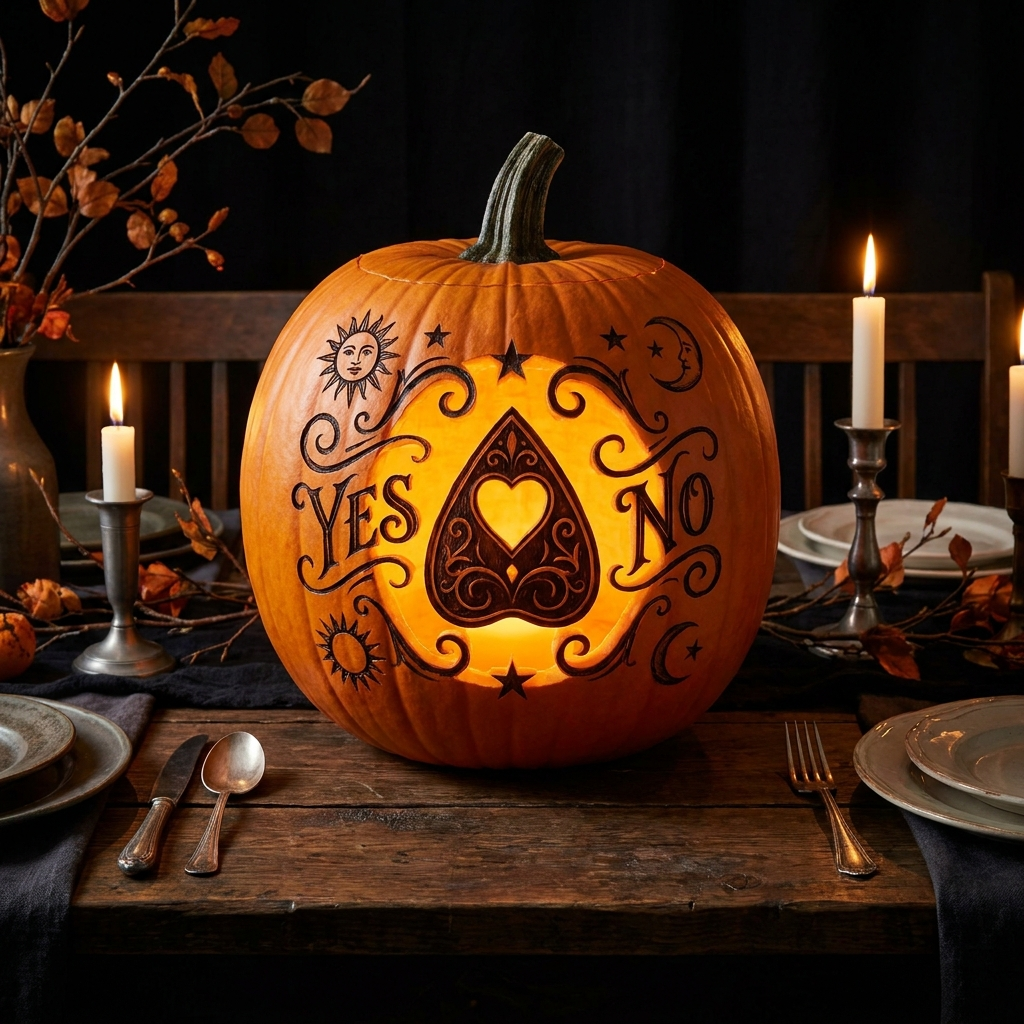
Best for: Spooky dinner-party decor | Difficulty: Medium | Time: About 60 minutes | Cost: Moderate
I use a planchette-style central shape, decorative lettering, and simple symbols to create a theatrical spirit-board-inspired pumpkin.
The lettering takes more planning than the basic shape, so I transfer it rather than drawing each character freehand.
Because themes like this can be a matter of personal preference, I consider my guests before using it as party decor.
Also read: 21 Halloween Table Decoration Ideas (Elegant to Spooky, From $10)
26. Coffin & R.I.P.
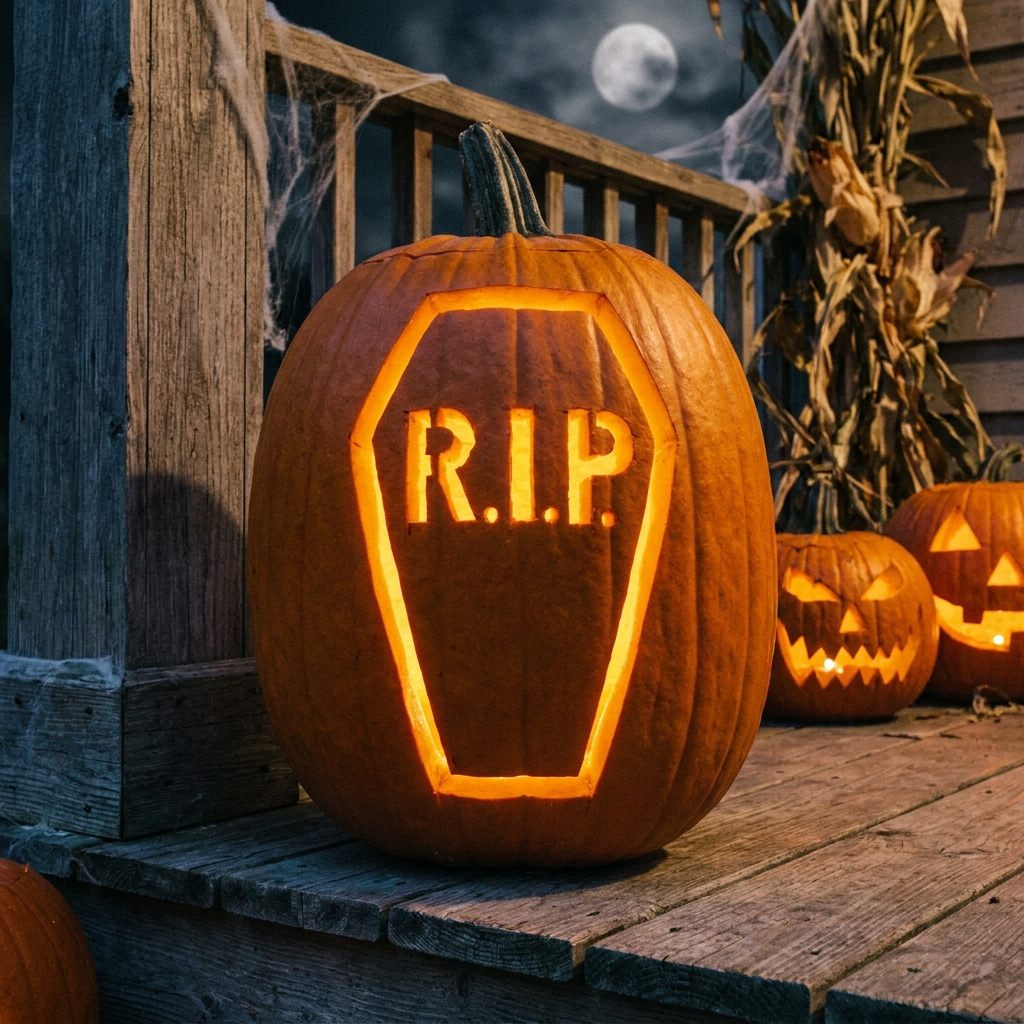
Best for: Beginners wanting something different | Difficulty: Easy | Time: About 20 minutes | Cost: Low
A simple coffin shape in the center gives me a quick Halloween design without complicated carving.
I mark the outline first, then cut the large shape and add the lettering. Keeping the letters fairly large makes them easier to see once the pumpkin is illuminated.
This works especially well as a supporting pumpkin beside a more detailed centerpiece.
27. Spider Web Full-Face
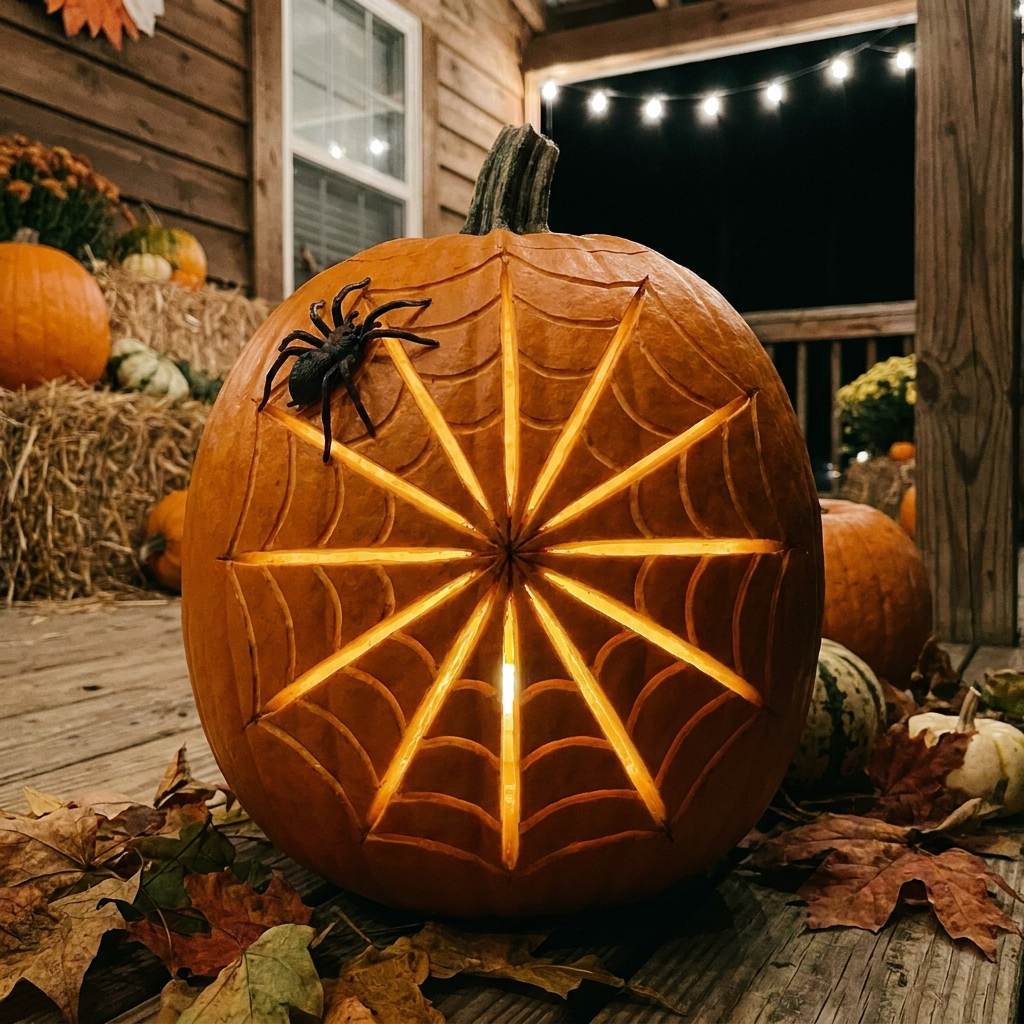
Best for: Classic Halloween lovers | Difficulty: Medium | Time: About 50 minutes | Cost: Low
I begin with a center point and draw spokes outward before adding the curved web sections.
Some areas can be cut through while others are left as etched lines. That combination gives me more variation than cutting every line completely open.
A small spider near one edge provides an extra detail without making the entire pumpkin too busy.
Funny & Whimsical
28. Pumpkin Eating Pumpkin
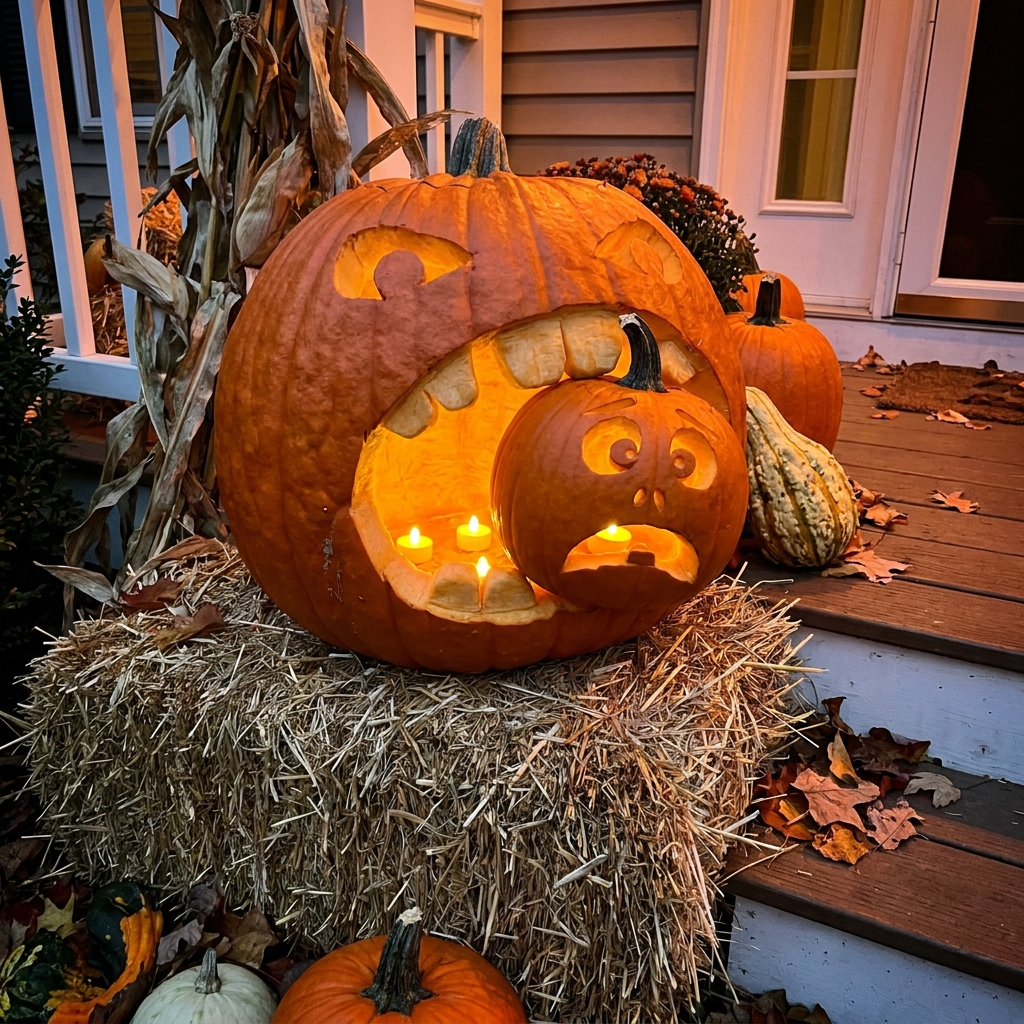
Best for: Funny displays | Difficulty: Medium | Time: About 60 minutes | Cost: Moderate
I carve a large pumpkin with an oversized open mouth and position a smaller carved pumpkin so it appears to be getting eaten.
The smaller pumpkin’s expression is what makes the idea work for me. I give it wide eyes and a worried open mouth so the joke can be understood from a distance.
I make sure both pumpkins are stable and avoid using exposed sharp supports in places where children could reach them.
Pro Tip: I photograph this setup from straight in front rather than from above. The smaller pumpkin reads much more clearly when the mouth frames it from the viewer’s perspective.
29. Emoji Pumpkin
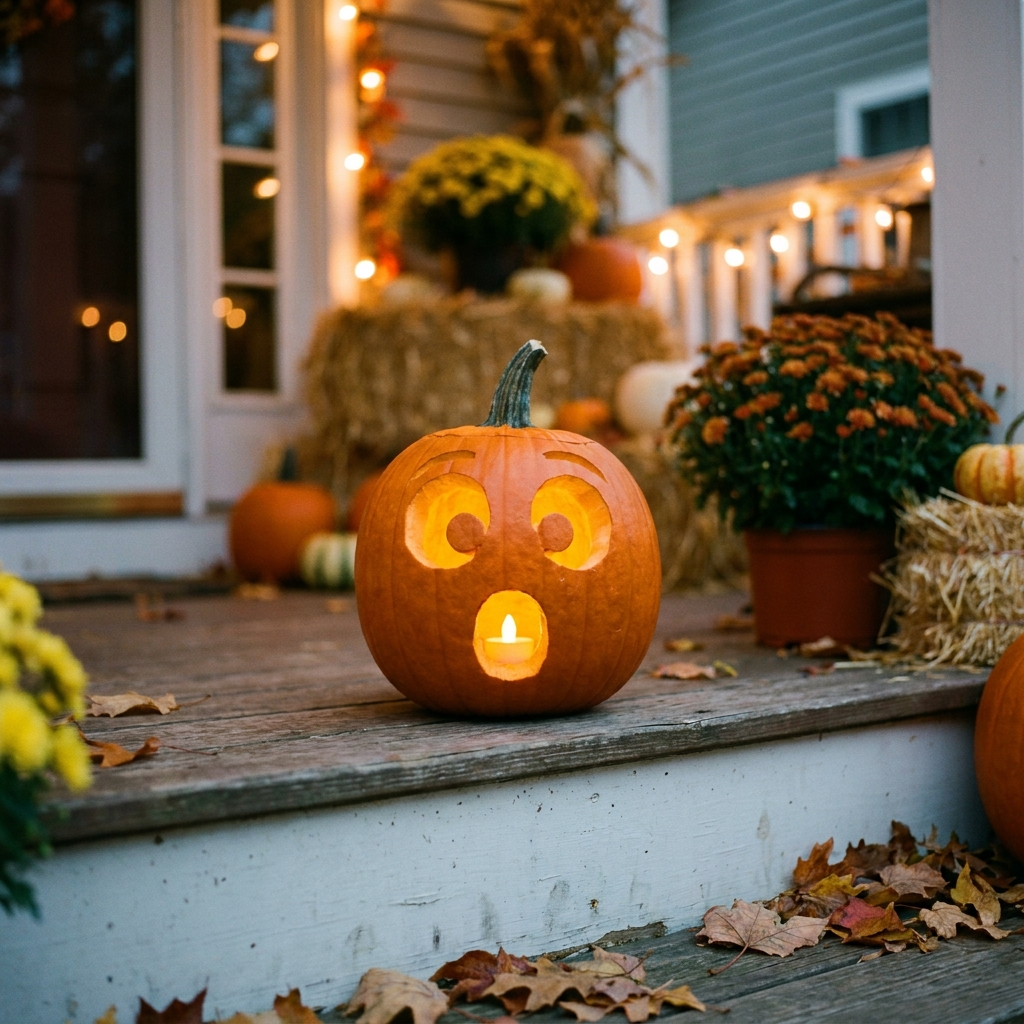
Best for: Kids and quick execution | Difficulty: Easy | Time: About 15 minutes | Cost: Low
A shocked emoji-style face is one of my easiest choices when I need a quick pumpkin. I use large round eyes and an oversized O-shaped mouth.
The simplicity is what makes it work. There is no need for a detailed stencil, and a small round pumpkin gives me enough space for all the main features.
For a last-minute Halloween project, this is one of the first designs I would consider.
30. Glasses + Mustache
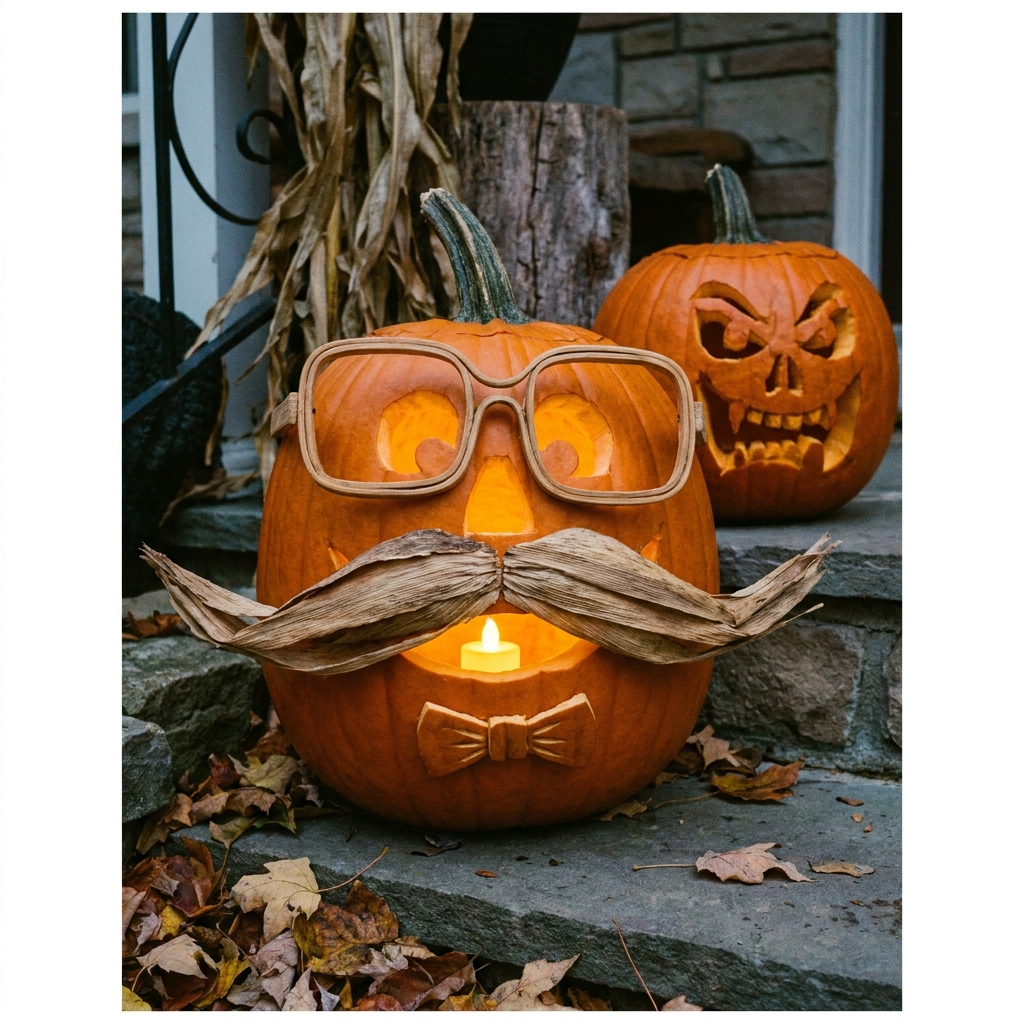
Best for: Funny doorstep display | Difficulty: Easy | Time: About 20 minutes | Cost: Low
I create square glasses, a curved mustache, and, if there is room, a small bow tie.
The face works particularly well when I exaggerate the features. Large glasses and a broad mustache remain recognizable even when the pumpkin is viewed from the sidewalk.
I like pairing this funny pumpkin with a more serious or spooky face so the contrast becomes part of the display.
31. Snaggle-Tooth Granny
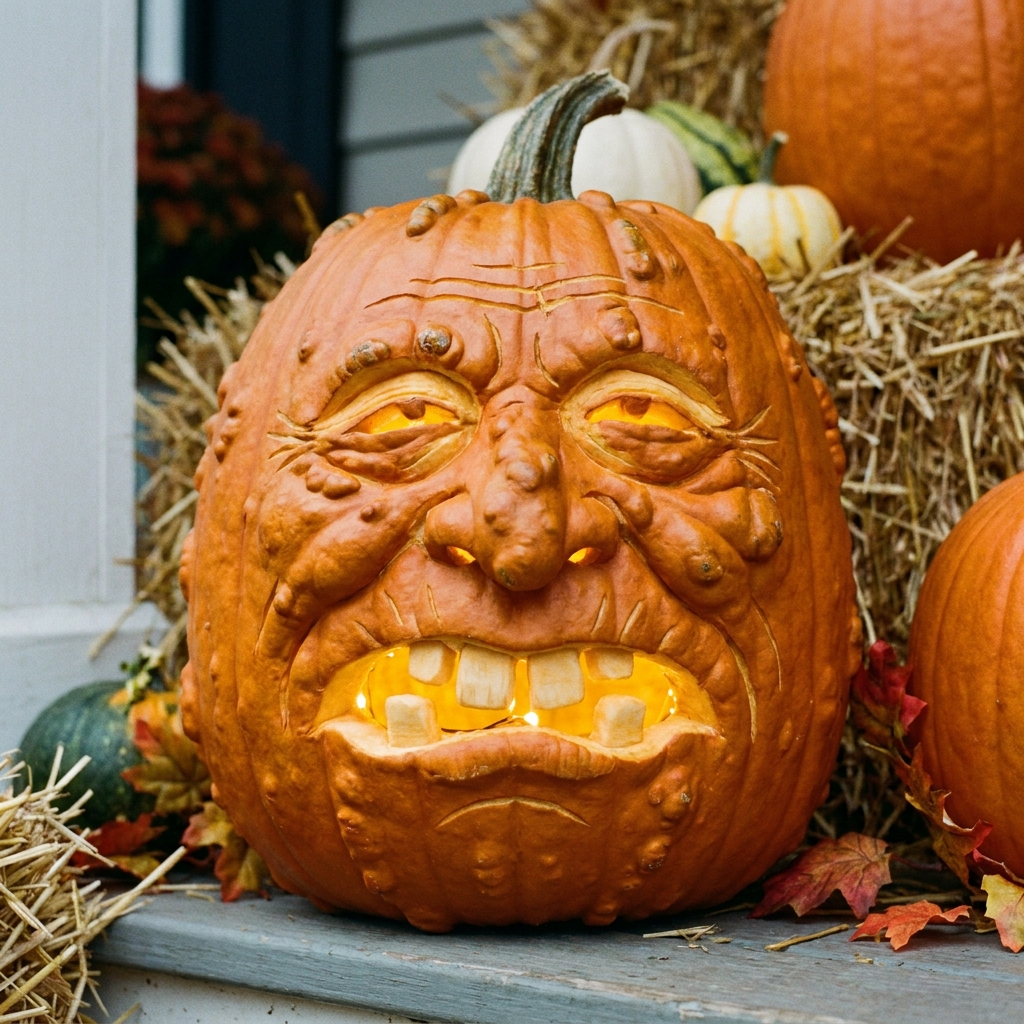
Best for: Humorous display | Difficulty: Easy | Time: About 30 minutes | Cost: Low
Uneven teeth, narrow eyes, and a few etched wrinkle lines create this silly character.
A lumpy pumpkin can actually work in my favor here. Instead of trying to find a perfectly smooth surface, I use the pumpkin’s natural shape to help form the expression.
I keep the teeth fairly large so they don’t turn into thin, fragile sections.
32. Pumpkin Puking Seeds
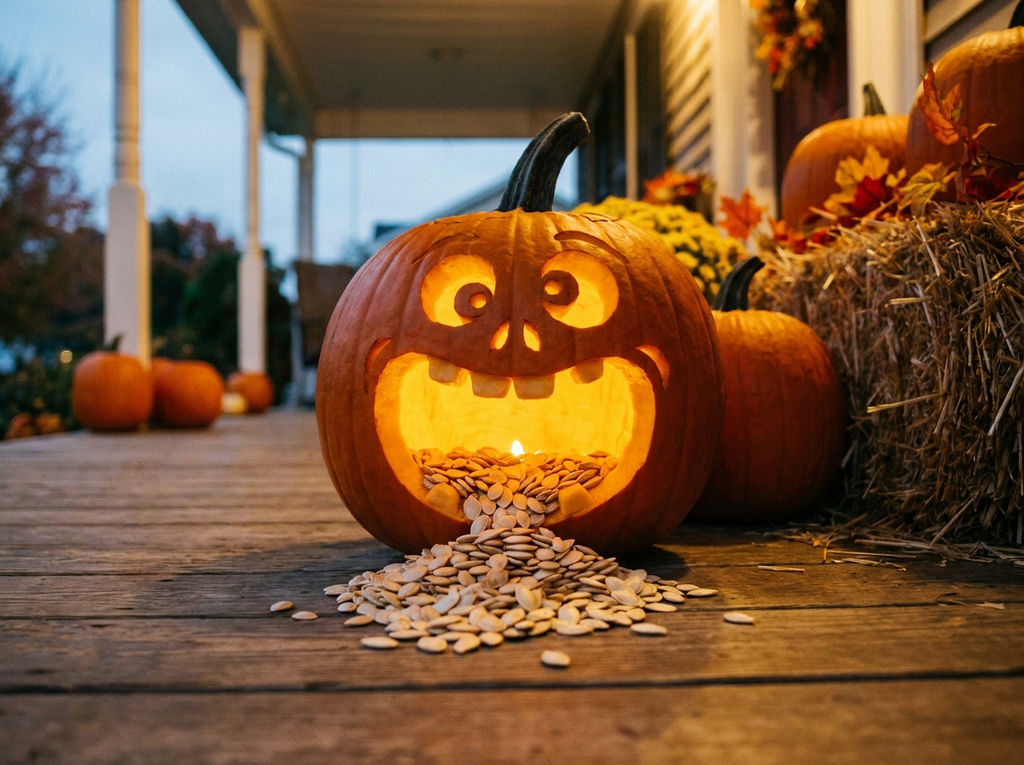
Best for: Quick and funny | Difficulty: Easy | Time: About 20 minutes | Cost: Low
I carve a large open mouth and save some of the seeds while cleaning the pumpkin.
For the finished effect, I arrange the clean, dry seeds below the mouth so they appear to be spilling out. I keep the display protected from rain and moisture because loose food material can become messy outdoors.
This is another design where the facial expression does most of the work, so I don’t need many small details.
Artistic Techniques
33. Ombré Etched Gradient
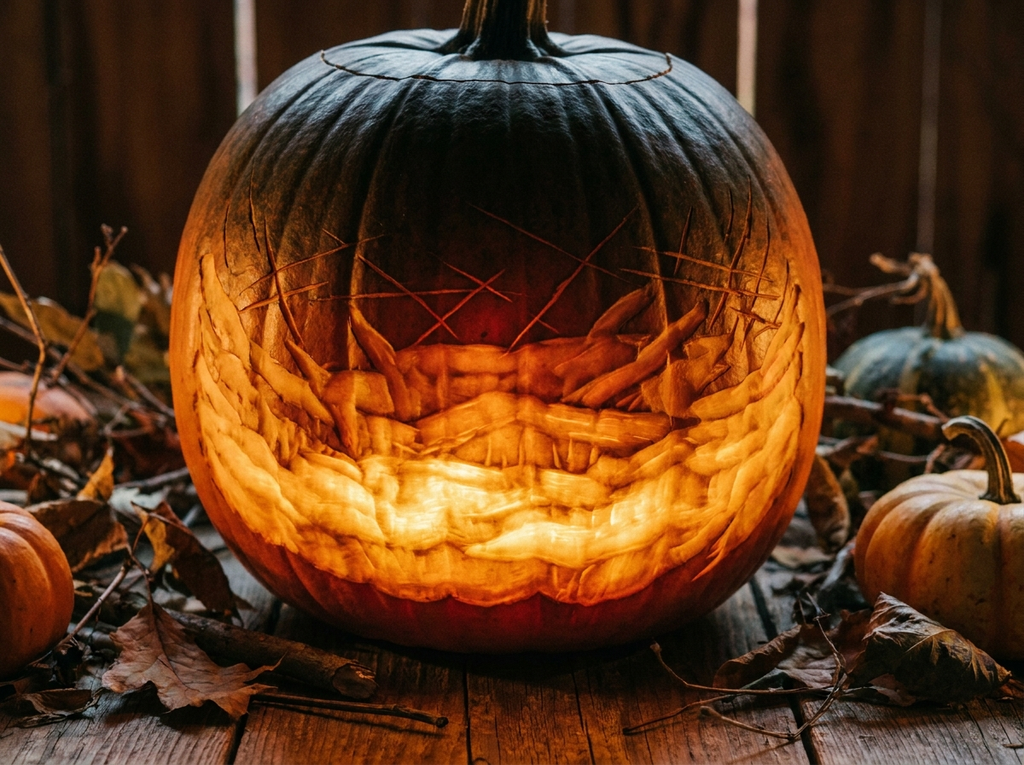
Best for: Art enthusiasts | Difficulty: Advanced | Time: About 2 hours | Cost: Moderate
This technique relies on carving at different depths rather than creating large openings. I remove more of the outer skin in some areas and leave it thicker in others.
The thinner areas allow more light through, while thicker sections remain darker. That difference creates a gradual light effect when the pumpkin is illuminated.
I mark the sections from lightest to darkest before I begin. Working gradually gives me more control than trying to reach the final depth immediately.
34. Negative Space Design
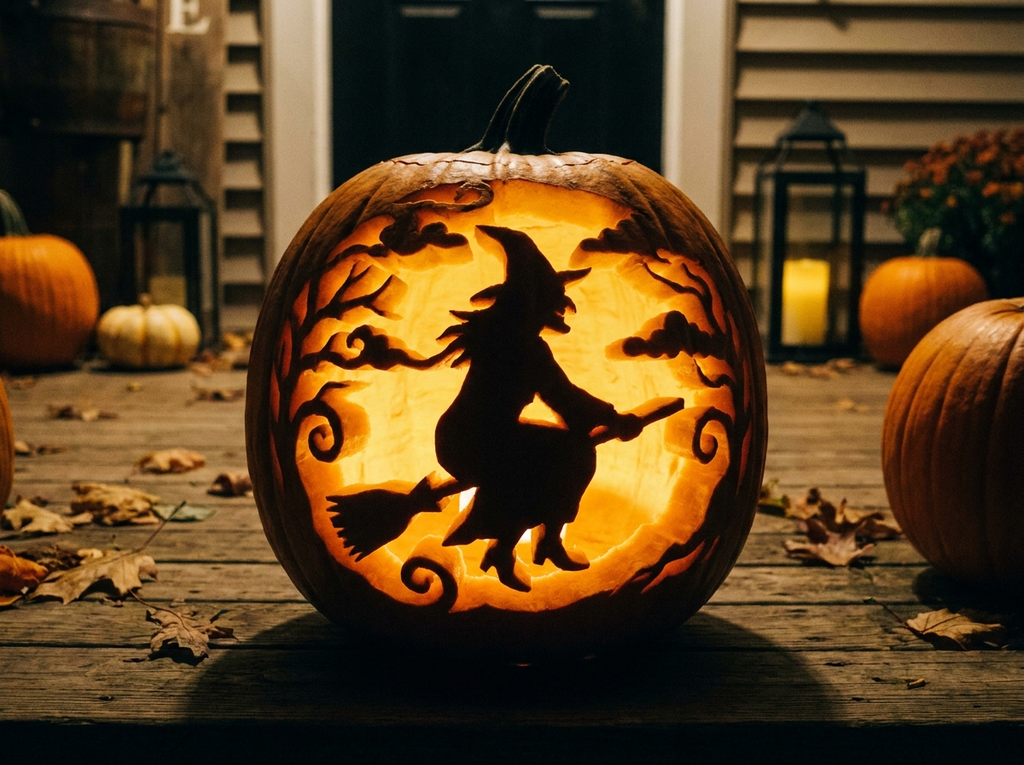
Best for: Dramatic lighting effects | Difficulty: Medium to Advanced | Time: About 60 minutes | Cost: Moderate
For this technique, I plan the areas around the main silhouette so the remaining pumpkin becomes part of the design.
A witch, cat, bat, tree, or other silhouette can work. I draw the complete composition first because it is easy to lose track of which sections should remain solid.
This method is especially useful when I want strong contrast between the solid pumpkin surface and the illuminated openings.
35. Starry Night Swirls
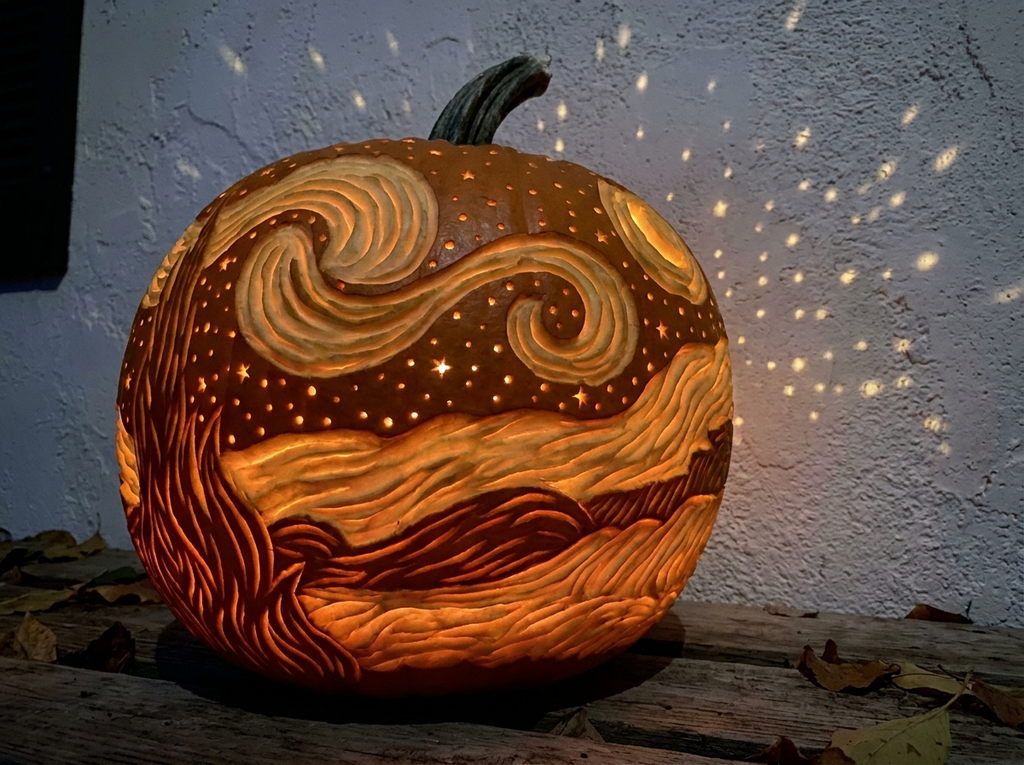
Best for: Art-lover households | Difficulty: Advanced | Time: 2+ hours | Cost: Moderate
I use swirling lines of different depths to create movement across the pumpkin, then add small punched openings for stars.
The important part is remembering that not every line needs to be cut through. Shallow and deeper etched areas can create different levels of brightness once the pumpkin is lit.
I take my time with this one because rushing the curves can make the pattern uneven and leave the pumpkin wall too thin.
36. Relief Leaves + Vines
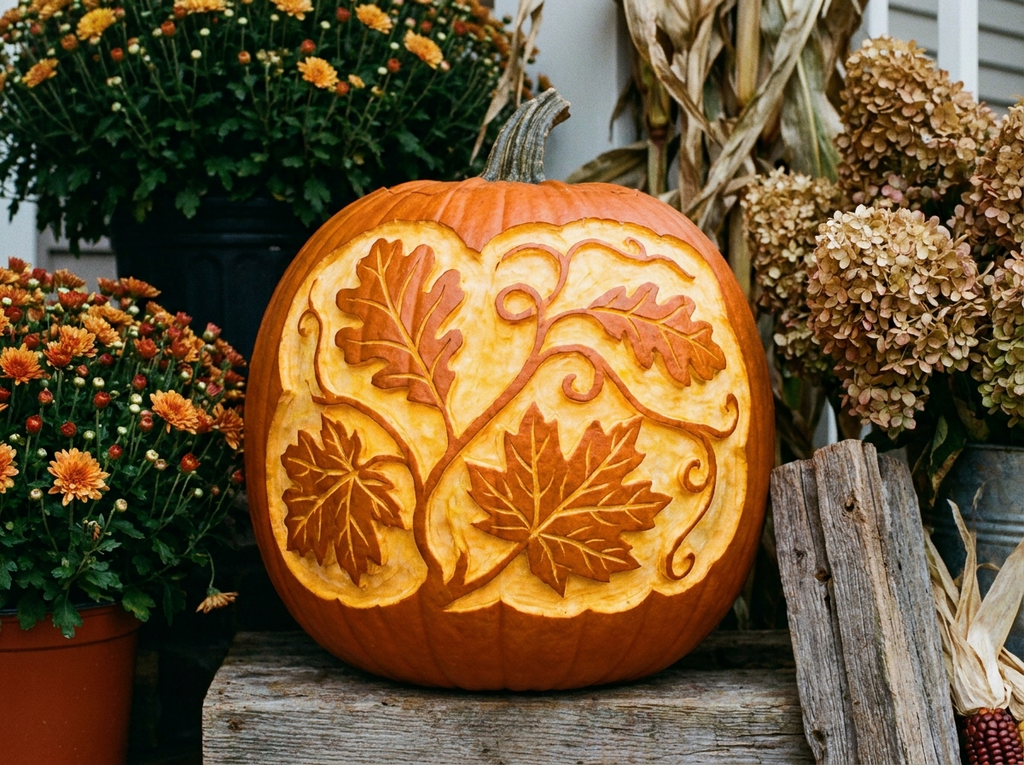
Best for: Elegant fall porch | Difficulty: Medium | Time: About 75 minutes | Cost: Low to moderate
I create leaves and winding vines by removing the outer pumpkin skin at different depths. There are no large cutouts, so the result has a softer glow.
I begin with the larger leaves and vines before adding smaller veins. This keeps the design from becoming crowded.
Because the subject is autumn foliage rather than a scary face, I can use this pumpkin as part of a broader fall display with mums, dried foliage, or lanterns.
37. Galaxy Constellation Map

Best for: Night display | Difficulty: Medium | Time: About 60 minutes | Cost: Low to moderate
I mark individual stars with small openings and connect selected points using shallow etched lines.
When I want a recognizable constellation, I use a reliable star chart as my guide rather than guessing where each star belongs.
This design really depends on nighttime lighting. I place it near a pale wall when possible so the small points of light have a surface onto which they can project.
Pro Tip: I test the position after dark before guests arrive. Moving the pumpkin closer to a light-colored wall can make the projected stars much easier to notice.
Statement & Themed Sets
38. Mummy Wrap
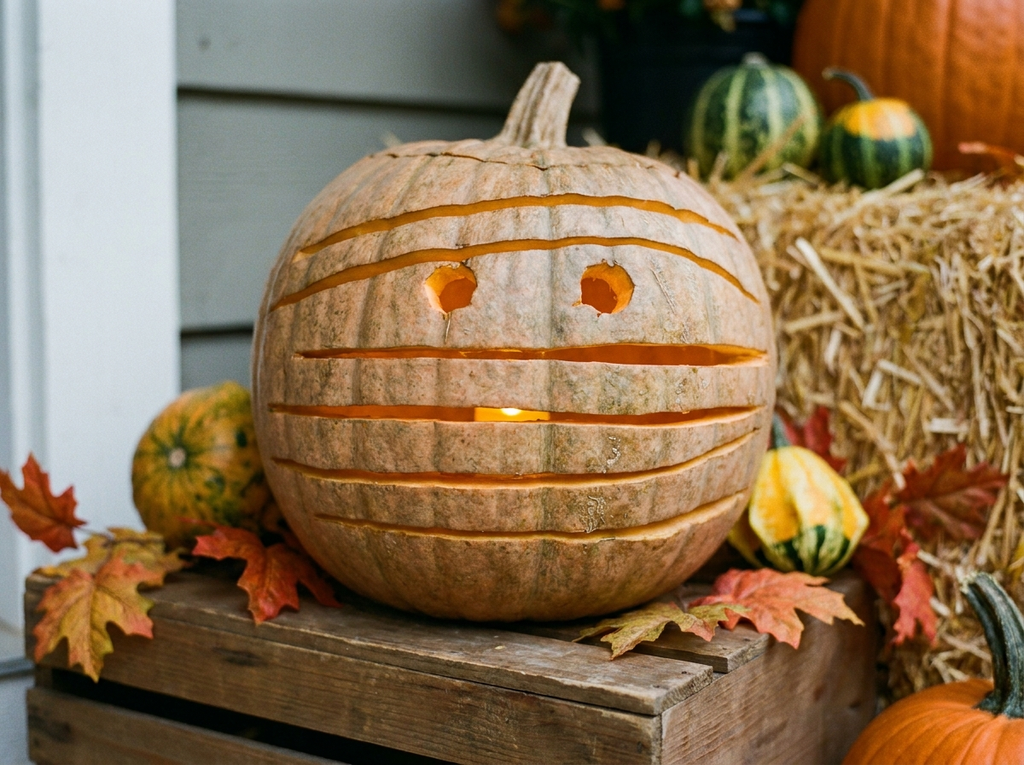
Best for: Beginners wanting something different | Difficulty: Easy | Time: About 30 minutes | Cost: Low
I carve several horizontal strips across the pumpkin and leave two small openings near the top for the eyes.
The strips don’t need to be perfectly straight. Slight variations help the mummy look more handmade and keep the carving from feeling overly rigid.
This is a useful beginner design because the main concept remains recognizable even if the lines aren’t identical.
39. Haunted House Silhouette

Best for: Statement centerpiece | Difficulty: Medium | Time: About 60 minutes | Cost: Low to moderate
For this design, I create a haunted house silhouette with pointed roofs, windows, and a moonlit background.
A printed silhouette template makes the layout easier, especially when I want several windows or roof sections to line up. I transfer the major shapes first and then work through the smaller openings.
A large pumpkin gives me more room for the house details. I avoid making the windows too tiny because they can be difficult to cut cleanly.
40. Dragon Scales

Best for: Fantasy fans | Difficulty: Advanced | Time: About 90 minutes | Cost: Moderate
I build rows of overlapping U-shaped scales using relief carving. Each scale is shallow enough to leave the pumpkin wall intact while creating visible changes in depth.
I work from one row to the next so the scales overlap consistently. Keeping the spaces between them sturdy is more important than making every scale identical.
A firm pumpkin with a reasonably thick wall gives me more room to experiment with the carving depth.
41. S-P-O-O-K Luminary Set
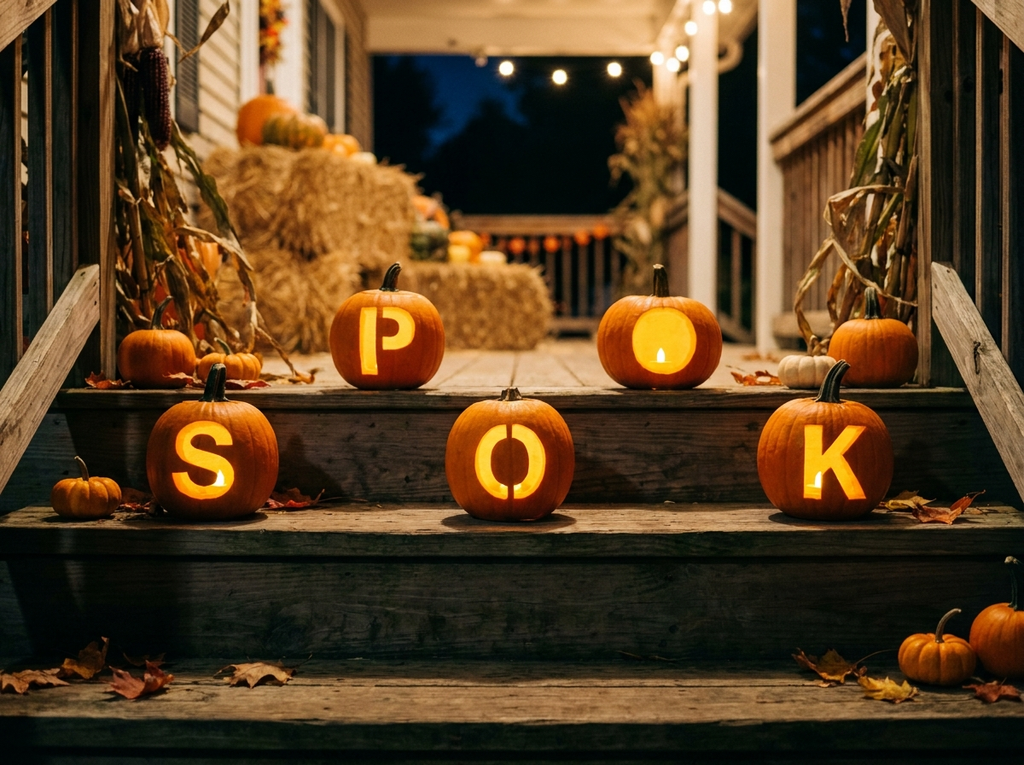
Best for: Mantel, steps, or windowsill display | Difficulty: Easy | Time: About 20 minutes per pumpkin | Cost: Low to moderate
I use five small pumpkins and give each one a large letter so they spell S-P-O-O-K when arranged together.
Bold block letters are easiest to see, especially when the pumpkins are placed on porch steps. I transfer each letter before cutting so the size remains consistent.
Battery-powered tea lights make the individual pumpkins simple to illuminate. A few uncarved mini pumpkins can fill the spaces between the letters without adding more complicated carving work.
For me, the strength of this idea is the overall arrangement. The individual pumpkins are simple, but together they create one clear display.
How Do You Keep a Carved Pumpkin From Rotting Before Halloween?
I don’t treat pumpkin preservation as an exact countdown because conditions make a big difference. Temperature, humidity, sunlight, moisture, the pumpkin’s original condition, and how often it is handled can all affect how quickly a carved pumpkin deteriorates.
My first step is choosing a pumpkin that is firm and free from soft spots, mold, major bruising, or damaged areas. A healthy pumpkin gives me a much better starting point.
After carving, I clean out the pulp thoroughly and keep the pumpkin as cool and dry as practical. I also protect it from strong sunlight and sources of heat.
A few habits that help me include:
- Remove loose pulp and excess moisture after carving.
- Keep the pumpkin shaded rather than sitting in direct sun.
- Move it somewhere cooler when practical, particularly during unusually warm weather.
- Check the pumpkin regularly for mold, leaking, soft areas, or a strong rotten odor.
- Keep carved pumpkins away from unnecessary heat.
- Use battery-powered LED lights instead of a hot light source.
- Discard a pumpkin once it has significantly deteriorated rather than trying to keep using it.
Petroleum jelly is sometimes used around exposed cut surfaces to reduce moisture loss. I consider that an optional care step, not a way to prevent rot or guarantee a certain number of extra days.
I also avoid carving too early when I can. My goal is to have the pumpkins looking fresh around Halloween rather than finishing them so far in advance that they have already started breaking down.
Pumpkin Carving Tools: Store Kit vs. Individual Tools
| Feature | Basic Store Kit | Individual Quality Tools |
|---|---|---|
| Durability | Quality varies | I can choose sturdier tools |
| Detail work | Usually limited | Better control with small carving tools |
| Relief carving | Often limited | Easier with dedicated detail tools |
| Main cuts | Suitable for simple projects | Serrated carving saw works well |
| Best use | Basic faces and quick projects | Simple through advanced designs |
| Long-term value | Depends on quality and reuse | Useful tools can serve multiple seasons |
My verdict: I don’t think beginners need the most expensive set available. A dependable serrated saw, sturdy scoop, marker, and a couple of detail tools can cover a lot of projects.
Cost also depends on what I already have at home, so I don’t treat the cost labels in this article as exact shopping totals. Here, Low, Low to moderate, and Moderate refer mainly to additional supplies beyond the pumpkin itself.
Quick Summary
- Best uses: Front porch displays, Halloween party decorations, windowsills, mantels, and family-friendly decorating projects
- Typical budget: Many simple designs need only basic carving supplies, while detailed projects may require additional tools or a larger pumpkin.
- Approximate time: Around 15–30 minutes for many easy designs, with advanced projects taking roughly 1–2+ hours depending on the pattern and experience.
- Beginner picks: Stacked Jack (#3), Emoji Pumpkin (#29), Mummy Wrap (#38), and S-P-O-O-K Luminary Set (#41)
- Advanced picks: Mandala Circle (#9), Moroccan Lattice (#10), Day of the Dead Sugar Skull (#18), and Starry Night Swirls (#35)
- Most useful planning tip: I choose the pumpkin and display location before carving. Size, shape, viewing distance, and lighting can change which design makes the most sense.
Frequently Asked Questions About Pumpkin Carving
What is the easiest pumpkin carving idea for beginners?
I would start with the Emoji Pumpkin (#29), Mummy Wrap (#38), or Toothy Skull Grin (#2). Each relies on large, straightforward shapes, so I don’t need to manage a complicated stencil or dozens of tiny cuts.
Even with a beginner-friendly design, I treat the carving saw as an adult tool and keep children away from the cutting area.
How do I transfer a stencil onto a pumpkin?
I tape the printed stencil securely to the pumpkin and mark along the important design lines with a suitable transfer tool or toothpick.
Once I remove the paper, the marks give me a guide for carving. For complicated designs, I transfer one section at a time so I don’t lose track of the pattern.
What is the difference between carving and relief carving?
Traditional pumpkin carving cuts through the pumpkin wall, creating an opening where light can pass through.
Etching removes only part of the outer skin. Relief carving takes that idea further by using different depths to create areas that appear lighter or darker when illuminated.
I use traditional carving for faces and silhouettes and relief techniques when I want flowers, leaves, animals, or other fine surface details.
How do I light a carved pumpkin safely?
Battery-powered LED tea lights are my practical choice, especially for pumpkins around children, crowded porches, indoor displays, or other decorations.
If I use a real candle, I keep it on a stable, nonflammable surface, away from flammable materials, and never leave it unattended. I also avoid placing an open-flame pumpkin where children or pets can easily knock it over.
How early should I carve my pumpkin?
I prefer carving a few days before Halloween when possible rather than following a fixed number of days. Warm, humid conditions can cause a carved pumpkin to deteriorate more quickly, while cooler conditions may help it remain presentable longer.
I check the weather and the pumpkin itself instead of assuming every carved pumpkin will last the same amount of time.
How do I keep a carved pumpkin fresh longer?
I begin with a firm pumpkin, remove the pulp thoroughly, and keep the finished pumpkin shaded, cool, and protected from excess moisture when practical.
I monitor it for mold, leaking, soft spots, or unpleasant odors. Petroleum jelly around exposed cut edges can be used as an optional moisture-loss measure, but I don’t rely on it to prevent decay.
What pumpkin size is best for detailed carving?
For intricate designs such as the Mandala Circle, Sugar Skull, Moroccan Lattice, or Dragon Scales, I prefer a larger pumpkin with enough surface area for the pattern.
Small pumpkins are better suited to simple faces, large letters, and quick luminary designs. I also check the pumpkin’s wall thickness and firmness because size alone doesn’t determine how easy it will be to carve.
What’s my favorite way to photograph carved pumpkins?
I photograph the display after dark with the pumpkins illuminated from inside and most surrounding lights reduced.
Getting close to pumpkin level usually gives me a more natural view than shooting from above. If the carving creates shadows, I place the pumpkin near a light-colored wall so those patterns have somewhere to show.
Read this next: 19 Indoor Halloween Party Ideas For Teens That Are Spookily good
Conclusion
Pumpkin carving can be as simple or detailed as I want it to be. I don’t need every pumpkin on the porch to have an elaborate design for the display to feel finished. One carefully planned centerpiece with a few simpler supporting pumpkins can be enough.
Before I choose a pattern, I think about the pumpkin’s shape, the time I have available, where it will sit, and who will be around it. A detailed design needs more surface area and patience, while a bold simple face may work better when the pumpkin will be viewed from the sidewalk.
I also prepare my tools and work surface before I make the first cut. Sharp tools stay in adult hands, pumpkins stay on a stable surface, and I stop to reposition the pumpkin whenever a cut doesn’t feel controlled. For lighting, battery-powered LEDs are usually the easiest practical option.
The goal for me isn’t to make the most complicated pumpkin possible. It’s to choose a design I can finish safely, place it where people can actually see it, and enjoy having something handmade as part of my Halloween display.