20 Kids Rock Painting Ideas That Turn Ordinary Stones Into Tiny Treasures
If your kids collect rocks the way mine do, with pockets full of grey stones after every walk, then these kids rock painting ideas will turn that collection into something worth keeping. I tested every idea below at my kitchen table with my own children, using basic acrylic craft paint and rocks from our garden and local park paths.
I picked these twenty ideas because they use cheap supplies, suit a range of ages, and actually survive being displayed. I skipped any design that needed special pens I could not find locally or that peeled off within a week. Each one below includes the real cost, time, and difficulty, plus the honest downside I noticed while making it.
You do not need artistic talent for any of this. A smooth rock, a few colors of acrylic paint, and a clear sealer are enough to start. Related article: if your kids love small hand crafts, my pipe cleaner crafts for kids use the same kind of afternoon-craft energy and are just as low-mess.
Key Takeaways
- Smooth, flat rocks paint far better than rough ones, so sort your stones before you start.
- Two thin coats of acrylic paint always beat one thick coat, especially for yellow, white, and orange.
- A clear sealer is what turns a craft into a keepsake that survives windowsills and gardens.
- Paint pens are worth buying for faces, words, and small details that brushes make messy.
- Let kids choose their own colors; the rocks they love most are rarely the ones that follow the rules.
20 Kids Rock Painting Ideas to Try
Here are my twenty favorite kids rock painting ideas, tested at home and ranked by how much my kids actually enjoyed making them.
1. Ladybug Rocks

Start with a smooth, palm-sized rock, wash it, and let it dry completely. I paint the whole stone red with two thin coats of acrylic craft paint, then add a black head, a center line, and dots with the end of a paintbrush handle. A coat of clear sealer keeps the red bright outdoors.
My daughter made six of these in one rainy afternoon and lined them up on our windowsill like a tiny ladybug parade. They are still there months later. The honest downside is that the black dots smudge easily if little hands pick the rock up before the sealer dries, so I always seal them myself at the end.
Cost / Time / Difficulty: Cost: under $5 for a set | Time: 30 minutes plus drying | Difficulty: Easy
Pro Tip: Paint the dots with a cotton swab tip instead of a brush if your child is under six; the dots come out rounder and there is far less frustration.
2. Rainbow Stripe Rocks

Pick a flat, light-colored rock so the colors pop. I paint five or six stripes across the stone in rainbow order, using painter’s tape as a guide for younger kids and a steady hand for older ones. White acrylic underneath makes red, yellow, and blue look twice as bright.
We made these for our front steps, and neighbors actually stopped to comment on them. The downside is that tape can pull off the base coat if it is not fully dry, so wait a full hour first.
Cost / Time / Difficulty: Cost: $3-$6 | Time: 25 minutes plus drying | Difficulty: Easy
Pro Tip: Lay the rocks on a paper plate while painting; kids can spin the plate instead of touching a wet rock.
3. Silly Monster Rocks

These are my favorite for kids who say they cannot draw. Paint the rock any wild color, then glue on two googly eyes of different sizes and paint a zigzag mouth with a thin brush or a paint pen. Horns made from tiny triangles of felt or foam finish the look.
My youngest named his monster Growler and carried it in his pocket for a week. The downside is that glued eyes pop off if the rock gets dropped on concrete.
Cost / Time / Difficulty: Cost: $4-$7 | Time: 20 minutes plus drying | Difficulty: Easy
Pro Tip: Use a dot of hot glue yourself for the eyes and let kids do the painting; school glue alone rarely holds on smooth stone.
4. Garden Marker Rocks

Choose flat, oval rocks and paint a white or cream rectangle on top as a label panel. Once dry, write the plant name in permanent marker or paint pen: tomato, basil, mint, carrot. Seal with two coats of outdoor varnish so rain does not wash the words away.
I made a full set for our herb pots last spring, and my kids still run outside to read them when we cook. The honest downside is that markers fade in strong sun within a season, so I repaint the labels every spring.
Cost / Time / Difficulty: Cost: $5-$8 | Time: 40 minutes plus drying | Difficulty: Easy
Pro Tip: Paint the whole rock a light color first; dark stones make marker writing almost impossible to read from standing height.
5. Kindness Word Rocks

Paint the rock a calm solid color, then add one short word in a contrasting shade: brave, kind, you matter, breathe. I use a fine paint pen for the letters because it gives far more control than a brush, and I seal each rock before it leaves the house.
We hid twelve of these along our walking path, and a neighbor later told me she found the one that said breathe on a hard day. The downside is that small lettering is hard for kids under seven, so let them paint the base and you write the word.
Cost / Time / Difficulty: Cost: $3-$5 | Time: 20 minutes plus drying | Difficulty: Easy
Pro Tip: Keep the words to one or two syllables; long words crowd the rock and frustrate new writers.
6. Bumblebee Rocks
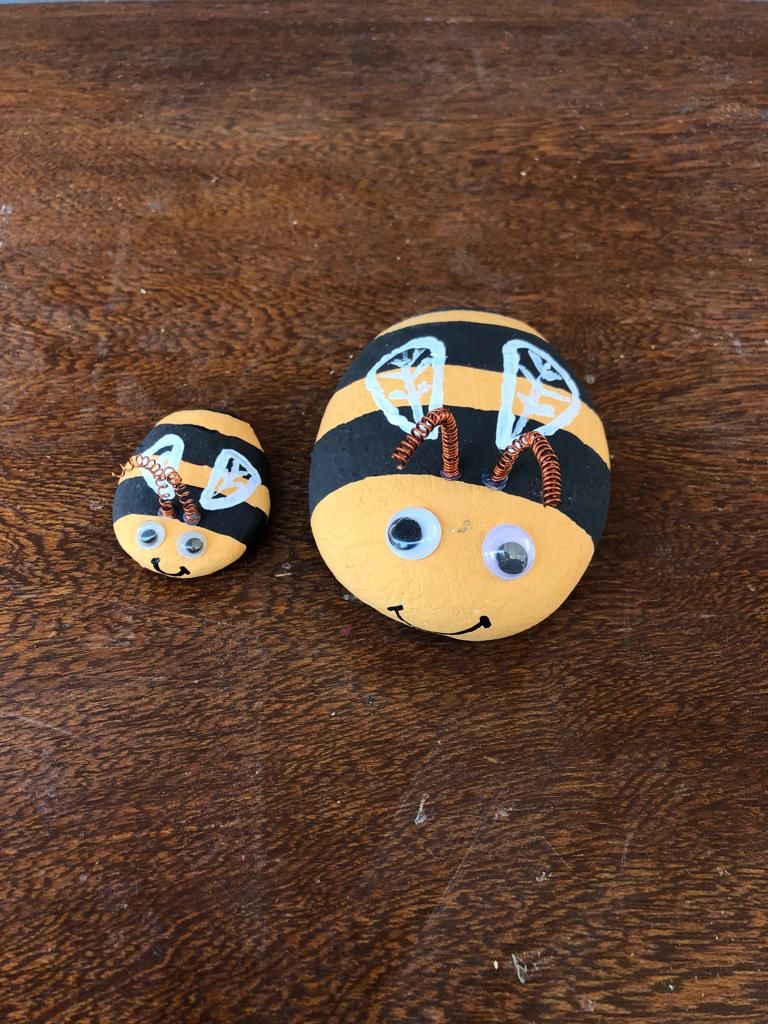
Paint the rock yellow, then add two or three black stripes with a flat brush and a small black head at one end. Two white teardrop wings painted on top, plus tiny eyes, turn it into a bee. A thin coat of sealer gives it a soft shine.
My daughter put hers in the flower bed, and for a week she insisted real bees were visiting it. The downside is that yellow shows every fingerprint, so handle painted rocks only by the edges until sealed.
Cost / Time / Difficulty: Cost: $3-$6 | Time: 30 minutes plus drying | Difficulty: Easy
Pro Tip: Draw the stripes lightly in pencil first; freehand stripes tend to drift and make the bee look lopsided.
7. Owl Rocks

A round, slightly tall rock makes the best owl body. I paint the belly cream, the rest brown, then add two big white eye circles with dark centers and a tiny orange triangle beak. Feather marks with a dry brush give the body texture without much skill.
My son’s owl still sits on our bookshelf, and he named it Professor Hoot. The downside is that dark brown paint can look muddy if applied too thickly, so thin coats work better.
Cost / Time / Difficulty: Cost: $4-$7 | Time: 35 minutes plus drying | Difficulty: Easy
Pro Tip: Use the round end of a pencil dipped in paint for perfectly round owl eyes every time.
8. Watermelon Slice Rocks

Paint the whole rock green, then add a thick pink or red oval on the face, a thin white rind line, and tiny black seed dots. A wedge-shaped rock works best, but any round rock reads as a watermelon slice once the colors are right.
We made a bowl of these for a summer picnic table, and guests kept trying to pick them up to eat. The downside is that pink needs two coats over green, or the green shows through and the slice looks dull.
Cost / Time / Difficulty: Cost: $3-$6 | Time: 30 minutes plus drying | Difficulty: Easy
Pro Tip: Paint the pink section first and the green rind last; it is much easier to neaten an outer edge than an inner one.
9. Cactus Rocks in Tiny Pots

Paint several tall, narrow rocks green, add lighter green vertical lines and tiny white dots for spines, then stand them in a small terracotta pot filled with pebbles or sand. No watering, no prickles, and they never die on a windowsill.
I made a set with my kids for my desk, and coworkers keep asking where I bought them. We solved standing them upright with a blob of modeling clay hidden under the pebbles. The downside is that top-heavy rocks tip easily, so choose flat-bottomed stones.
Cost / Time / Difficulty: Cost: $5-$9 including a pot | Time: 40 minutes plus drying | Difficulty: Easy
Pro Tip: Group three rocks of different heights in one pot; a single cactus rock on its own looks a little lost.
10. School of Fish Rocks

Paint each rock a bright ocean color, then add a triangle tail, a round eye, and a few scale dots along the body. Making five or six fish in different colors turns one small craft into a whole school, and they look wonderful arranged on a blue tray or plate.
My kids staged an entire ocean scene on our coffee table with these. The downside is that the tail shape is hard to paint neatly on a curved rock, so I now draw it in pencil first for younger kids.
Cost / Time / Difficulty: Cost: $4-$7 | Time: 45 minutes plus drying | Difficulty: Easy
Pro Tip: Vary the fish sizes; a school of identical fish looks flat, while mixed sizes look alive.
11. Daisy Flower Rocks
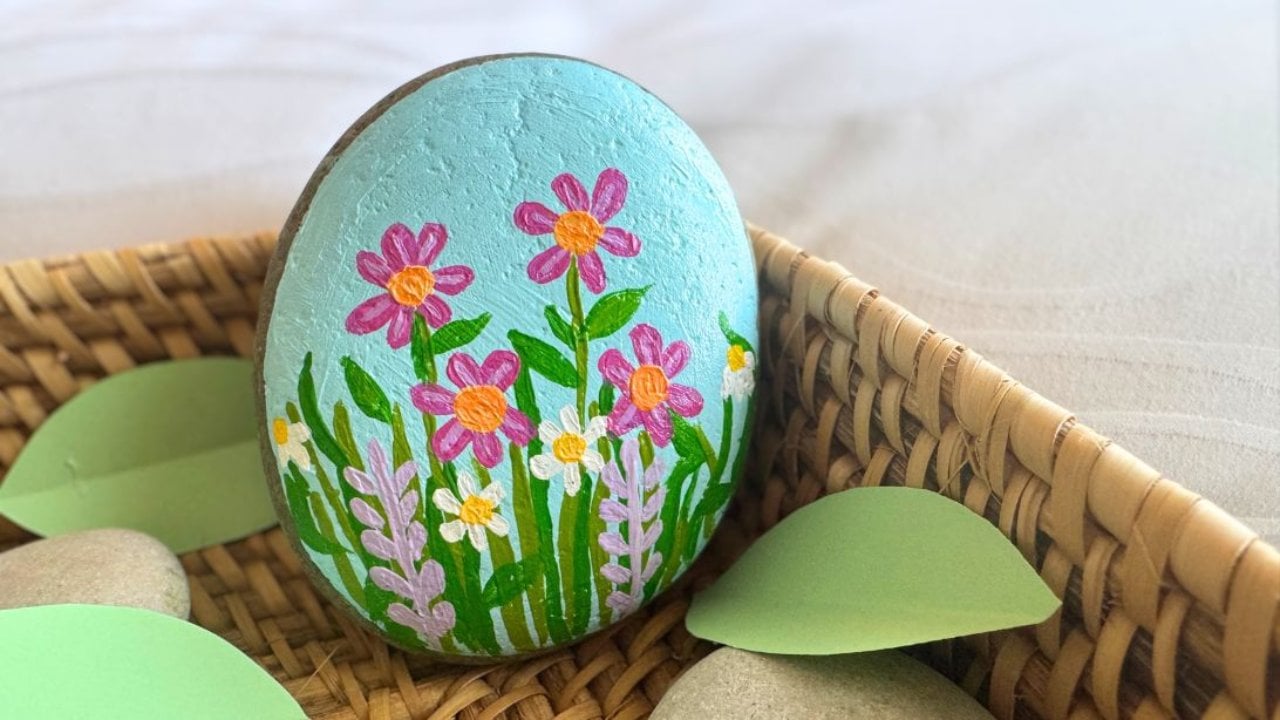
Paint the rock a soft background color, then add white petals around a yellow center using the flat end of a brush or a fingertip. I like to paint one big daisy on a large rock and three small ones on a smaller stone so kids can choose their challenge level.
These were the first rocks my daughter ever painted, and she still remembers which one was hers because the petals are delightfully uneven. The downside is that white petals need two coats to look clean, and impatient painters will smear the first coat. Patience is genuinely part of this craft.
Cost / Time / Difficulty: Cost: $3-$6 | Time: 30 minutes plus drying | Difficulty: Easy
Pro Tip: Let kids press a thumbprint for each petal; thumbprint daisies look charming and need almost no brush control.
12. Emoji Face Rocks

A round, yellow-painted rock is a blank emoji waiting to happen. Kids paint or draw a favorite expression: happy eyes, heart eyes, a silly tongue, or a sleepy face. Black paint pens work best for the details, and a clear sealer keeps the face from rubbing off.
My son made a whole set of moods and used them at breakfast to show how he felt without saying a word. It became a surprisingly useful family routine. The downside is that paint pens bleed on rough stone, so smooth rocks matter more for this idea than for almost any other.
Cost / Time / Difficulty: Cost: $3-$5 | Time: 20 minutes plus drying | Difficulty: Easy
Pro Tip: Sketch the face in pencil first and let kids trace over it with the paint pen for cleaner expressions.
13. Galaxy Night-Sky Rocks

Paint the rock deep navy or black, then sponge on purple, teal, and white in soft patches. Flick white paint off a toothbrush for stars, and add one or two bigger dots as planets. The sponging technique hides mistakes beautifully, which makes this great for nervous painters.
I tried this with a group of kids at a birthday party, and every single galaxy looked different and genuinely beautiful. That never happens with more precise crafts. The downside is that toothbrush flicking sprays paint everywhere, so do it outside or inside a cardboard box.
Cost / Time / Difficulty: Cost: $4-$7 | Time: 35 minutes plus drying | Difficulty: Medium
Pro Tip: Use a dry sponge, not a wet one; too much paint turns the galaxy into one muddy purple blob.
14. Christmas Penguin Rocks

Paint the rock black, then add a white belly oval, two eyes, and an orange beak and feet. A tiny red scarf painted around the neck or a scrap of felt tied on top makes it festive. These are perfect for December craft tables and small handmade gifts.
We made a family of penguins one December evening, and they still come out with the decorations every year. My youngest insisted his penguin wear a Santa hat, which we painted on top. The downside is that felt scarves fall off in storage, so I now paint scarves on and skip the fabric.
Cost / Time / Difficulty: Cost: $4-$7 | Time: 35 minutes plus drying | Difficulty: Easy
Pro Tip: Paint the white belly before the black outline; it is easier to neaten black edges than white ones.
15. Heart Rocks for Someone You Love

Paint the rock a favorite color, then add a heart in a contrasting shade using a stencil, a potato stamp, or a steady hand. Writing initials or a short message inside the heart turns it into a keepsake gift for a grandparent, teacher, or friend.
My daughter gave one to her grandmother, who keeps it on her kitchen windowsill to this day. That rock cost almost nothing and means more than most store gifts. The downside is that hearts painted freehand often come out lopsided, so a simple paper stencil saves tears.
Cost / Time / Difficulty: Cost: $3-$5 | Time: 20 minutes plus drying | Difficulty: Easy
Pro Tip: Cut a heart stencil from masking tape stuck on the rock; it gives a crisp edge and peels off cleanly.
16. Turtle Rocks
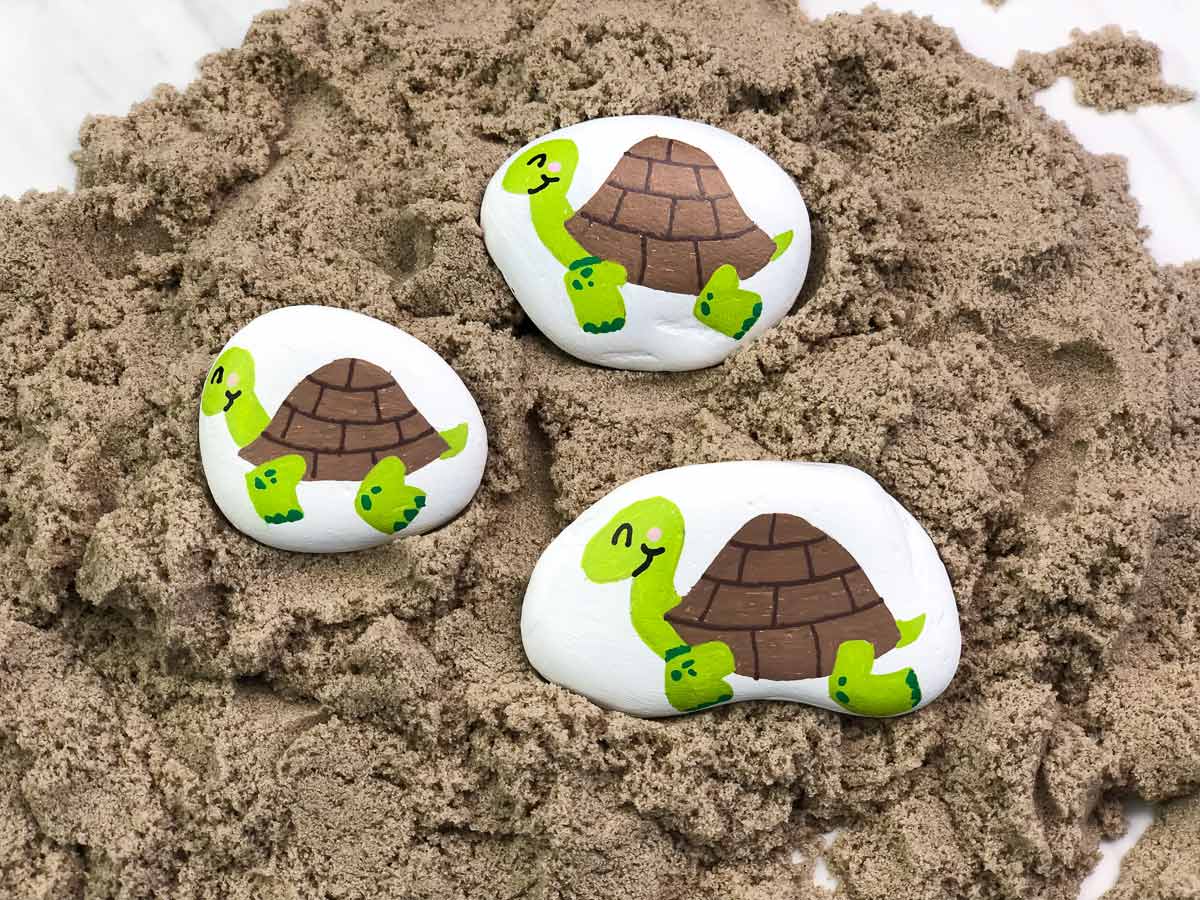
A low, dome-shaped rock is already a turtle shell. Paint the shell green with a pattern of darker shapes, then add a head, four legs, and a tail at the edges with paint or small stones. A smile painted on the head gives the turtle instant personality.
Our turtle rocks live in the garden bed, and my son checks on them every morning like real pets. The shell pattern took longer than I expected because we kept adding more detail. The downside is that legs painted on the sides rub off quickly outdoors, so seal garden turtles twice.
Cost / Time / Difficulty: Cost: $4-$7 | Time: 35 minutes plus drying | Difficulty: Easy
Pro Tip: Keep the shell pattern simple for young kids: five big shapes beat twenty tiny ones that blur together.
17. Pumpkin Patch Rocks for Halloween

Paint round, slightly squat rocks bright orange, add darker orange ribs with a thin brush, then paint a green or brown stem on top. A little jack-o-lantern face turns them into Halloween decorations, while plain pumpkins work all autumn long.
We lined our porch steps with these last October, and they survived wind and rain far better than real carved pumpkins. My daughter’s favorite had a deliberately goofy face. The downside is that orange paint over grey stone needs three thin coats, so start this one early in the day.
Cost / Time / Difficulty: Cost: $3-$6 | Time: 30 minutes plus drying | Difficulty: Easy
Pro Tip: Dry-brush a little yellow on the ribs after the orange dries; it gives the pumpkin a rounded, realistic look.
18. Cat Face Rocks

Paint the rock in your cat’s colors, then add two triangle ears at the top, whiskers with a thin brush or paint pen, and eyes that match your pet. A pink triangle nose finishes the face. Kids who love animals spend the longest on this one.
My daughter painted our tabby cat’s face so carefully that guests recognized the cat immediately. She was enormously proud. The downside is that whiskers are the hardest detail to paint, and one shaky line can make the cat look surprised forever, so practice on paper first.
Cost / Time / Difficulty: Cost: $3-$6 | Time: 30 minutes plus drying | Difficulty: Easy
Pro Tip: Paint the ears the same color as the face first, then add a smaller pink inner-ear triangle once dry.
19. Snowman Rocks

Stack the idea, not the rocks: paint a single tall rock white, then add a black hat, coal eyes, a carrot nose, and a scarf stripe. Or paint three round rocks as snowman faces and display them in a row. Either way, they make sweet winter gifts.
We made snowman rocks for teacher gifts one December, and they were finished in a single afternoon with paint we already owned. The downside is that white paint shows every brush stroke, so use a foam brush for a smoother finish. My first snowman looked streaky until I learned that trick.
Cost / Time / Difficulty: Cost: $3-$6 | Time: 30 minutes plus drying | Difficulty: Easy
Pro Tip: Use a foam brush or sponge for the white base coat; bristle brushes leave visible lines on white paint.
20. Mandala Dot Rocks

This is the calmest rock painting idea I know. Paint the rock black, then build a mandala from the center outward using dots of different sizes and colors, made with dotting tools, pencil ends, or toothpicks. There is no wrong pattern, which makes it relaxing for older kids.
I made one alongside my ten-year-old on a quiet Sunday, and we both ended up completely absorbed for over an hour. That focus is rare and wonderful. The downside is that mandala dots take real patience, and younger kids often rush the outer rings, so save this one for ages eight and up.
Cost / Time / Difficulty: Cost: $5-$9 including dotting tools | Time: 45-60 minutes plus drying | Difficulty: Medium
Pro Tip: Start with one big center dot and work outward in rings; planning the whole pattern first leads to cramped edges.
Which Rock Painting Idea Should You Start With?
| Idea group | Best for | Cost | Effort |
|---|---|---|---|
| Ladybug, Bee, Owl | Ages 4+ | $3-$7 | Easy |
| Monster, Emoji, Heart | Ages 5+ | $3-$7 | Easy |
| Garden markers, Fish, Turtle | Ages 6+ | $4-$8 | Easy |
| Galaxy, Mandala | Ages 8+ | $4-$9 | Medium |
| Penguin, Snowman, Pumpkin | Seasonal gifts | $3-$7 | Easy |
Mistakes I Made (So You Don’t Have To)
I skipped washing the rocks. Dusty stones reject paint, and the first coat peeled off in sheets on our very first batch. A quick wash with soap and water, plus full drying, fixed the problem completely.
I sealed rocks while they were still damp. The sealer turned cloudy and trapped moisture underneath, ruining three ladybugs. Now I wait until the paint is dry to the touch and then wait another hour before sealing.
I bought one thick brush for everything. Details were impossible, and my kids got frustrated fast. A small set with a flat brush, a round brush, and a detail brush costs little and changes the whole experience.
I let kids paint on the good table without a cover. Acrylic paint does not forgive a wooden table. An old shower curtain or a stack of newspaper is now a non-negotiable part of our setup.
Frequently Asked Questions
What paint works best for kids rock painting?
Basic acrylic craft paint is my pick. It covers stone well, dries fast, and costs little. Washable kids paint looks bright at first but rubs off without heavy sealing, so I only use it for practice rocks.
Do painted rocks last outside?
Yes, if you seal them with two coats of clear outdoor varnish. Unsealed rocks fade within weeks in sun and rain. Sealed ones in my garden have lasted through a full summer and winter.
What age can kids start rock painting?
Four-year-olds can paint solid colors and dots happily. Faces, words, and mandala dots suit ages seven and up. The trick is matching the design to the child, not forcing a hard design on a young painter.
How do I seal painted rocks?
I use a brush-on clear varnish or a spray sealer outdoors. Two thin coats, dried fully between coats, protect the paint. I always do the spraying myself, away from kids, because of the fumes.
Where can kids hide or gift painted rocks?
We gift most of ours to grandparents and teachers, and hide kindness rocks along walking paths. Check local rules first: some parks and nature reserves ask visitors not to leave painted rocks behind.
Final Thoughts
Rock painting is the rare craft that starts with a free walk and ends with something my kids are genuinely proud of. The rocks on our windowsill are not perfect, and that is exactly why we love them. Each one carries a memory of an afternoon together.
Start with ladybugs or monsters this weekend, and keep a small box of smooth rocks ready for rainy days. Also read my rainbow crafts for kids for more color-filled projects, and read this next: easy flower painting ideas if your child falls in love with painting. Happy painting, and may your pockets always be full of good stones.