20 Ornament Storage Ideas
The year I found my grandmother’s glass angel in pieces at the bottom of a bag, I knew my ornament storage had to change completely. That loss is why I rebuilt everything around ornament storage ideas that protect glass, keep memories intact, and make next December’s tree go up without a single sad discovery.
I picked these 20 ornament storage ideas by using each one through at least one full pack-up and unpack cycle in my own house, keeping what protected ornaments and dropping what chipped, tangled, or hid things. Some of these systems cost nothing, and the most expensive one still costs less than replacing a single box of good glass baubles.
Key Takeaways
- Give every ornament its own compartment or wrap, never let glass touch glass.
- Keep heirlooms and kids’ handmade pieces in their own separate boxes.
- Label by color, room, or tree so unpacking takes minutes, not hours.
- Store boxes indoors, off damp floors, with a photo of the contents on the lid.
1. A Divided Box With One Ornament Per Cell

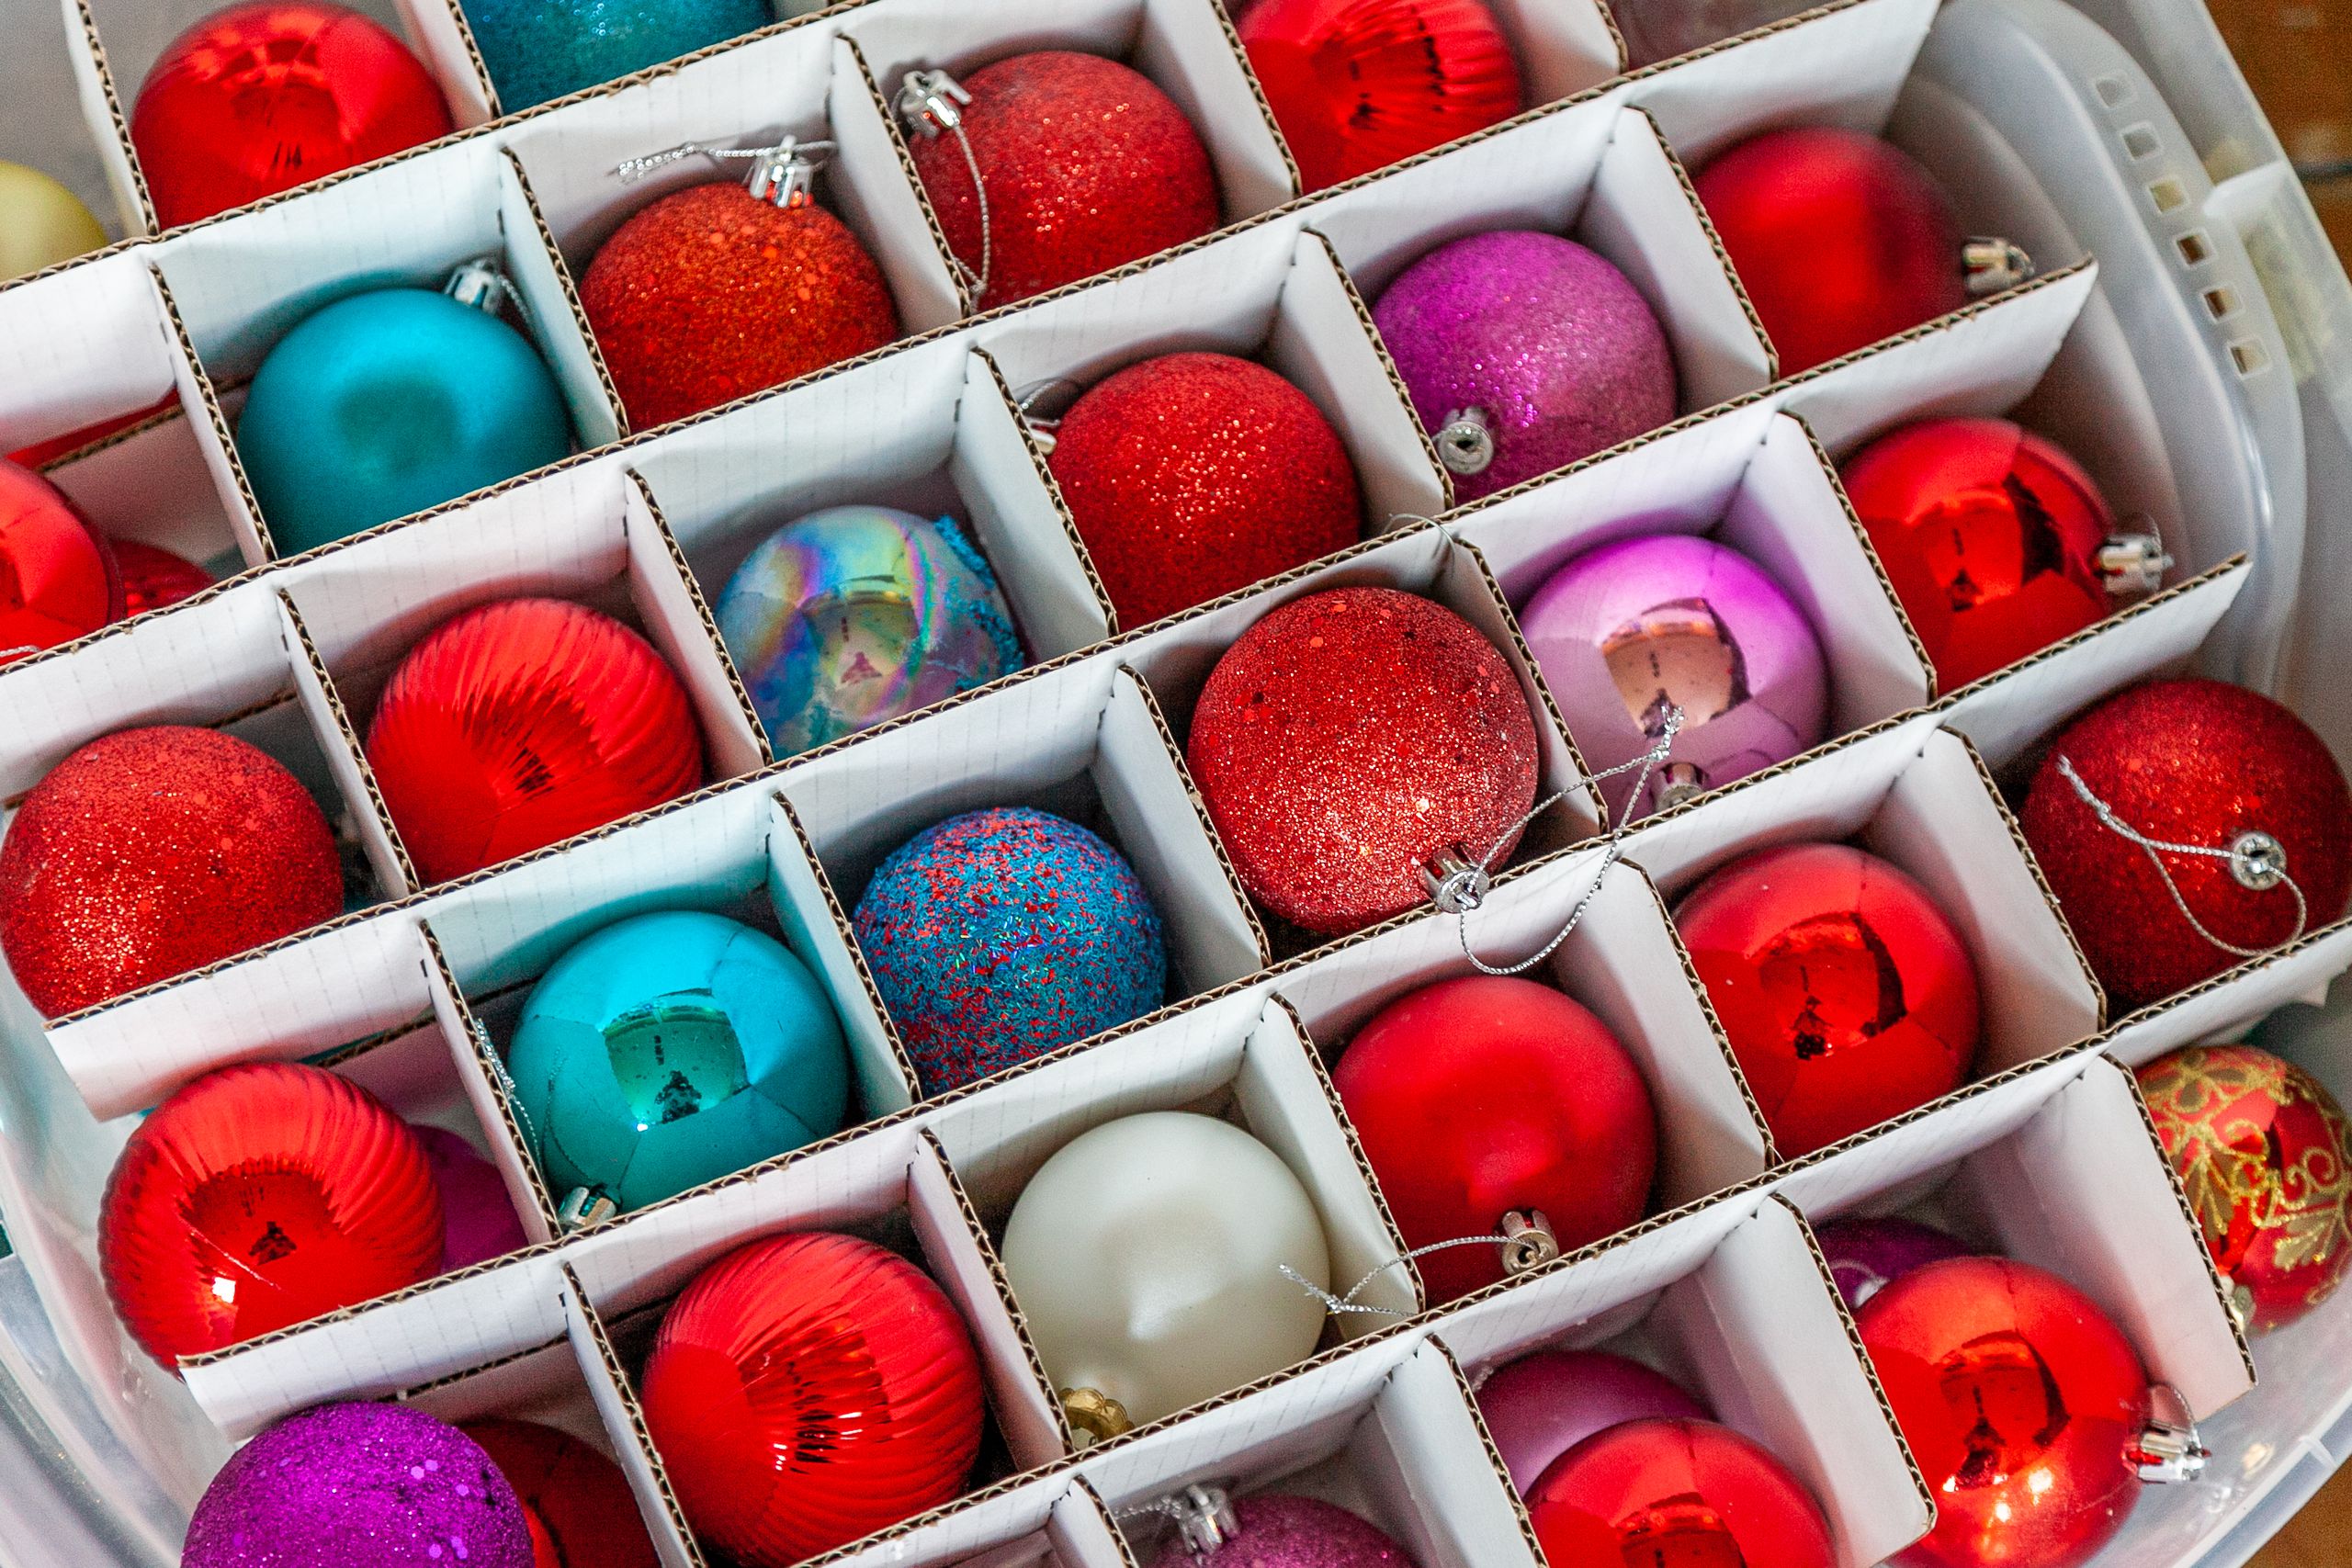
The single best change I made was moving from bags to divided boxes where every ornament gets its own cell. Glass stopped knocking against glass, hooks stopped tangling into nests, and unpacking became a calm job instead of a salvage operation. My everyday baubles have survived four seasons in these boxes without a single chip.
I sort the boxes by color, so each box goes straight to its tree on setup day, with tissue between stacked trays.
Pro Tip: Choose dividers you can move, so large ornaments get double cells instead of being squeezed.
Cost: $12–$25 per box | Time: 30 minutes | Difficulty: Easy
2. Egg Cartons for Tiny Baubles

Tiny baubles are the hardest ornaments to store, because they roll everywhere and chip the moment they touch each other. Sturdy egg cartons solved it for free: each mini bauble sits in its own cup, the carton closes flat, and several cartons stack inside one lidded bin. I have kept the same set of mini baubles unchipped for four years this way.
The honest limit is that cartons are not waterproof and they look scruffy, so they always stay inside a sealed bin and never on a damp garage floor. For anything valuable I use a proper tray, but for everyday minis, cartons are unbeatable.
Pro Tip: Line each cup with a tissue square for shiny finishes that scratch easily.
Cost: Free | Time: 15 minutes | Difficulty: Easy
3. Plastic Cups Glued Into a Tray

When I needed more divided trays than I wanted to buy, I hot-glued small plastic cups into a shallow box and made my own. It took one evening, cost almost nothing, and held my medium ornaments perfectly through two seasons. The cups keep ornaments from rolling, and the shallow box stacks neatly with the store-bought trays.
Hot glue needs care here, and I burned a fingertip the first time I rushed, so I use a low-heat gun now and let every cup cool before placing ornaments. The tray is also not as sturdy as a bought one, so it stays on top of the stack, never underneath.
Pro Tip: Use cups slightly wider than your ornaments, so nothing has to be forced in.
Cost: $3–$8 | Time: 45 minutes | Difficulty: Easy
4. Tissue-Wrap Every Glass Piece

Glass ornaments get wrapped individually in plain tissue in my house, no exceptions, because one unwrapped piece can scratch three neighbors in a single car ride to the attic. I wrap loosely rather than tight, since tight wrapping presses glitter and paint onto the tissue and pulls it off by December. It takes a little longer, but it is the reason my glass collection still looks new.
I never use newspaper for this, after newsprint rubbed gray marks onto a white ceramic angel years ago. Plain tissue is cheap, soft, and safe for every finish I own, from matte to glittered.
Pro Tip: Write the ornament’s story on the tissue in pencil before wrapping, so memories travel with it.
Cost: $3–$6 for tissue | Time: 20 minutes per box | Difficulty: Easy
5. A Separate Heirloom Box

The ornaments that matter most get their own box, far from the everyday baubles: my grandmother’s angel, the first ornament my husband and I bought, and the ones the kids made as toddlers. That box is smaller, sturdier, clearly labeled, and stored indoors where temperature and dampness cannot reach it. Losing one heirloom taught me that separation is not fussiness, it is protection.
Inside, every piece is tissue-wrapped and nestled in soft fabric, with nothing heavy on top, and I photograph the contents each year.
Pro Tip: Keep the heirloom box small enough to carry with one hand, so it never gets stacked under heavy bins.
Cost: $10–$20 for a sturdy box | Time: 30 minutes | Difficulty: Easy
Related article: 20 Salt Dough Ornament Craft Ideas for a Homemade Christmas Tree
6. Separate Zones for Glass and Shatterproof

Our house has two kinds of trees now: the main tree with glass ornaments up high, and the family-room tree with shatterproof ornaments where little hands and pets can reach. Storing them in separate, clearly marked zones stopped the annual mix-up where a glass bauble ended up on the low branches. The shatterproof box is even labeled with a big green dot the kids recognize.
The shatterproof ornaments still get divided trays, because even unbreakable ornaments scratch and lose their shine when they rub together. Separation is about safety and about keeping both collections looking their best.
Pro Tip: Mark the shatterproof box on all four sides, so it is identifiable from any angle on a shelf.
Cost: $12–$25 per box | Time: 20 minutes | Difficulty: Easy
7. Wooden Ornaments in Their Own Tray

Wooden ornaments need different care from glass: they do not shatter, but they do dent, and their paint chips when they knock together. Mine live in a shallow tray lined with felt, each piece in its own space, with no stacking. The hand-painted set from a craft fair has survived six years this way, which is longer than any previous storage method managed.
Wood also hates dampness, so this tray stays indoors and never in the garage, where humidity warped a wooden star of mine one winter. A small silica packet in the box helps, and I replace it every year when I unpack.
Pro Tip: Line the tray with felt or soft cloth, not bubble wrap, which can stick to painted surfaces over time.
Cost: $8–$15 for a tray | Time: 20 minutes | Difficulty: Easy
8. A Photo Map of Where Ornaments Hang

Every December I take a photo of our finished tree before taking it down, and I tuck a printout into the ornament box. The next year, that photo tells me exactly which ornaments hung where, so the tree looks balanced without an hour of rearranging. It also settles the annual debate about whether the gold star went on the left or the right.
The photo doubles as an inventory: if an ornament is missing, I can see it in the photo instead of assuming it was thrown away.
Pro Tip: Take the photo in daylight with the tree lights off, so colors show true.
Cost: Free | Time: 5 minutes | Difficulty: Easy
9. Color-Coded Boxes by Tree

We decorate two trees, so I color-code the ornament boxes to match: gold tape for the living room tree, red tape for the family room tree. The tape goes on the front and sides of every box, and setup day became dramatically simpler, because each box goes straight to its tree without opening. The kids learned the system in one season.
The tape also helps at pack-up, because a gold ornament found in January goes straight into a gold-taped box instead of a random one. Color-coding sounds simple, and that is exactly why it works when everyone in the house is tired.
Pro Tip: Match the tape color to the tree’s main ornament color, not the room color, to avoid confusion.
Cost: $3–$6 for tape | Time: 10 minutes | Difficulty: Easy
10. Felt Pouches for Painted and Glittered Pieces

Painted and glittered ornaments shed and scratch when they rub, so mine travel in small felt pouches inside the divided trays. The felt is soft enough to protect glitter and paint, and each pouch holds one ornament, which stops the slow damage I used to find every December. A set of glittered stars that once arrived half-bald now comes out looking freshly made.
I sew simple pouches from felt scraps in January, which is a calm craft job after the holidays, and I label each pouch with a fabric pen. Store-bought pouches work just as well if sewing is not your thing.
Pro Tip: Never store glittered ornaments in plastic bags, which build static and pull glitter off.
Cost: $5–$12 for pouches | Time: 30 minutes | Difficulty: Easy
Also read: 20 Winter Wreath Craft Ideas to Make Your Door Feel Like December
11. A Keepsake Box With a Ribbon Tie

Each child in our house has a small keepsake box tied with ribbon, holding the ornaments they made or received each year. The ribbon makes the box feel special, and more practically, it stops the lid from sliding off on a shelf. When the kids are grown, these boxes will be the easiest gift I ever give them, already packed and labeled by year.
Inside, ornaments are wrapped in tissue and layered with soft cloth, and I add a short note each year about what happened that Christmas. The notes have become just as precious as the ornaments themselves.
Pro Tip: Use a different ribbon color per child, so boxes are identifiable without reading labels.
Cost: $6–$12 per box | Time: 20 minutes | Difficulty: Easy
12. A Kids-Can-Touch Bin of Their Own

Every child wants to handle ornaments, and telling them not to touch anything makes December miserable for everyone. So each of my kids has a bin of sturdy, handmade, and shatterproof ornaments they can hang, rearrange, and even drop without a crisis. Their own small tree in the playroom gets decorated entirely by them, and the main tree stays calm.
The handmade pieces in these bins still get tissue wrapping, because paper and salt dough crumble when tossed loose. But the rule is relaxed on purpose: this bin is for joy first and perfection second, and it has made our Decembers much happier.
Pro Tip: Let kids pack their own bin in January, so they learn care without a lecture.
Cost: $8–$15 per bin | Time: 20 minutes | Difficulty: Easy
13. Handle Heirlooms With Clean Hands and Tissue

Old ornaments carry oils and dust from decades of handling, and I learned to wash and dry my hands before touching the heirloom box, every single time. Skin oils darken old paint and weaken old glue, and a quick hand wash is the cheapest preservation step there is. I also handle heirlooms over a soft towel, so a slip does not become a smash.
Each heirloom gets fresh tissue every year, because old tissue collects dust and grit that can scratch. It adds ten minutes to pack-up, and it is the reason a sixty-year-old ornament in my house still looks like it did in my grandmother’s home.
Pro Tip: Keep a soft towel in the heirloom box lid, ready for handling day.
Cost: Free | Time: 10 minutes | Difficulty: Easy
14. Flat Storage for Flat Ornaments

Flat ornaments like wooden stars, felt shapes, and paper snowflakes get crushed in deep boxes, so mine live in a shallow flat box layered with tissue like pages in a book. Each layer holds one row of ornaments, and I can flip through them without lifting a pile. The paper snowflakes my daughter made three years ago are still perfectly flat because of this one change.
The flat box sits on top of the stack, never underneath, because even a light bin will bend paper ornaments over eleven months.
Pro Tip: Slip a sheet of card between layers for extra stiffness on long storage.
Cost: $8–$14 for a flat box | Time: 15 minutes | Difficulty: Easy
15. Coil Garlands Separately, Never With Ornaments

Garlands stored with ornaments are a recipe for tangles and scratches, because beads and wire wrap around hooks and chip paint. I coil each garland loosely around a cardboard tube, slip it into its own bag, and store it beside, never inside, the ornament boxes. The first year I separated them, unpacking took half the time and nothing was scratched.
Beaded garlands get extra care: I coil them loosely and never pull them tight, because tight coils stretch the string and snap beads. A snapped garland in January is a repair job nobody wants, and loose coils prevent it entirely.
Pro Tip: Label each garland bag with its length, so you grab the right one for each tree.
Cost: Free with scrap tubes | Time: 10 minutes per garland | Difficulty: Easy
Read this next: 20 Christmas Crafts for Kids
16. A Padded Box for the Tree Topper

The tree topper is the most fragile and most awkward ornament in the house, and it deserves better than the top of a mixed bin. Mine lives in its own padded box, wrapped in tissue and nested in soft cloth, with the word topper written large on every side. It has survived five years this way, including two house moves.
Star toppers with points need the most room, because bent points never straighten properly. I measure the topper before choosing its box, and I never let anything else share that box, no matter how tempting the empty space looks.
Pro Tip: Store the topper box with the first-out box, so setup day never starts with a search.
Cost: $8–$15 for a padded box | Time: 10 minutes | Difficulty: Easy
17. A Small Repair Kit in the Ornament Bin

Every ornament bin in my house now holds a tiny repair kit: spare hooks, a small tube of clear glue, a needle and thread for fabric pieces, and a few replacement caps for baubles. When I find a loose hook or a wobbly cap at unpack time, I fix it on the spot instead of setting it aside and forgetting it until next year. Last December I repaired four ornaments in ten minutes flat.
The glue stays sealed in a zip bag, since a leaked tube once glued a tray compartment shut, and I check the kit every January.
Pro Tip: Add a few spare ornament caps in mixed sizes, since caps are the part that vanishes most.
Cost: $5–$10 | Time: 10 minutes | Difficulty: Easy
18. Audit Ornaments Before You Pack Them Away

Before anything goes into a box, I lay all the ornaments out on the table and do a quick audit: broken ones get repaired or recycled, unloved ones go to donation, and favorites get noted for next year’s tree plan. The audit takes twenty minutes and stops damaged ornaments from being stored, rediscovered, and stored again for years. I found three cracked baubles this way last January that I would otherwise have packed.
I also count the boxes during the audit, so I know exactly how many bins need shelf space. That count stops the January surprise of one bin too many for the attic shelf.
Pro Tip: Audit while the tree is still up in your memory, not weeks later when details fade.
Cost: Free | Time: 20 minutes | Difficulty: Easy
19. A Tree Plan Card Inside the Box Lid

Alongside the tree photo, I tape a small plan card inside the ornament box lid listing which ornaments go on which tree and roughly where: heirlooms up high, kids’ pieces at their eye level, heavy baubles on strong lower branches. It sounds overly organized, but it stops the yearly debate about where things belong and keeps fragile pieces off the branches the dog brushes past.
I update the card every January in pencil, since the plan drifts a little each year as the kids grow and new ornaments join the collection. The card also notes which box holds the topper, so setup day never starts with a search through every bin.
Pro Tip: Keep the card short, ten lines at most, or nobody will read it next December.
Cost: Free | Time: 10 minutes | Difficulty: Easy
20. Keep Wreath Ornaments With Their Wreath

Small ornaments that live on wreaths used to get stripped off at pack-up and lost in the big ornament boxes, so the wreaths came out bare the next year. Now wreath ornaments stay attached to their wreath, and the whole wreath goes into its own bag. The wreaths look complete the moment they come out, and I never hunt for their matching pieces.
The trade-off is that wreath bags take more space than flat ornament trays, so I only do this for two favorite wreaths and store the rest of the small ornaments normally. For those two wreaths, though, the time saved and the look preserved are absolutely worth the shelf space.
Pro Tip: Photograph each wreath before bagging it, so you can check nothing fell off in storage.
Cost: $5–$15 per wreath bag | Time: 10 minutes | Difficulty: Easy
Mistakes I Made With Ornament Storage Ideas
My worst mistake was storing ornaments loose in a shopping bag, which is how my grandmother’s angel broke. Bags let glass knock together, hooks tangle, and heavy pieces crush light ones, and I will never use one for ornaments again. Divided boxes cost a little, but they cost far less than replacing a memory.
I also stored ornament boxes in the garage for two winters before dampness dulled wooden ornaments. Now glass and wood stay indoors, and only sealed shatterproof bins go in the garage.
My third mistake was skipping labels because I trusted my memory. I mixed up the trees, misplaced the heirlooms, and spent one whole December searching for a star that was in the wrong box all along. Big labels on two sides of every box fixed a problem that was entirely my own making.
Ornament Storage Comparison Table
| Method | Best For | Cost | Effort |
|---|---|---|---|
| Divided boxes | Glass and everyday baubles | Medium | Low |
| Egg cartons | Mini baubles | Free | Low |
| Tissue wrapping | Glass and glittered pieces | Low | Medium |
| Heirloom box | Sentimental pieces | Medium | Low |
| Felt pouches | Painted and glittered ornaments | Low | Low |
| Flat boxes | Flat and paper ornaments | Low | Low |
Frequently Asked Questions
How long did your ornament system actually last?
The divided boxes and heirloom box have lasted five seasons with zero glass breakages. The only failures were shortcuts: damp cardboard and one overstuffed tray.
What would you do differently if you started over?
I would buy divided boxes from the very first year instead of spending three years with bags and hoping for the best. I would also photograph every box from day one, because those photos have stopped duplicate purchases and settled more than one lost-ornament panic.
Can I store ornaments in the attic?
Yes, if the boxes are sealed plastic, kept off the floor, and away from roof leaks and extreme dampness. I keep heirlooms and wood indoors, and only sturdy sealed boxes go in the attic, checked once in summer.
How do I stop ornament hooks from tangling?
Remove hooks before packing and store them in a small zip bag taped inside the box lid, or leave one hook per ornament but nest each ornament in its own cell so hooks cannot reach each other. Either method beats untangling a nest in December.
Final Thoughts
Good ornament storage ideas are really about respect for the stories hanging on your tree. A divided box, a sheet of tissue, and a label cost almost nothing, but they protect the pieces your family will still be hanging decades from now.
Start this January with one box: sort it, wrap it, label it, and photograph it. By next December, your tree will go up faster and nothing will be broken.