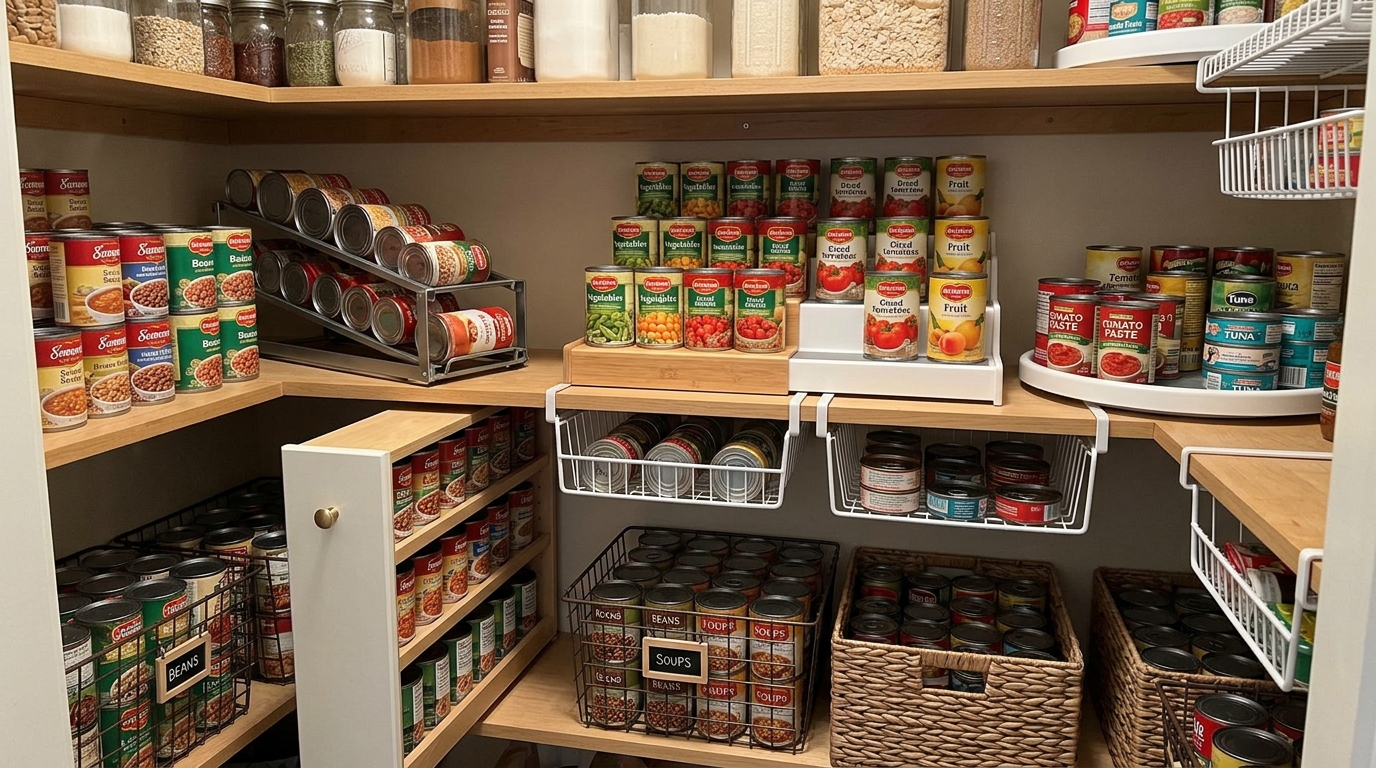
23 Canned Food Storage Ideas for 2026
Canned food is convenient for quick meals, but it can be surprisingly easy to lose track of what is already in the cupboard. A few cans of beans, tomatoes, and soup can turn into crowded shelves, hidden labels, and duplicate grocery purchases. When I cannot see what I have, planning meals and using older supplies becomes harder.
The good news is that useful canned food storage ideas do not have to involve a pantry makeover or a collection of expensive organizers. Simple category groupings, shelf risers, and sturdy dividers can make an existing cabinet work better. For larger collections, pull-out baskets and dedicated shelving may offer more convenient access.
Below, I cover 23 ways to organize canned goods for different kitchen layouts, from a single cupboard in a small home to a walk-in pantry with room for bulk supplies. The right setup depends on your available space, the sizes of your cans, and how easily you need to reach them.
I recommend keeping canned food in a cool, dry place, grouping similar products together, and placing older, suitable cans where they are easy to use first. Tiered racks, clear bins, drawer dividers, and pull-out baskets can improve visibility, while pantry walls and cubby shelving provide more capacity when space allows.
Save this for later
Table of Contents
Before purchasing an organizer, measure the available area and check its weight rating. A simple shelf arrangement may be all you need to keep supplies visible and reduce unnecessary grocery purchases.
Key Takeaways
- Group canned goods by type, such as beans, vegetables, fruit, soups, and sauces.
- Keep labels visible and rotate suitable products according to their dates and storage guidance.
- Measure cabinets, drawers, and door clearance before buying organizers.
- Place heavy cans on sturdy, lower shelves whenever possible.
- Use existing shelves and inexpensive dividers before investing in a new storage system.
- Check cans and home-canned jars for damage or warning signs before use.
Related article: 26 Vertical Storage Ideas for 2026
How Can You Build a Simple Canned Food Storage System at Home?
Start by choosing one main storage area for canned food. A kitchen cabinet, pantry shelf, or sturdy freestanding rack can work, provided the location stays cool and dry. Keeping most of your cans together makes it easier to check supplies before shopping.
Next, assign a place to each food group. Beans and lentils can share a section, while soups, vegetables, fruit, and sauces can occupy separate rows or shelves. If you have only one shelf available, small dividers or a little space between groups can be enough.
Use vertical space when the shelf height allows it. Tiered racks make labels easier to see, while bins and drawer dividers keep cans grouped together. Leave enough clearance to remove individual cans without moving a whole stack.
Before buying anything, measure the width, depth, and usable height of the storage area. Also consider the weight of full cans and whether the shelf or drawer can support them. A simple system that fits your kitchen is more useful than an elaborate one that is difficult to maintain.
Pro Tip: Check your existing supplies before grocery shopping. Keep older, suitable products accessible and place new purchases behind them, following the product’s storage guidance.
1. Gravity-Feed Can Dispenser
Best for: Households that regularly buy the same sizes of canned food.
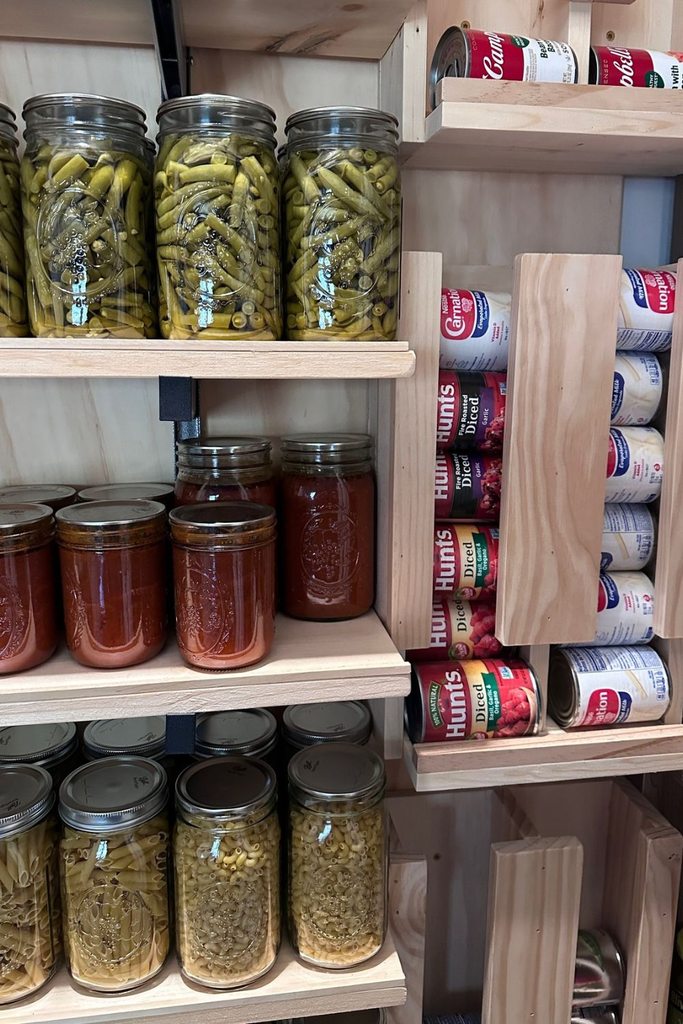
A gravity-feed can dispenser uses angled tracks to move cans toward the front as space becomes available. Depending on the design, you load cans from the top or back, and the next can moves into position when one is removed.
This setup can be useful for frequently used products such as beans, tomatoes, and soups. Before buying or building a dispenser, check the can diameter, height, and track length. Different can sizes may not move smoothly through the same channel.
A homemade wooden dispenser is an option for someone comfortable with basic DIY work, but the rails must be secure, the edges smooth, and the angle suitable for the cans. Test it with a few cans before loading it fully.
Pro Tip: A dispenser helps with access, but it does not automatically ensure that older cans are used first. Check dates and reload it carefully so your rotation system stays reliable.
2. Tiered Canned Food Racks

Best for: Existing cabinets where cans at the back are difficult to see.
Tiered racks create raised levels on a shelf, allowing the labels on the back row to remain visible above the front row. This makes it easier to find a particular soup or vegetable without lifting several cans out of the way.
These organizers come in different widths and materials, including metal, plastic, and wood. Measure the cabinet’s depth and the clearance between shelves before choosing one. There should be enough room to lift cans off the raised level comfortably.
I recommend keeping heavier cans on the main shelf or lower level when the rack design permits. Avoid overloading a lightweight riser simply because it fits the cabinet.
Pro Tip: Arrange cans with labels facing forward and group similar products together. The raised levels improve visibility, while the categories make the shelf easier to maintain.
3. Freestanding Floor Racks

Best for: Walk-in pantries and households that store canned food in bulk.
A freestanding rack can turn unused floor space into a dedicated area for canned goods. It is useful when kitchen cabinets are full but a pantry or utility area has room for additional shelving.
Choose between flat shelves and a dispenser-style rack according to how you use your supplies. Flat shelves accommodate a wider variety of can sizes, while angled tracks may make regularly used products easier to reach.
Before setting up the rack, check its load rating and place it on a level surface. Keep heavy cans on lower shelves, secure tall units according to the manufacturer’s instructions, and leave enough room to walk around safely.
Pro Tip: Measure the full footprint, including the space needed to access the shelves. A rack that blocks a doorway or narrows a walkway too much is not a practical solution.
4. Corner Pantry Storage
Best for: Kitchens with awkward corners or hard-to-reach cabinet shelves.
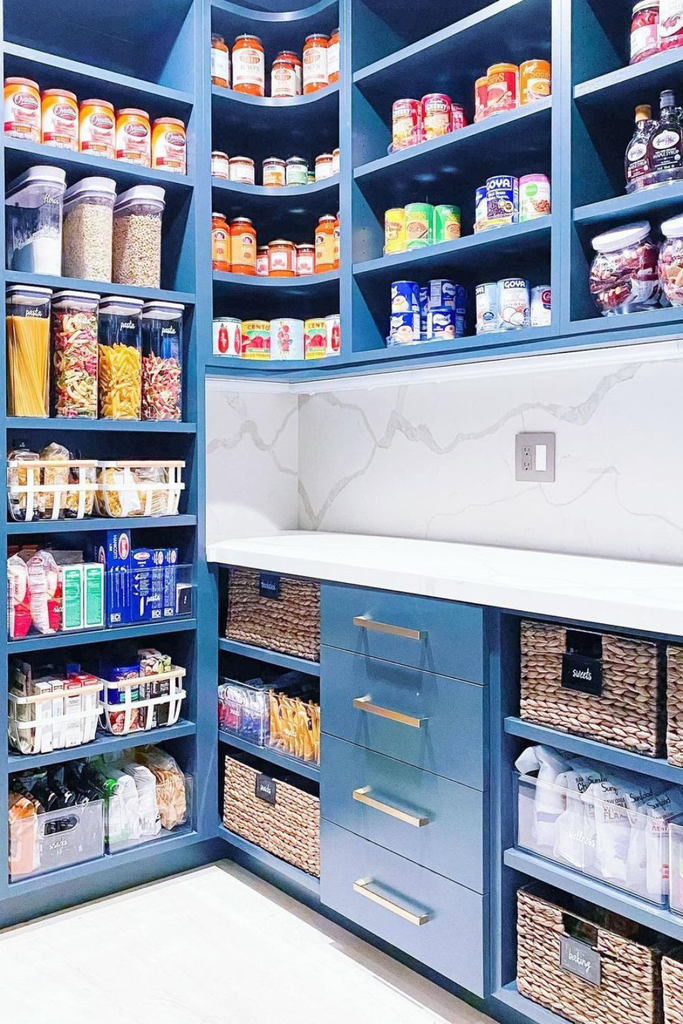
Corner cabinets can waste useful space when cans get pushed into the back. Curved shelves, corner inserts, or a suitable rotating organizer can make these areas easier to use.
The right design depends on the cabinet shape. A rounded shelf may suit a purpose-built corner pantry, while a compact insert can help organize an existing cupboard. Avoid filling the deepest part with everyday cans if you cannot reach them comfortably.
Measure the cabinet opening and usable depth before purchasing a corner organizer. Check that doors open fully and that cans can be lifted out without knocking over neighboring items.
Pro Tip: Keep frequently used cans toward the front of the corner shelf. Reserve the less accessible sections for suitable products you use less often, and check them during routine pantry reviews.
5. Canned Food Zones
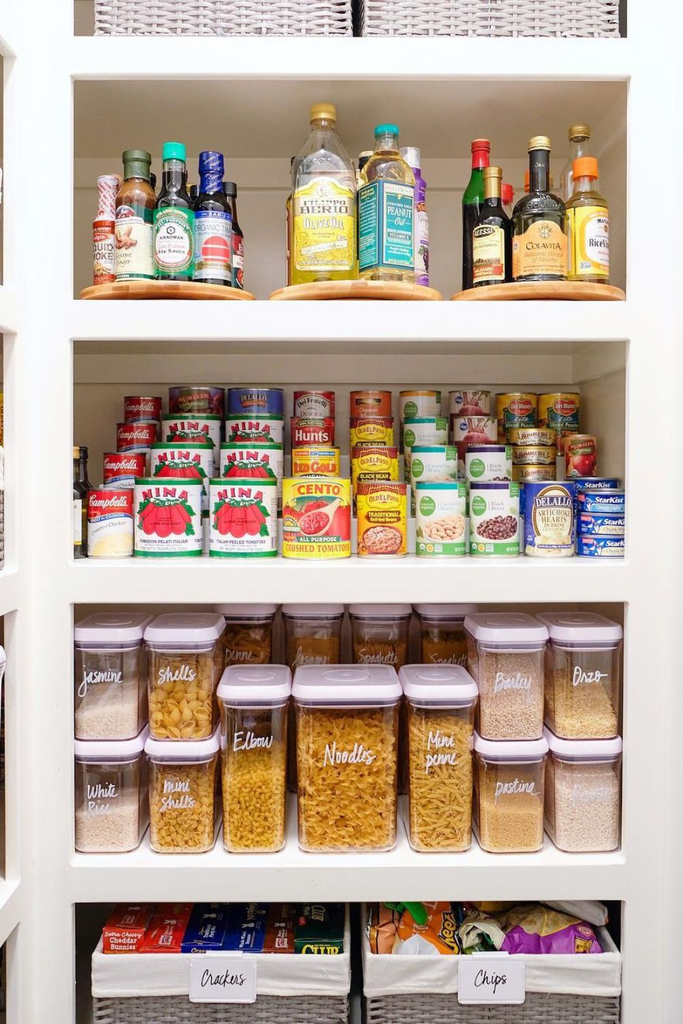
Best for: Anyone who wants a low-cost system using existing shelves.
You do not need special organizers to create an orderly canned food shelf. Simply divide the available space into zones for beans, vegetables, soups, fruit, and sauces.
I find this approach especially useful when storage space is limited. Each group has a defined area, making it easier to see which products are running low and which ones are already well stocked.
Use small labels if several people share the kitchen, or leave a little space between categories if you prefer not to buy anything. Keep the arrangement flexible enough to accommodate different can sizes.
Pro Tip: Give your most frequently used categories the easiest-to-reach spaces. If one section becomes crowded, review the quantity you keep rather than squeezing more cans into an unstable pile.
6. Drawer Dividers for Canned Goods
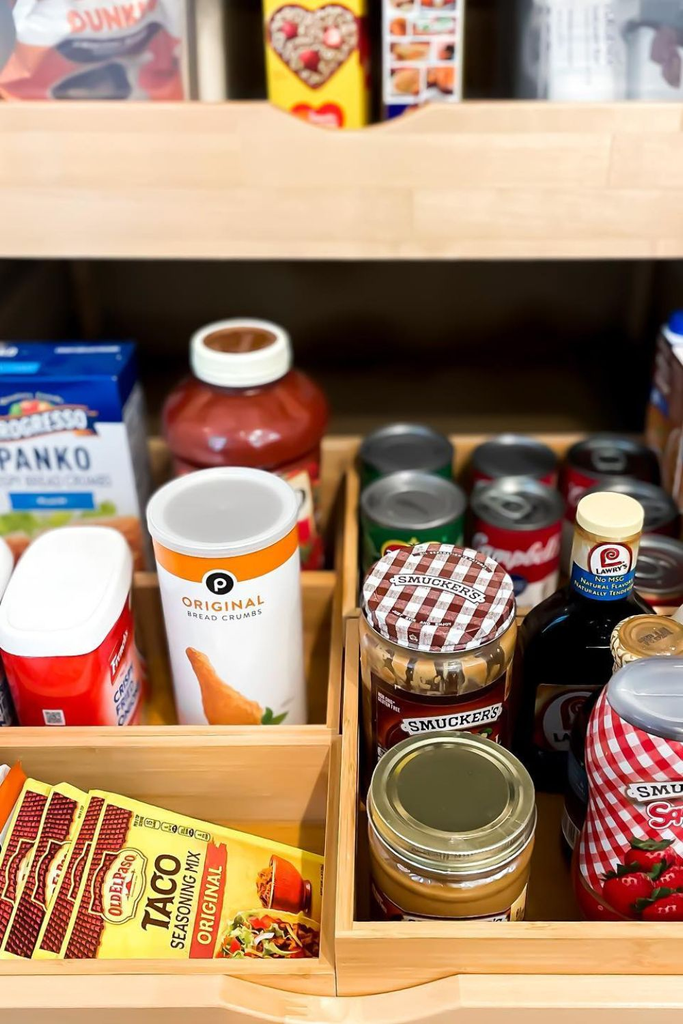
Best for: Deep kitchen drawers that are specifically rated to hold the load.
Drawer dividers create separate compartments so cans do not roll around or become mixed together. They can be useful in a wide drawer where the contents are difficult to manage without some structure.
Adjustable dividers allow you to change the compartment sizes when your collection includes different can dimensions. Wooden dividers offer a fixed arrangement, while suitable plastic options can be easier to move and clean.
The important consideration is the drawer itself. Full cans are heavy, so check the manufacturer’s weight limit for both the drawer and its runners. A drawer that is not designed for canned food may sag, stick, or become difficult to open.
Pro Tip: Keep the dividers low enough to lift cans out easily. A compartment that fits the cans but makes them difficult to remove will not improve everyday access.
7. Clear Storage Bins

Best for: Deep shelves where loose cans spread out or get overlooked.
Clear bins keep related cans together and allow you to see their labels without moving every item. One container might hold beans, another soups, and another vegetables or fruit.
The main benefit is that the whole group can be pulled forward for access. This is especially helpful on a deep shelf where reaching the back can otherwise disturb several rows.
Measure the shelf before choosing a bin, and consider its filled weight. A large container packed with full cans can be awkward to lift, so handles and a manageable size are worth considering. You can also leave the bins in place and remove cans individually.
Pro Tip: Use bins that fit the shelf without blocking nearby products. Keep labels facing forward where possible, and place newer purchases behind older, suitable cans.
8. Shelf Glides and Can Guides
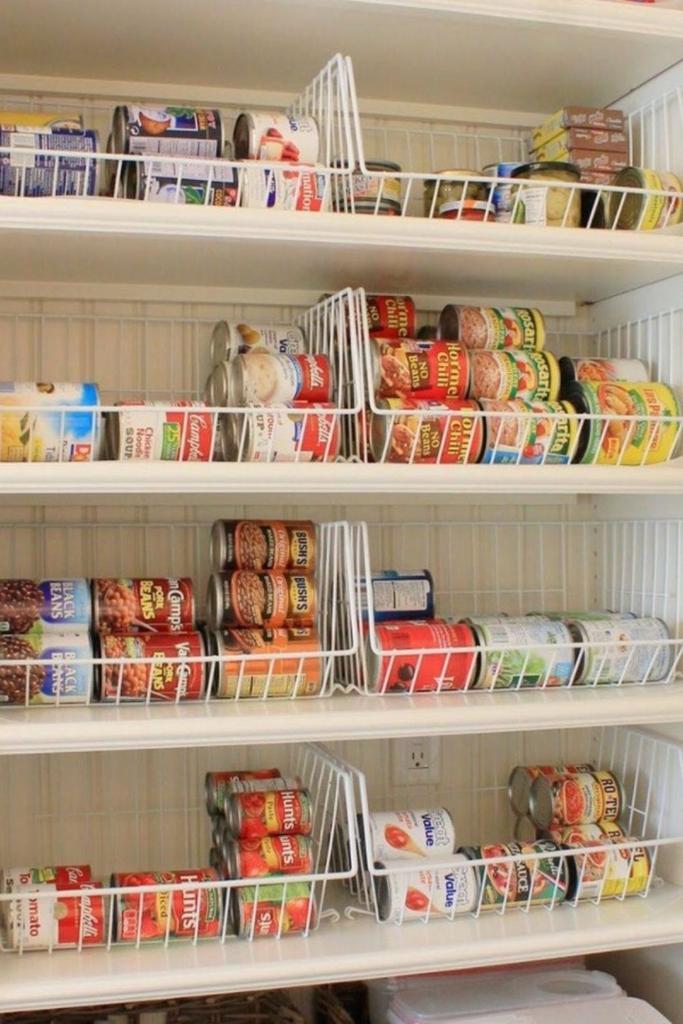
Best for: Keeping rows of canned food aligned on a wide shelf.
Shelf glides and can guides help prevent cans from spreading into neighboring groups. Some are simple dividers that hold cans in separate lanes; others use angled tracks that let cans move forward as they are removed.
That difference matters when choosing an organizer. A basic guide improves alignment but does not rotate the cans automatically. A moving track may provide easier access, but it must match the can sizes and be designed for the intended load.
Measure the shelf width and depth, then plan how many lanes you can fit without making each one too narrow. Check that cans can be removed and replaced without catching on the dividers.
Pro Tip: Use a separate lane for each frequently purchased food type. If the cans vary considerably in size, simple guides may be more flexible than a dispenser designed for uniform cans.
9. Pantry Wall Shelving
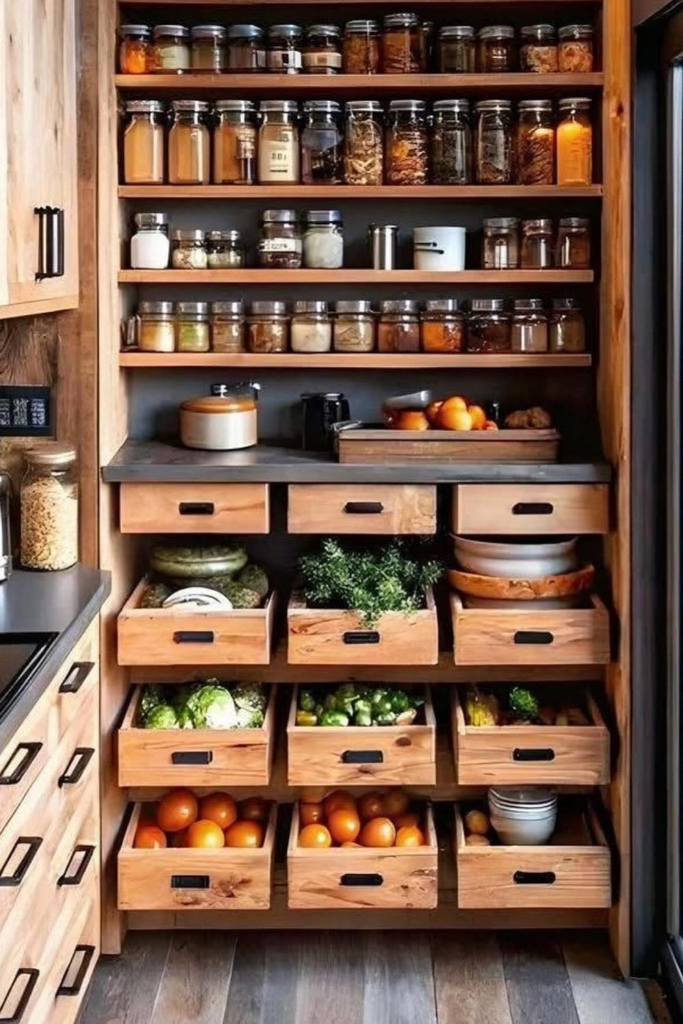
Best for: Kitchens or pantries with an unused wall and room for additional storage.
A pantry wall can provide more storage without requiring another freestanding unit. Depending on the space, you could add open shelves, enclosed cabinets, or a combination of both.
Open shelves make canned food easy to see, while lower cabinets can hide less attractive packaging and keep supplies away from dust. I would organize the cans into clear groups rather than filling every shelf indiscriminately.
Wall shelving must be securely attached using fixings appropriate for the wall type and intended load. Full cans add substantial weight, so check the shelf and bracket specifications before installation. Renters should also confirm whether drilling or permanent alterations are allowed.
Pro Tip: Put heavy cans on lower shelves and keep the most frequently used products within comfortable reach. Leave enough space to read labels and remove cans without disturbing the row beside them.
10. U-Shaped Pantry
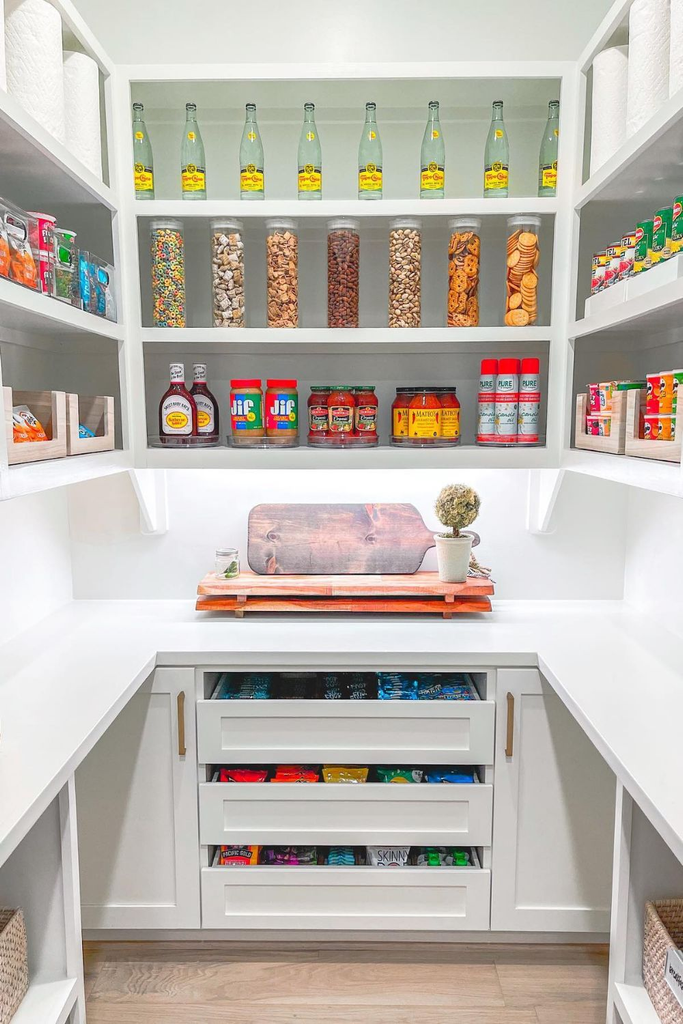
Best for: Walk-in pantries with usable shelving on three walls.
A U-shaped layout makes use of three sides of a pantry, creating separate areas for different food groups. One wall could hold canned vegetables and beans, another soups and sauces, and the third other pantry supplies.
This arrangement can work well for larger households because the categories remain separate while everything is stored in one area. It also allows you to distribute supplies according to how often they are used.
The main consideration is aisle space. Shelves that extend too far into a small pantry can make it difficult to turn, open drawers, or reach items comfortably. Measure the room before changing the shelving layout, and avoid making shelves deeper than you can use effectively.
Pro Tip: Keep everyday canned goods on the most accessible wall. Reserve higher shelves for lighter items and use lower shelves for heavier products.
11. Inside-the-Door Shelves
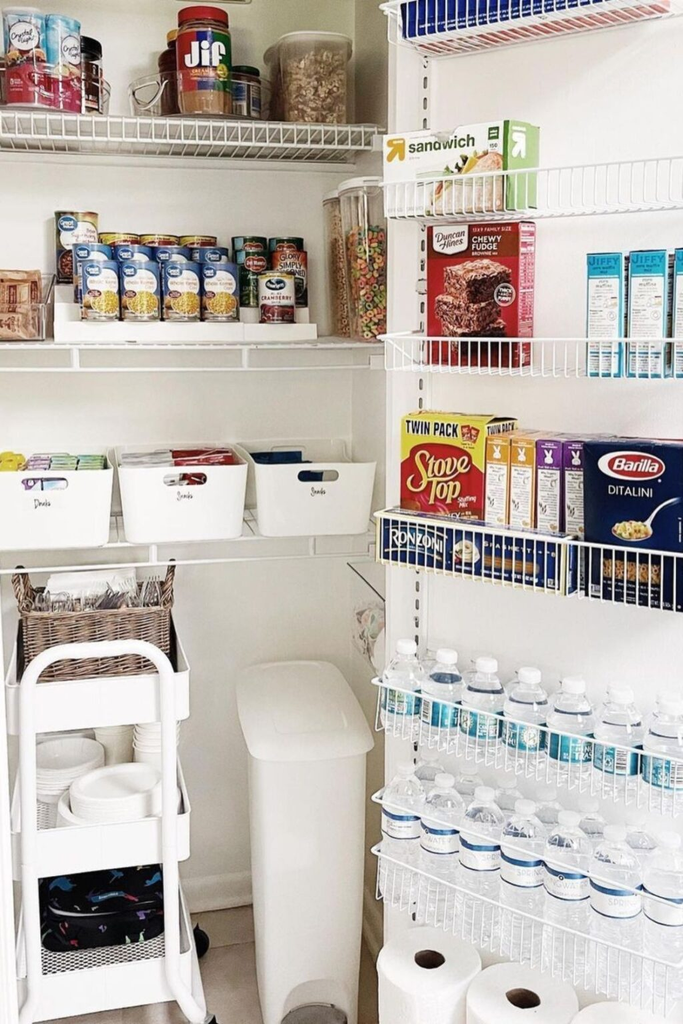
Best for: Small pantries where an extra storage surface is needed.
The inside of a pantry or cupboard door can provide additional space for slim cans and other lightweight pantry products. Over-the-door racks may avoid permanent changes, while screw-mounted systems can offer a more fixed installation.
Before choosing one, check the door’s thickness, hinge capacity, available clearance, and the depth of nearby shelves. The organizer must not prevent the door from closing or collide with cans stored inside the cabinet.
I would avoid loading a door rack with heavy canned goods unless the product is specifically designed for that purpose and the door can safely support the added weight. Lightweight packages may be a better use of this space.
Pro Tip: Test the rack with a small load before filling it. Open and close the door carefully to check that the contents remain secure and the hinges are not under excessive strain.
12. Lazy Turntable for Small Cans and Containers
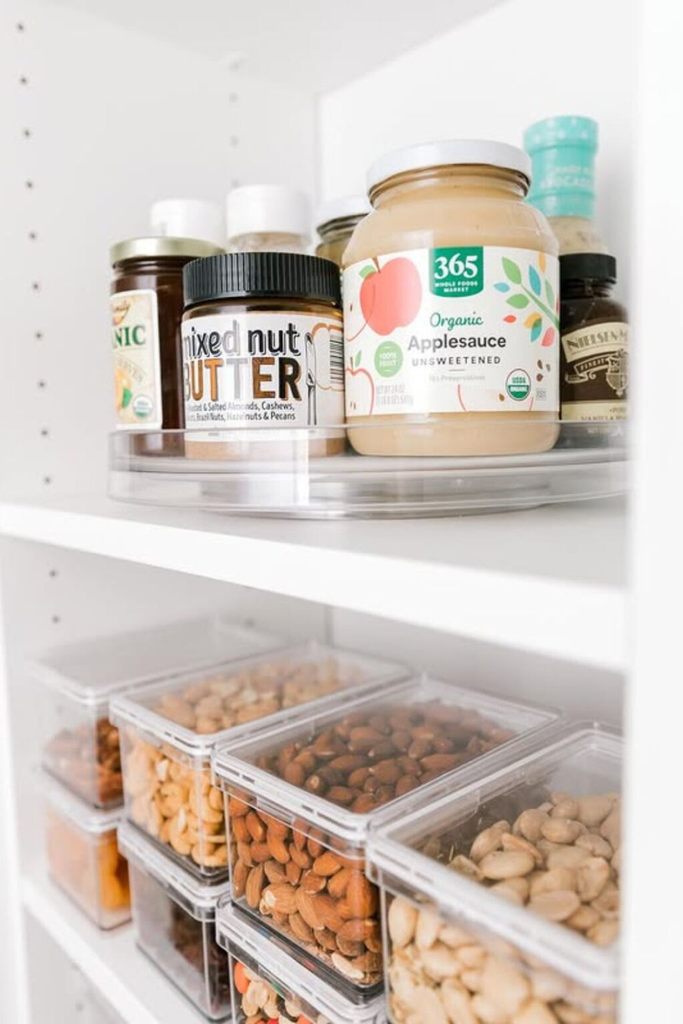
Best for: Deep or corner shelves holding compact pantry items.
A lazy turntable rotates so containers at the back can be brought forward without moving everything by hand. It is particularly useful for small cans, sauces, and other compact products that tend to disappear behind one another.
Choose a tray that fits the shelf and rotates without hitting nearby containers. A raised edge can help keep items in place, but it does not replace checking the turntable’s weight capacity.
Large or heavy cans may not be suitable for every model. Check the manufacturer’s specifications and avoid overcrowding the tray, especially if the shelf is narrow or uneven.
Pro Tip: Keep similar products together and leave a little space between containers. A turntable is most useful when it can rotate freely and the items remain easy to identify.
13. Home-Canned Jar Storage Wall

Best for: People who preserve their own food and need dedicated jar storage.
A wall of shelves can organize home-canned jars by food type and preparation date. Unlike commercially canned products, home-canned food requires particular care during preparation, processing, storage, and inspection.
Use sturdy shelves with suitable brackets and fixings, and check the total weight they can support. Keep jars upright in stable rows rather than building tall, precarious stacks. A cool, dry storage area away from sunlight and temperature extremes is preferable.
Label each jar with its contents and preparation date. Follow tested recipes and processing instructions from reliable food-safety authorities, such as the USDA or National Center for Home Food Preservation. Check jars after processing and again before use; an intact-looking jar alone does not prove that its contents are safe.
Never taste food from a jar with a broken seal, leakage, a bulging lid, unusual damage, or other signs of spoilage. When in doubt, discard it safely.
Pro Tip: Organize jars by food type and date so you can identify each batch quickly. Keep storage records if you preserve several varieties throughout the year.
Also read: 26 Dining Room Storage Ideas for 2026
14. Pull-Out Pantry Cabinets
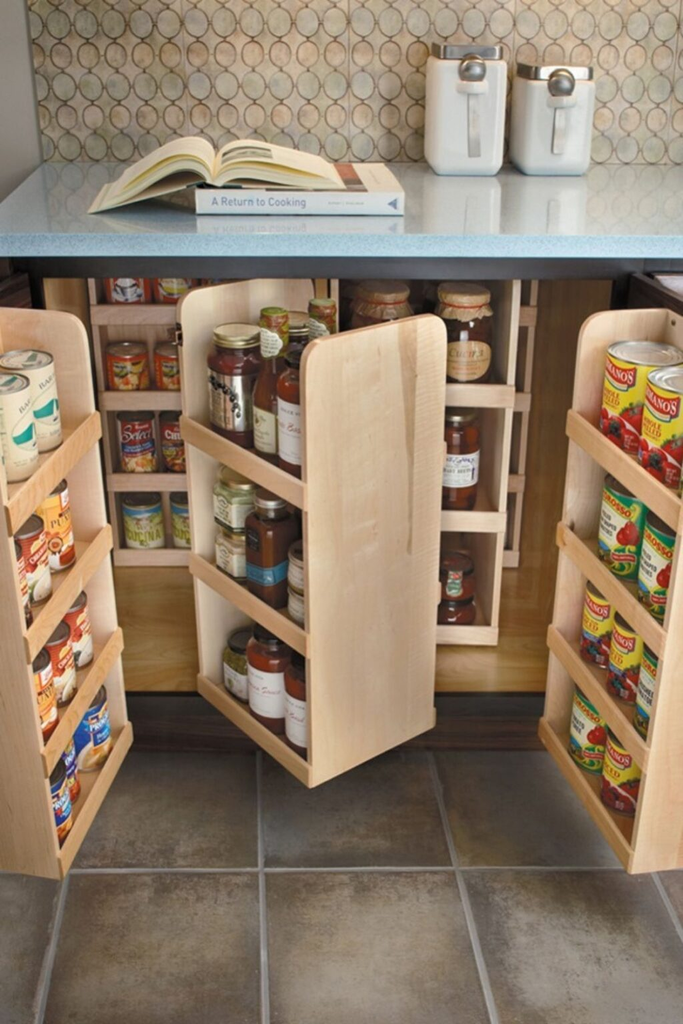
Best for: Narrow gaps beside kitchen cabinets or deep storage spaces.
A pull-out pantry cabinet slides outward to reveal narrow shelves that might otherwise be difficult to reach. Full-height units can store a variety of pantry supplies, while smaller pull-out organizers can fit inside suitable existing cabinets.
These systems are particularly useful when a deep cabinet hides cans at the back. Instead of reaching into the cupboard, you pull the unit forward and access its contents from the side.
Measure the opening, interior depth, and available clearance carefully. Check the runner’s weight rating and follow the installation instructions, including any requirements for securing the unit to prevent tipping. Some systems require more extensive installation than others.
Pro Tip: Arrange heavier cans on the lowest shelf and keep frequently used products near the front. Avoid filling every shelf to its maximum capacity if doing so makes the unit difficult to move.
15. Pantry Lighting
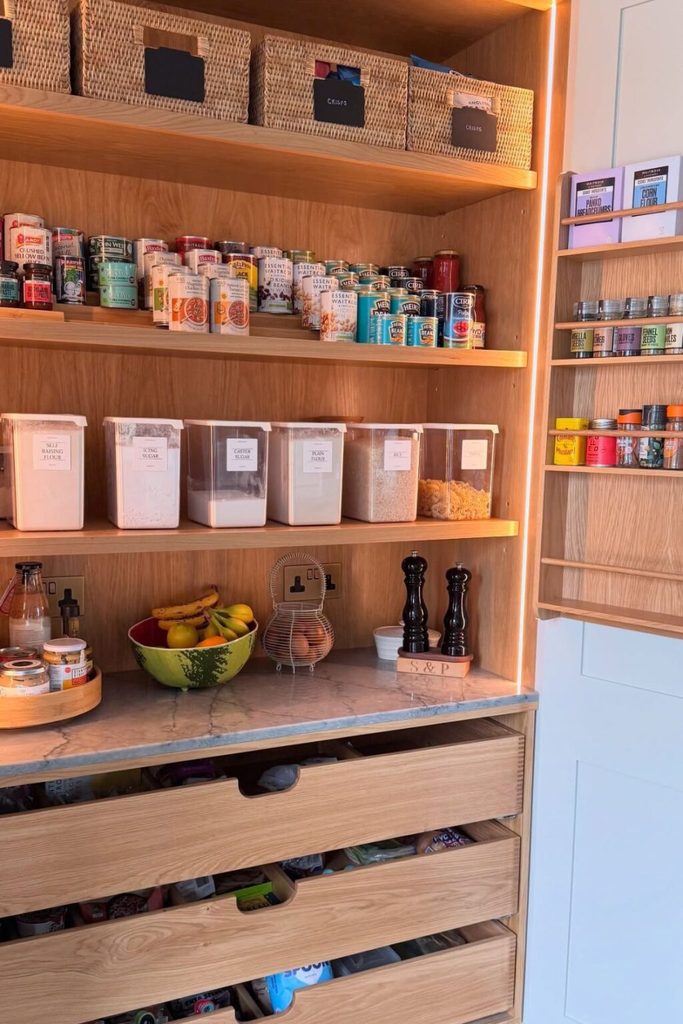
Best for: Dark cupboards where labels are difficult to read.
Lighting can make an existing canned food storage system easier to use, particularly when deep shelves cast shadows over the back rows. LED strips beneath shelves or battery-powered motion-sensor lights can illuminate labels without requiring a major renovation.
Choose lighting that suits the location and follow the manufacturer’s instructions. Battery-powered models may be convenient for renters, while wired lighting may require professional installation or permission to modify the space.
Lighting does not add storage capacity, but it can help you find ingredients, check dates, and notice supplies that are running low. Combine it with a clear category system so you can locate products quickly.
Pro Tip: Start by lighting the darkest shelf rather than installing lights everywhere. Check whether the improvement is sufficient before spending more on additional fixtures.
16. Dedicated Canned Food Drawer
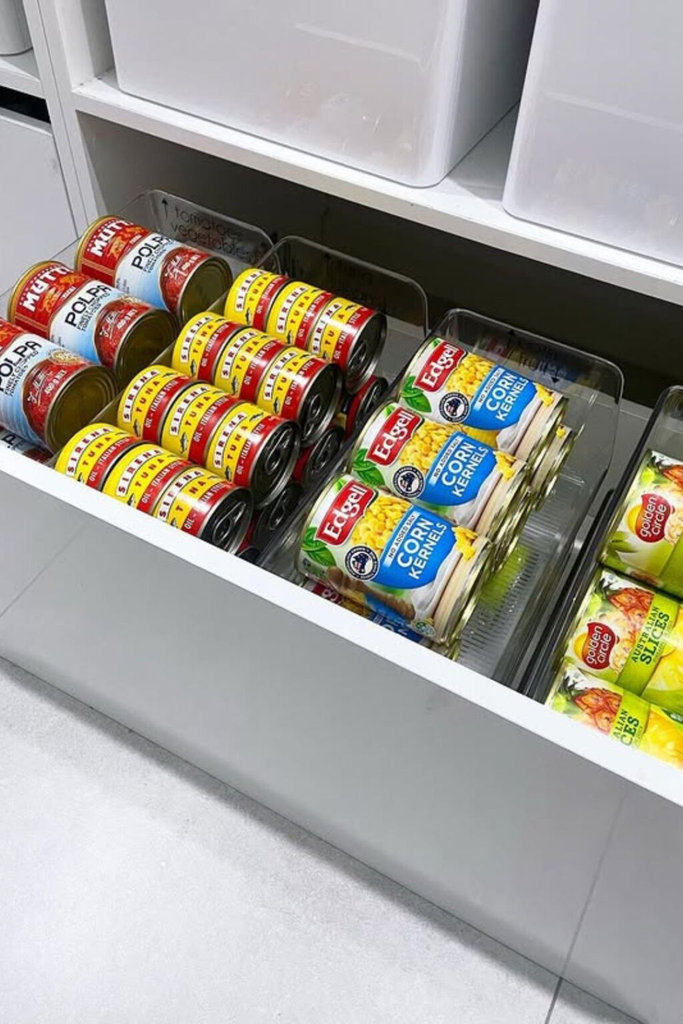
Best for: Kitchens with a sturdy, weight-rated drawer available for canned goods.
A dedicated can drawer provides one place for canned food instead of mixing it with utensils, packets, or other kitchen supplies. Unlike a general-purpose drawer fitted with dividers, this drawer is reserved specifically for cans and arranged around their sizes and weight.
Adjustable inserts or fitted trays can separate beans, vegetables, soups, and other products. A fully extending drawer is particularly useful because it brings the stored cans forward for easier access.
The drawer box, runners, and cabinet structure must all be suitable for the combined weight. Check the manufacturer’s specifications before converting an existing drawer, and avoid overloading it simply because there is room for more cans.
Pro Tip: Keep the drawer layout simple enough to maintain. A few clear sections are often more useful than numerous narrow compartments that are difficult to refill.
17. Sliding Wire Baskets
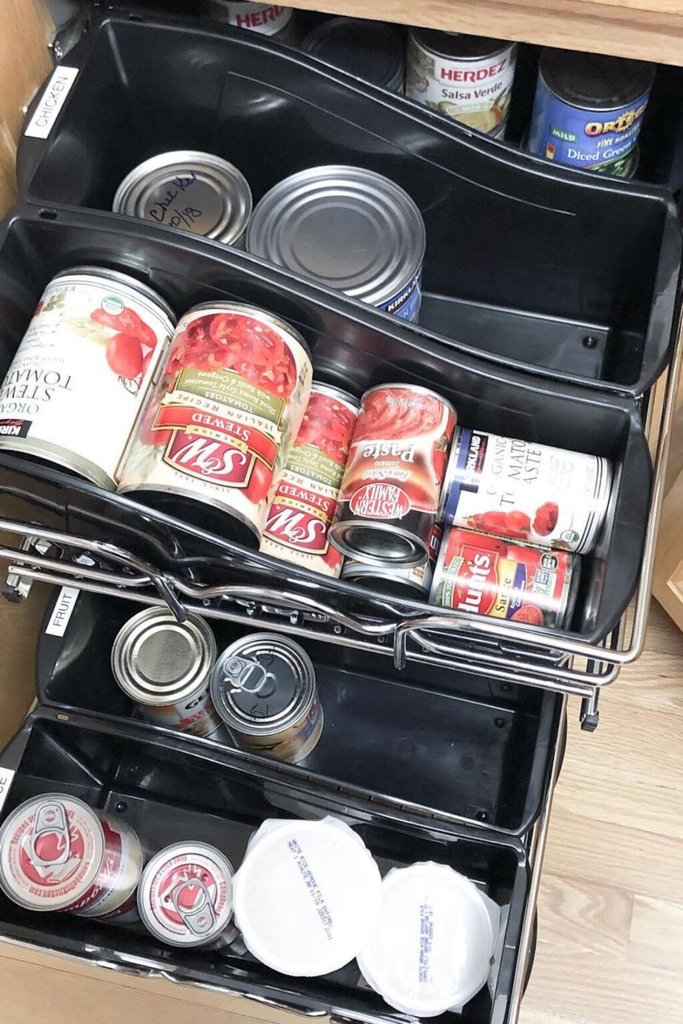
Best for: Deep lower cabinets where cans get lost at the back.
Sliding baskets provide pull-forward access without requiring a full pantry cabinet replacement. Once the basket is extended, you can see more of its contents and reach cans that would otherwise sit behind the front row.
Wire baskets work well for standard-sized cans that sit securely on the base. Some designs have narrower gaps or solid trays, which may be better for smaller items that could slip through the wires.
Check the basket’s dimensions, runner capacity, and installation requirements before purchasing. The unit should remain stable when extended, and the cabinet needs enough clearance for it to slide freely.
Pro Tip: Assign each basket a category, such as beans, soups, or vegetables. Keep heavy products in the lower basket and leave enough space to lift cans out without catching them on the sides.
18. Slat Shelves for Canned Goods and Jars

Best for: Pantries that need long rows of storage for suitable cans or home-canned jars.
Slat shelves use horizontal boards or slats to create a series of storage surfaces. Depending on the design, the gaps between boards may offer a different appearance from solid shelving, but they do not automatically make the shelves safer or stronger.
For canned food, the important factors are a stable surface, adequate support, and enough depth to keep each can secure. For home-canned jars, I would make sure the jars sit level and cannot tip into gaps between slats.
This arrangement can suit a dedicated pantry or storage room where longer shelves are needed. Choose the material and construction according to the intended load, and check the manufacturer’s recommendations for brackets and spacing.
Pro Tip: If the gaps between slats make jars unstable or difficult to clean around, use a suitable solid shelf instead. Reliable support matters more than the style of the shelving.
19. Open Pantry Display

Best for: Pantries where visibility and easy access are priorities.
Open shelving allows me to see canned goods without opening drawers or moving containers. It works well when products are arranged in clear groups and there is enough space to read the labels.
Keep vegetables, beans, soups, and sauces in separate sections, and avoid stacking cans so high that the labels disappear. If dry goods are stored nearby, use suitable containers to keep them separate from canned products and make cleaning easier.
Open shelves also require a little more upkeep. Dust can collect on exposed surfaces, while direct sunlight and nearby heat sources may create unsuitable storage conditions. Choose a cool, dry location and clean the shelves regularly.
Pro Tip: Leave a small gap between food categories so the shelves do not become visually crowded. A display should make supplies easier to find, not simply make more cans visible.
20. Shelf Risers
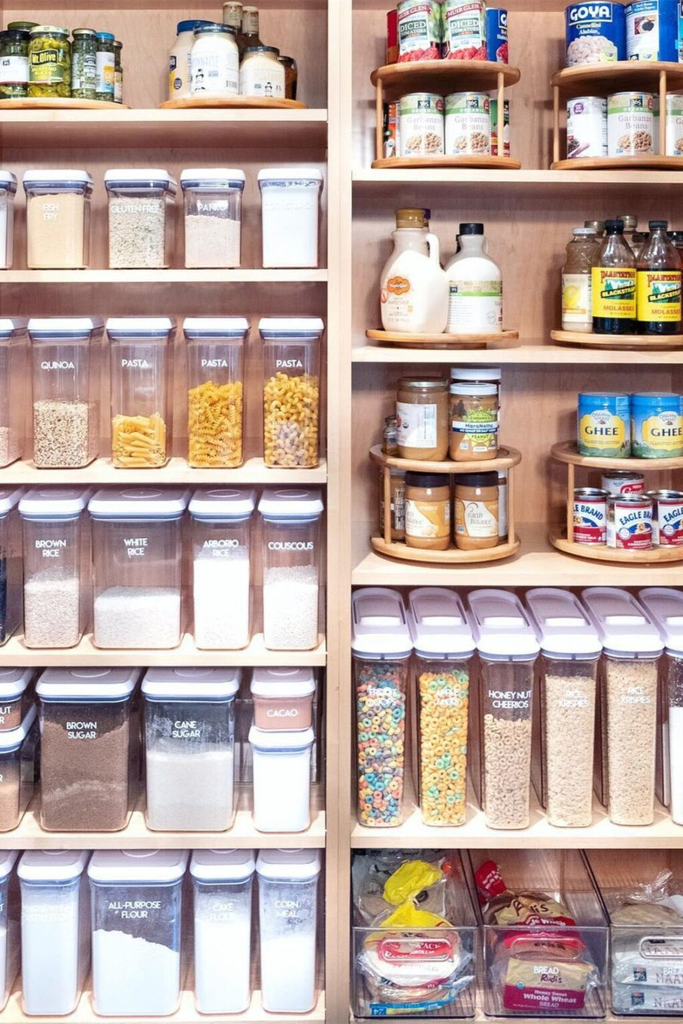
Best for: Cabinets with unused vertical clearance but limited shelf width.
A shelf riser adds a raised surface to an existing shelf, creating two levels of storage without installing another permanent shelf. The raised back row helps keep labels visible when cans would otherwise be hidden behind the front row.
Risers are available in several materials and sizes. Measure the height between shelves and check the dimensions of your cans before choosing one. You need enough room to lift items off both levels comfortably.
The riser must also support the intended load. A lightweight display stand may be suitable for small containers but not for several full cans. Place the riser on a flat surface and avoid letting it overhang the shelf.
Pro Tip: Try a riser on one crowded shelf before buying several. If the raised row makes cans easier to see and remove, you can use the same approach elsewhere.
21. Dedicated Category Shelves
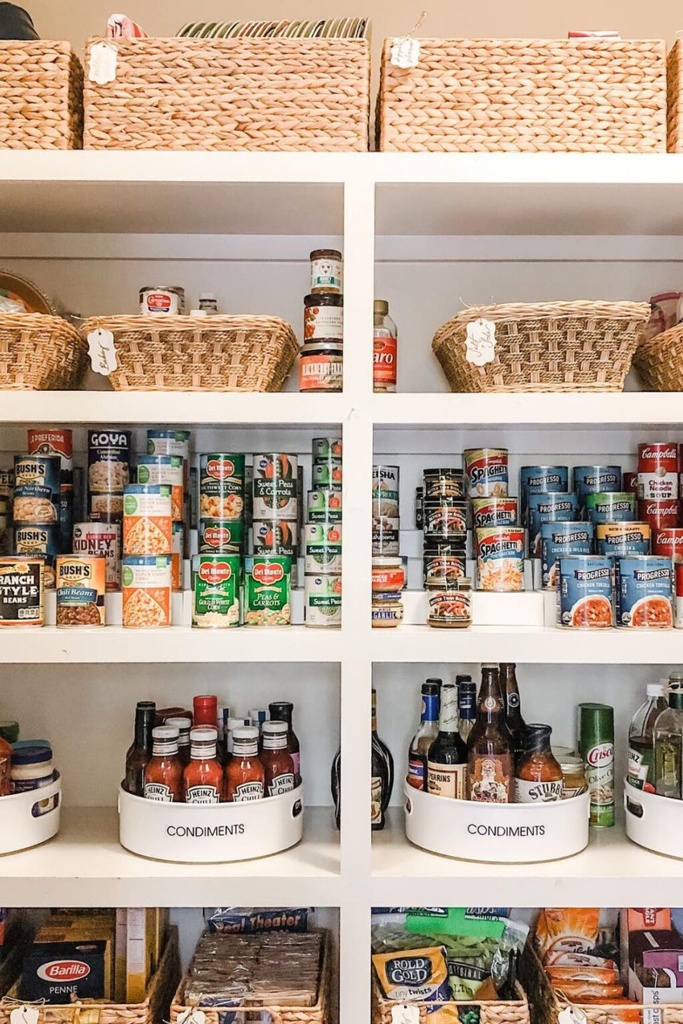
Best for: Larger pantries with enough shelves to give food groups their own sections.
Category shelves take food grouping a step further than simple zones on one shared shelf. Instead of placing every kind of can together, you can assign a shelf or clearly defined shelf section to a particular category.
For example, one shelf might hold canned vegetables, another beans and lentils, and another soups and sauces. This works particularly well when a household buys several varieties of the same products or keeps a larger supply on hand.
The arrangement should reflect the amount of food you actually store. There is no need to dedicate an entire shelf to a category that contains only two or three cans; small groups can share a shelf without losing their identity.
Pro Tip: Review each category before shopping. If a shelf is already full, use that as a signal to check your stock rather than automatically adding more cans.
22. Stable Can Stacks and Stack Towers
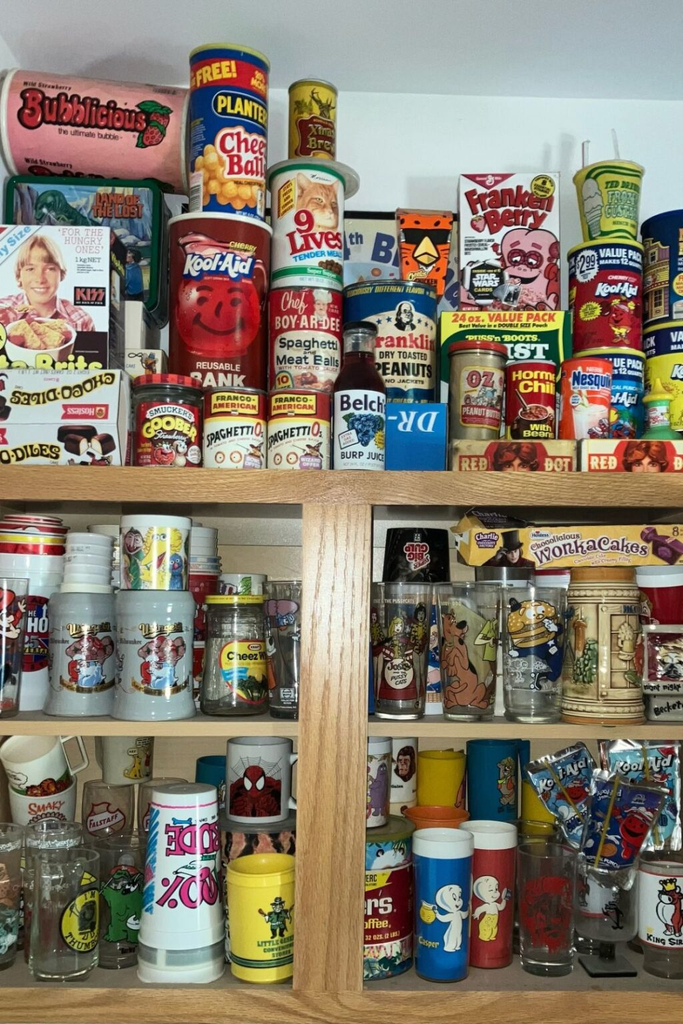
Best for: Small collections of compatible cans on strong, stable shelves.
Stacking cans can make use of unused vertical space, but it needs more care than simply building a tall tower. Different can sizes, slippery surfaces, and uneven stacks can make cans unstable, especially when someone removes one from the middle or bottom.
For everyday storage, a low stack of matching cans may be practical if the cans and shelf remain stable. A purpose-built stacking rack can offer a more organized alternative when you regularly store several cans of the same size.
Keep heavy cans on lower shelves, avoid overhead stacks, and make sure labels remain accessible. Do not stack cans so high that removing one requires moving an unstable pile.
Pro Tip: If you need to store many cans vertically, consider a suitable tiered rack or dispenser instead of making taller stacks. Easier access and stability are more important than fitting every can onto one shelf.
23. Cubby Storage

Best for: Large pantry cabinets or shelving units with several separate compartments.
Cubby storage divides a larger area into individual compartments, each of which can hold a specific category of canned food. It is useful when a single open shelf feels too broad and cans keep spreading into neighboring groups.
One cubby could hold soups, another vegetables, and another beans or fruit. Small bins can be added when needed, but the compartments should already be sized to suit the cans you use.
Check the depth and height of each cubby before filling it. Deep compartments can hide products behind the front row, while narrow openings can make it difficult to remove larger cans. A tall unit may also need to be secured according to the manufacturer’s instructions.
Pro Tip: Keep the most frequently used categories in the easiest-to-reach cubbies. Reserve upper compartments for lighter items and avoid filling spaces so tightly that cans become difficult to remove.
FAQs
How do you organize canned food so older cans are used first?
Group cans by food type and keep older, suitable products toward the front. Place new purchases behind them and check dates and storage guidance when restocking. Clear bins, tiered racks, and pull-out drawers can help you see what you have, but rotation alone does not guarantee that food is safe to eat. Inspect containers before use and discard questionable cans without tasting their contents.
Where should canned food be stored in a kitchen?
Choose a cool, clean, dry cupboard or pantry away from direct sunlight, excessive heat, and moisture. Avoid storing cans beside ovens, dishwashers, or other heat-producing appliances. Keep heavy cans on sturdy, lower shelves and check storage areas periodically for dampness, rust, or damage.
How can I organize canned food in a small kitchen?
Start with one cabinet or shelf and group similar products together. Tiered racks can improve label visibility, while compact bins and dividers help keep cans in place. Measure the available space before purchasing organizers, and check whether an existing shelf can be rearranged to provide better access. You may not need to buy anything if a simple category system works well.
How should home-canned jars be stored?
Store properly processed home-canned jars in a cool, dry location away from sunlight and temperature extremes. Label each jar with its contents and preparation date, and follow tested recipes and processing instructions from reliable food-safety authorities. Check seals and jars after processing and before use. Never taste food from a jar with a broken seal, leakage, a bulging lid, or other warning signs. An intact seal by itself does not guarantee safety.
How can you tell whether a damaged can should be discarded?
Discard cans that are swollen, leaking, severely dented, deeply rusted, or damaged around their seams. A small, shallow dent away from the seams does not automatically make a can unsafe, but serious damage warrants caution. If you are unsure about a can’s condition, do not taste its contents. Follow official food-safety guidance when deciding whether a damaged container should be discarded.
Do you need special organizers for canned food?
No. A clean, sturdy shelf and a consistent system for grouping and rotating cans may be sufficient. Tiered racks, dividers, bins, and pull-out baskets are optional tools that can help when shelves are deep, space is limited, or cans are difficult to reach. Choose an organizer only when it solves a specific storage problem, and check its dimensions and weight capacity before buying.
Read this next: 26 Narrow Storage Ideas for 2026
Conclusion
Organizing canned food does not require a large pantry or an expensive collection of storage products. A few clear categories, visible labels, and a reliable rotation routine can make everyday cooking and grocery shopping easier.
For crowded cabinets, tiered racks, shelf risers, and clear bins are practical starting points. Deep cupboards may benefit from sliding baskets or pull-out cabinets, while larger pantries can make use of dedicated shelves, cubbies, or a freestanding rack.
I recommend starting with the space you already have, measuring before making changes, and choosing a system that is easy to maintain. The best canned food storage solution is one that keeps supplies accessible, supports their weight, and helps you manage food responsibly.




3 Comments