15 Drill Storage Ideas for 2026
I have found that drills are much easier to manage when each one has a dedicated place instead of being tossed onto a workbench or shelf. The drill itself takes up space, but batteries, chargers, cords, bits, and cases can create even more clutter.
When I have several drills in one workshop, I want to grab the right one without moving three other tools first. I also want the battery and charger close enough that putting everything away after a project is quick and easy.
The best setup depends on how many drills I have, how much wall and bench space is available, and whether I need a dedicated charging area. These 15 drill storage ideas cover simple DIY racks, compact stations, cabinets, and larger storage systems.
I look at drill storage as a complete system rather than a place to park the drill. The most useful setup gives the drill, battery, charger, bits, and related accessories a logical home without making the tools difficult to remove.
Wall racks are useful when bench space is limited, while bench-top units work well when I do not want to modify the wall. A narrow drill tower can make use of a small vertical section, and a cabinet is a better choice when I want enclosed storage and some protection from workshop dust.
For charging areas, I keep the charger and battery storage close to the drills while leaving the electrical equipment accessible. I also follow the specific battery and charger manufacturer’s instructions for charging, storage, temperature, ventilation, and long-term use.
Save this for later
Table of Contents
Before building anything, I measure the drill body, widest battery, handle shape, overall height, available wall or bench space, and the clearance needed to remove each tool comfortably. A storage system only works well when the tools actually fit it.
Key Takeaways
- Give each drill an individual storage position whenever practical.
- Use wall-mounted storage when bench space is limited.
- Keep frequently used batteries and chargers close to the drills.
- Measure the largest drill-and-battery combination before cutting slots.
- Allow enough clearance to remove a tool without hitting its neighbor.
- Use appropriate hardware for the wall construction and total loaded weight.
- Follow the manufacturer’s instructions for battery storage and charging.
- Choose open racks for quick access and cabinets when enclosed storage is more useful.
- Leave some room for future tools instead of filling every available opening.
Related article: 12 Pot Lid Storage Ideas for 2026
How to Choose the Right Drill Storage
The right storage system depends more on the way I use my drills than on how attractive the organizer looks. A small DIY rack may be all I need for two drills, while a larger cordless-tool collection calls for a more structured setup.
One or two drills: A small slot rack, bench-top organizer, or compact wall holder can usually handle a small collection without taking over the workshop.
Several cordless drills: Individual vertical slots, cubbies, or a larger wall organizer make it easier to give each tool a consistent home.
Limited wall space: A narrow drill tower, compact plywood station, or bench-top unit can make better use of the space I already have.
Dust-prone workshop: An enclosed wall cabinet can be more practical than completely open storage when keeping tools protected is a priority.
Frequent charging: A dedicated charger shelf or built-in charging bay keeps batteries and charging equipment together without mixing them into the drill slots.
Growing tool collection: I leave a few positions available for future additions. Adjustable shelves or modular storage also make it easier to change the layout later.
Limited permanent wall modifications: A stable bench-top or freestanding unit can provide useful storage without requiring a large wall installation.
Before cutting any material, I measure the drill body, widest battery, handle shape, overall tool height, slot width, and removal clearance. I also measure the available wall area, bench depth, or cabinet depth so the finished storage does not interfere with the workspace.
The opening should be based on the largest relevant drill-and-battery combination, not just the drill body. Different brands and models can vary enough that one universal slot size is not a reliable rule.
Pro Tip: I make a full-size test layout from cardboard or scrap wood before permanently cutting the storage. It can reveal a slot that is too narrow, drills that collide, an awkward mounting position, or a height that is uncomfortable to reach.
Wall-Mounted Charging Rack
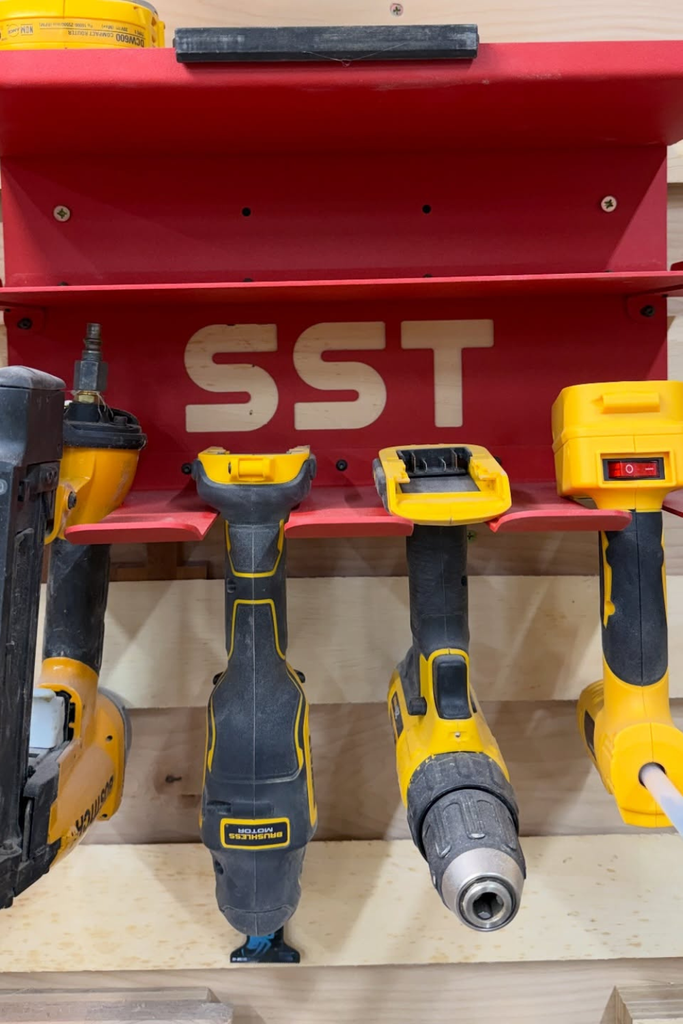
A wall-mounted charging rack is useful when my workbench is already crowded. Moving the drills and their charging equipment onto the wall leaves the main work surface available for actual projects.
A simple version can be made from sturdy plywood, or I can use an appropriate metal storage system. Whatever material I choose, the rack needs to be attached with hardware suitable for the wall construction and the total loaded weight.
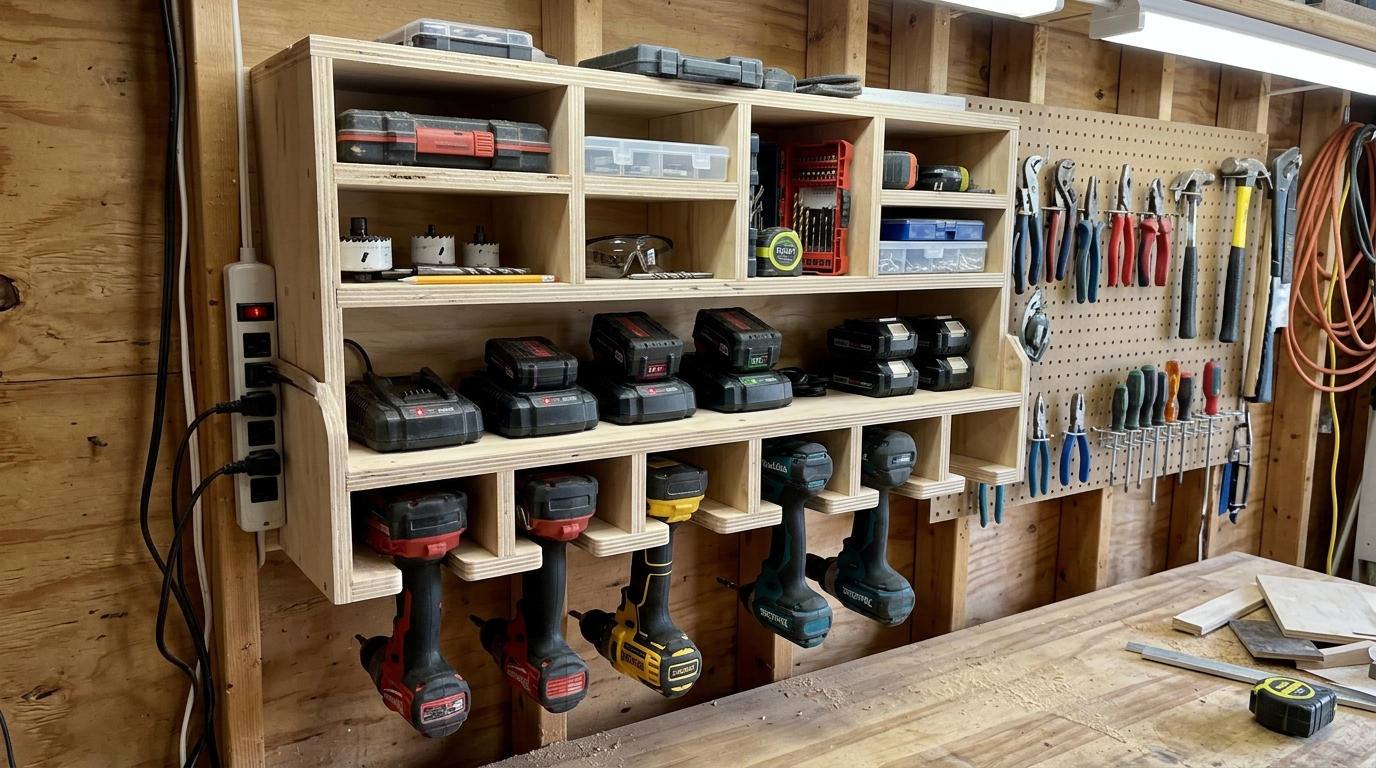
I like placing the drills in individual positions below a shelf where batteries and chargers can stay nearby. That keeps the storage compact without forcing the charging equipment into the drill slots.
The spacing matters just as much as the mounting. I leave enough room to grip a drill and remove it without catching the neighboring tool or battery.
Pro Tip: I arrange the drills by frequency of use. The tools I reach for most often get the easiest positions rather than simply being arranged by size.
Vertical Tool Cubes
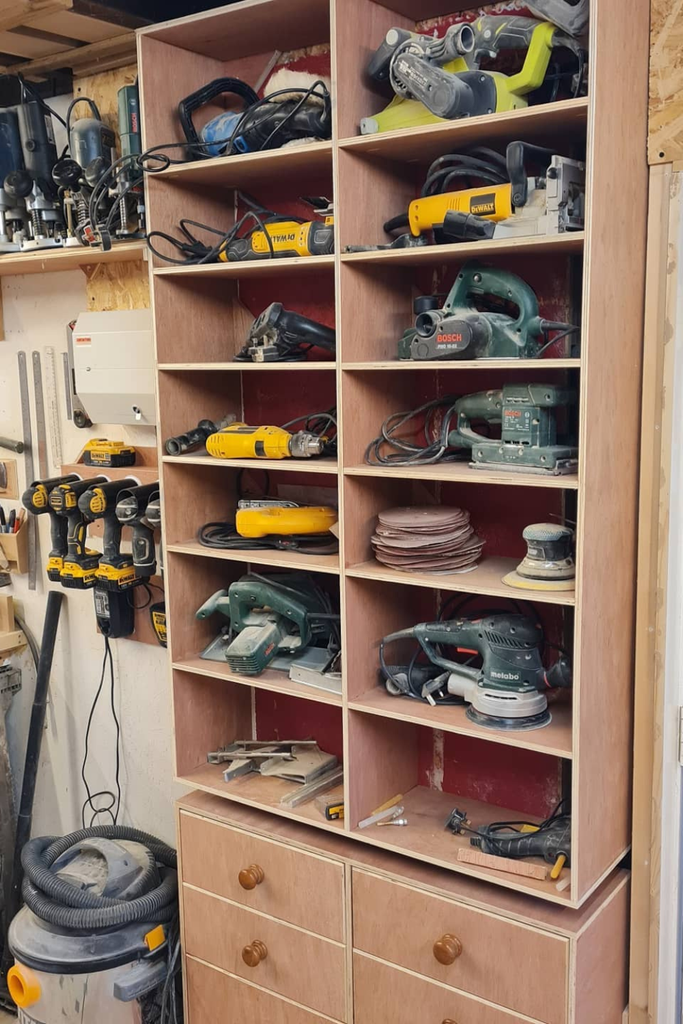
Vertical tool cubes give each drill or cordless tool its own compartment without requiring a completely separate cabinet for every item.
I can build the cubbies from plywood and vary the compartment sizes based on the tools I actually own. Compact drivers may need less space than larger drills or other cordless equipment.
Heavier items should be placed where the cabinet structure and mounting system can support them properly. For everyday convenience, I keep frequently used tools around a comfortable reaching height instead of putting everything on the highest shelves.
One advantage of open cubbies is that I can immediately see which tool is missing. Simple labels can make the system even easier to maintain, especially when several tools look similar.
Pro Tip: I label cubbies by tool type or purpose rather than permanently labeling them by one specific model. That gives me more flexibility if I replace a drill later.
Custom Drill Slots

Custom drill slots make sense when I want the storage to fit my actual tools rather than forcing the tools into standard openings.
I measure the widest part of the drill and battery combination first, then add enough working clearance for comfortable removal. The opening should hold the tool securely without making me fight to pull it out.
A narrow shelf above the slots can hold chargers or small accessories, while a separate container or magnetic holder can keep loose bits from disappearing across the workbench.
The biggest advantage is that I can use an awkward section of wall efficiently. Instead of building a large organizer, I can make the openings fit the exact collection I already have.
Pro Tip: I cut one test opening before repeating the pattern. If the first drill does not slide in and out naturally, I can adjust the design before wasting more material.
Plywood Charging Station

A plywood charging station is a compact DIY option when I want the drills, batteries, and charging equipment grouped together.
I can create a shallow upper section for chargers and batteries, with individual drill openings below. A planned opening at the back can help route cables away from the front of the station.
This type of station is easy to modify as my tool collection changes. Extra dividers or a wider slot can often be added without rebuilding the entire unit.
Charging equipment should have the clearance and ventilation required by its manufacturer, and I avoid enclosing equipment in a way that blocks required airflow or makes electrical connections inaccessible.
Pro Tip: I leave a little unused space in the charging section. A station packed tightly with adapters and cords becomes difficult to use, even when the drills themselves are neatly stored.
Full Wall Organizer

When a collection outgrows a small rack, a full-wall organizer can put the drills, batteries, accessories, and related tools into one organized area.
I can combine drill slots along the lower portion with battery shelves, small bins, and open storage above. Daily-use tools stay within comfortable reach, while less frequently used items can occupy higher areas.
A large organizer becomes considerably heavier once it is loaded with batteries, chargers, cases, and tools. I therefore treat the mounting system as part of the design rather than something to figure out afterward.
I also leave some open capacity instead of filling every shelf on day one. That makes the organizer more useful if my collection grows.
Pro Tip: I group items by how I use them, not just by size. Keeping the drill, commonly used battery, and related accessories within the same general zone saves time during projects.
Compact Wall Cabinet
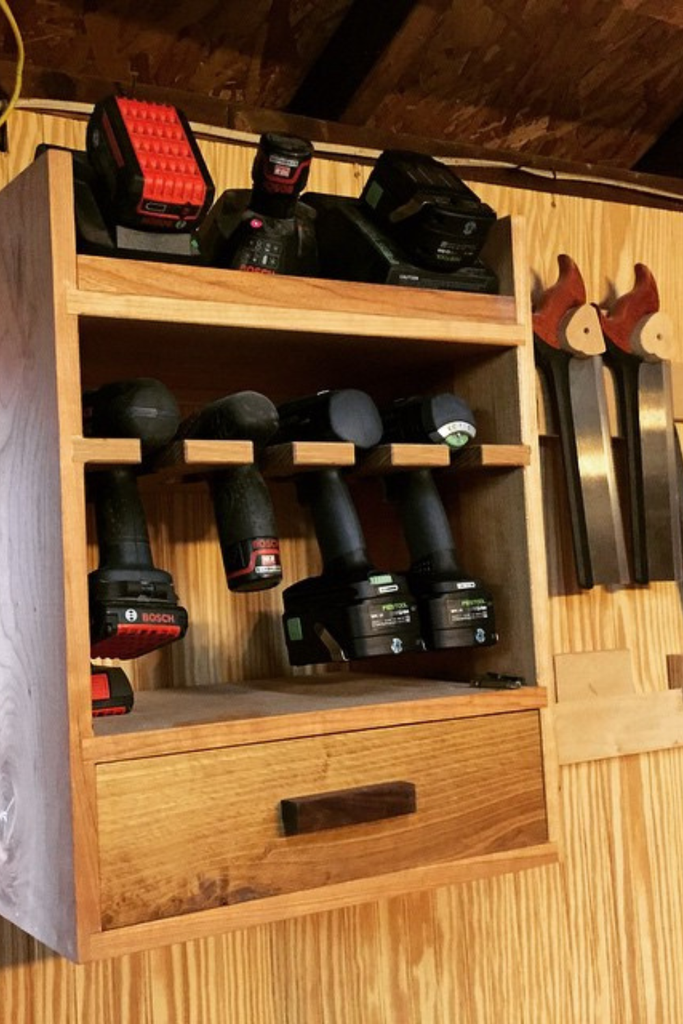
A compact wall cabinet gives me enclosed storage when I want to keep drills and accessories out of the open workshop environment.
Inside, I can create individual drill positions, a shelf for batteries, and a small drawer or container for bits. A shallow cabinet is usually easier to manage than a very deep one because tools are less likely to disappear behind other equipment.
A small front lip on shelves can help keep loose items from sliding forward when the door opens or closes.
The cabinet should be mounted using hardware appropriate for both the wall and the cabinet’s loaded weight. I also check the door swing before installation so it does not interfere with the workbench or another tool.
Pro Tip: I avoid making every compartment deeper than necessary. Extra depth sounds useful, but it often creates a second row of tools that I have to move before reaching what I need.
Bench-Top Storage Unit
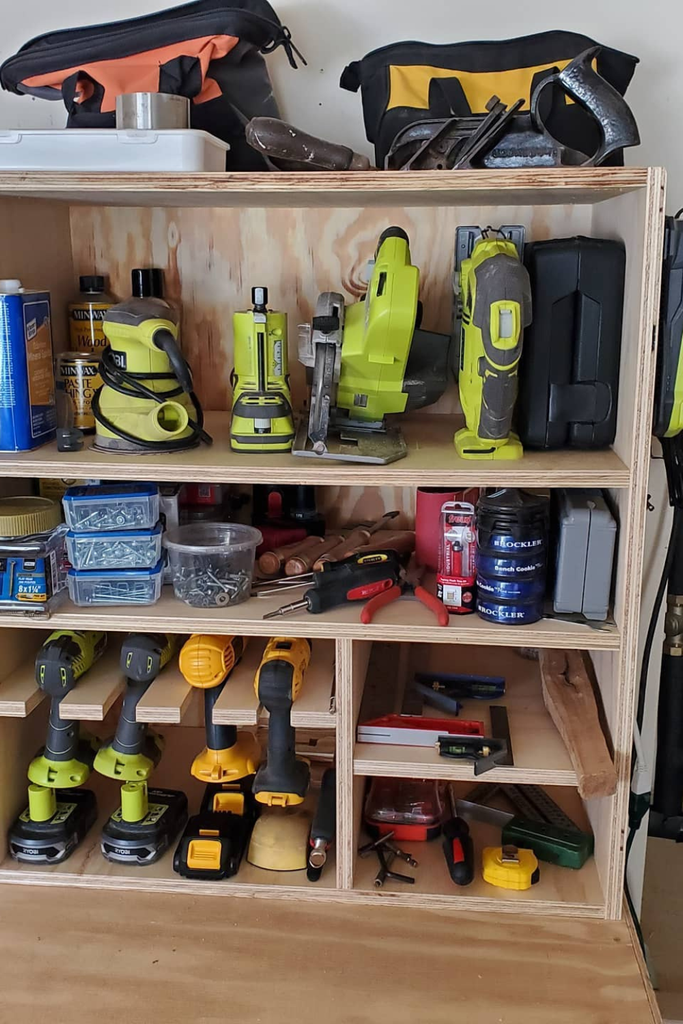
A bench-top storage unit is useful when there is no suitable wall space or I do not want to make permanent changes to the workshop.
The unit can organize drills vertically while using the upper sections for batteries, bits, screws, or other small supplies. This keeps the tools contained without requiring a wall-mounted installation.
Stability is important because removing a drill from a poorly balanced unit can make the entire organizer shift. I keep heavier items low and avoid creating a top-heavy structure.
I also measure the available bench depth before building. A storage unit that extends too far forward can take away more working space than it provides.
Pro Tip: I mark the portion of the workbench that must remain clear for projects before deciding how large the organizer can be. That keeps storage from slowly taking over my main work area.
Open Shelf System
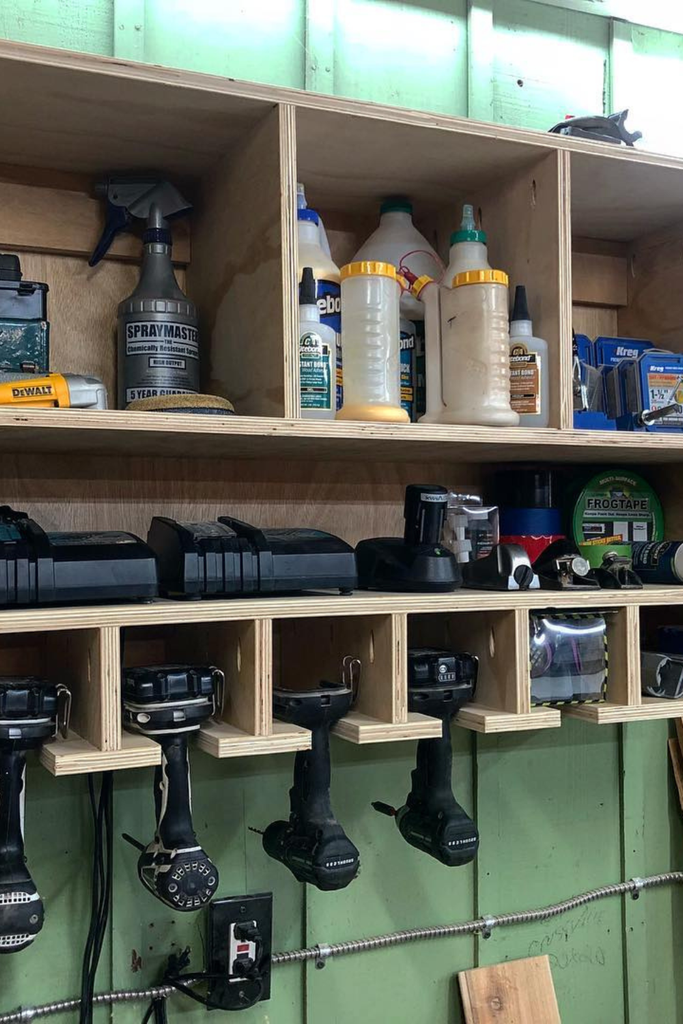
An open shelf system gives me quick visibility and easy access. I can see the drills immediately rather than opening doors or drawers every time I need one.
The upper shelves can hold chargers, glue, boxes, or other supplies, while individual drill holders below keep the larger tools separated.
For frequently used drills, I prefer shallower storage that allows me to reach the tool directly. Small hardware belongs in dedicated bins rather than loose behind the drills where it can become difficult to find.
Tall or heavily loaded shelving should be properly supported and anchored according to the wall and shelving construction. I do not rely on the weight of the unit alone to keep it stable.
Pro Tip: I keep the most frequently used drill positions open and visible. If I have to move several items every time I need one tool, the storage system is not working efficiently.
Also read: 20 Makeup Brush Storage Ideas for 2026
Minimal Slot Rack
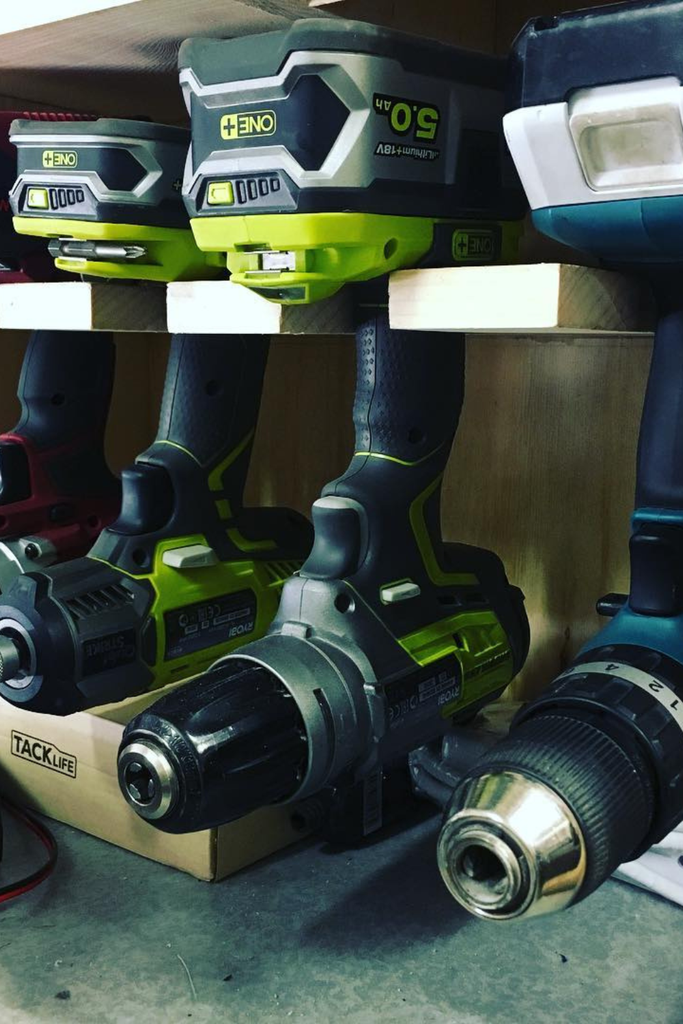
A minimal slot rack is the simplest option when I want individual drill storage without building a complete cabinet.
A sturdy board with evenly spaced openings can be mounted beneath an existing shelf or cabinet, provided the mounting surface and hardware can safely support the tools.
I check the widest battery before deciding how close the slots can be. The goal is to save space without making neighboring drills collide when I remove one.
This design keeps the work surface below the rack clear and uses very little material compared with a full storage cabinet.
Pro Tip: I leave one spare slot when I have enough room. It costs very little in space but gives me somewhere to put another drill if my collection grows.
Narrow Drill Tower

A narrow drill tower is designed for those awkward vertical strips of wall that are too narrow for a conventional organizer.
Instead of spreading the tools across a wide rack, I stack several drill positions vertically. Separate shelves or compartments can hold batteries, bits, and other small accessories.
This can work particularly well between existing cabinets, shelving units, or other fixed workshop features. I still check the surrounding clearance so I can remove the tallest drill without hitting the shelf above it.
I keep the tools I use most frequently around a comfortable working height and reserve the less convenient positions for occasional-use tools.
Pro Tip: I measure the tallest drill with its battery attached before setting the vertical spacing. The complete tool is what needs to come out of the rack, not just the drill body.
Compact Plywood Station
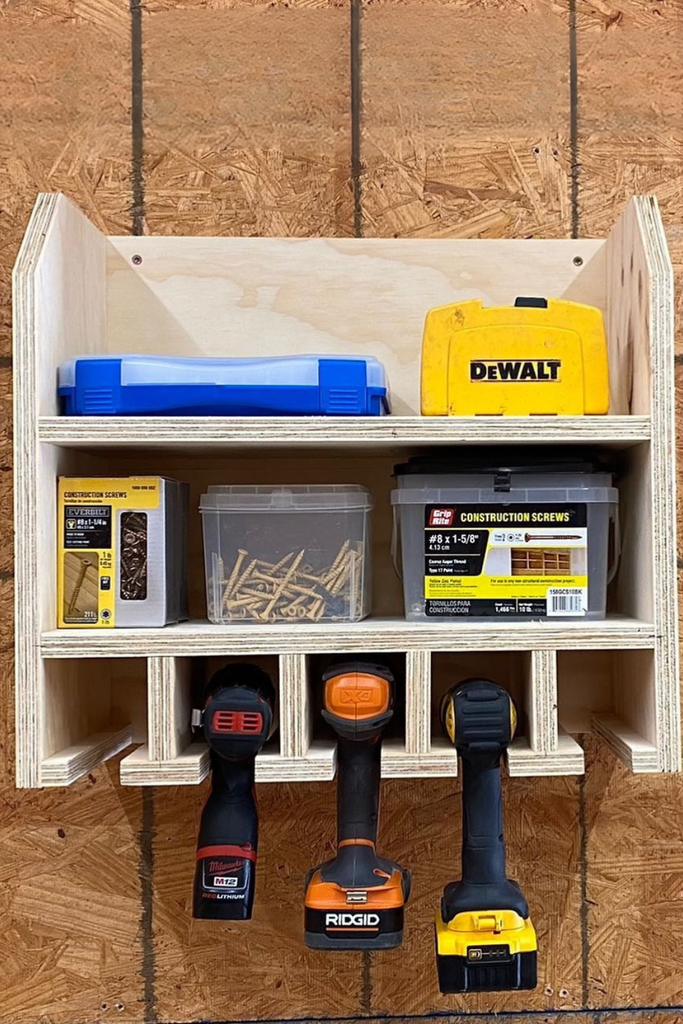
A compact plywood station is primarily a small storage and accessory organizer rather than a dedicated charging setup.
I can build it against a small unfinished workshop wall, with shallow upper shelves for bits, screws, and accessories and individual holders underneath for drills.
The open front makes it easy to see everything, which is especially useful when the station is small and I do not want tools hidden behind doors.
I pay attention to proportions here. The accessory shelves do not need to be deep, but the drill section needs enough room for handles, batteries, and comfortable removal.
Pro Tip: I sort the accessories before deciding the shelf sizes. That helps me avoid building oversized storage for tiny items while leaving too little room for the actual drills.
PVC Pipe Holders

PVC pipe holders can be a low-cost DIY option when I have suitable leftover pipe and want individual drill positions.
I cut short sections of pipe to create holders, then attach them securely to a shelf, backing board, or other properly supported structure. The pipe diameter needs to match the actual drill shape rather than being chosen simply because the material is available.
I smooth and deburr the cut edges before using the holders. A rough cut can damage a tool or make it uncomfortable to handle.
I also test one holder with the heaviest or largest drill before making several. The mounting method and supporting surface need to handle the tool’s weight without allowing the holder to loosen.
Pro Tip: I test the drill in the first holder from several angles before repeating the design. A holder that looks right when empty may not provide enough clearance once the tool is inserted.
Dedicated Charger Shelf

A dedicated charger shelf has a different job from a drill rack: it keeps chargers, batteries, adapters, and their cords organized in one accessible location.
I like giving chargers enough room to sit flat without stacking them on top of each other. A small retaining lip can be useful if the shelf is shallow or the chargers tend to slide forward.
Cables should have enough room to bend naturally rather than being sharply folded into a tangled pile. Simple labels can also help when several chargers look almost identical.
For charging and storage, I follow the specific battery and charger manufacturer’s instructions. I do not assume that every battery should remain plugged in, charged, or stored in exactly the same way.
Pro Tip: I label chargers by tool type when several use similar-looking power adapters. It takes very little time and can prevent unnecessary searching during a project.
Built-In Charging Bay
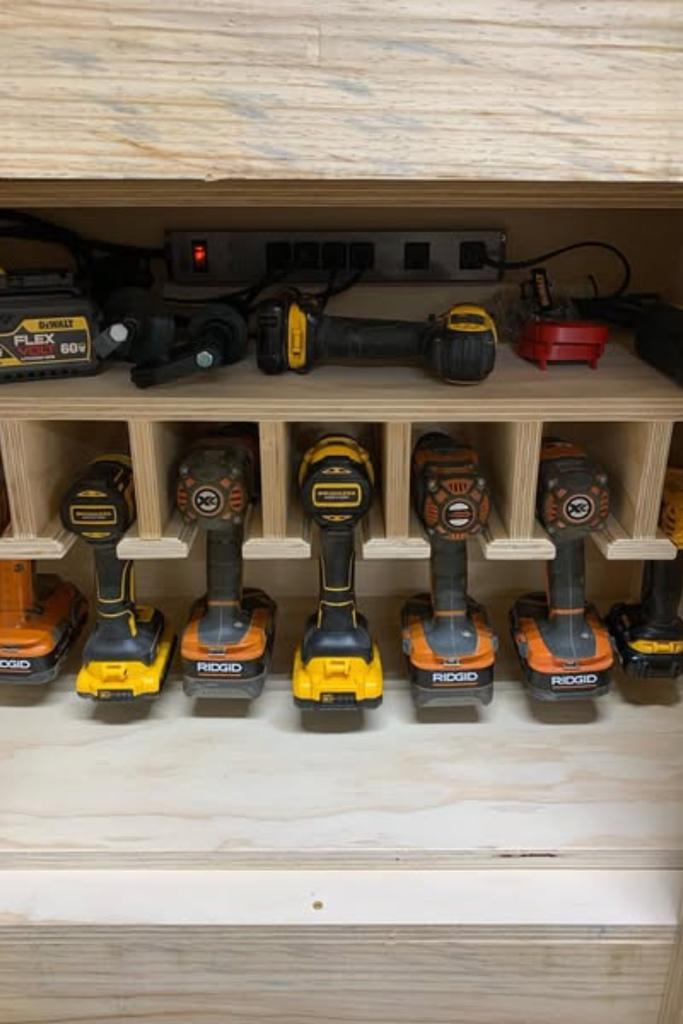
A built-in charging bay is a more integrated option for a workshop where I want a permanent, dedicated place for charging equipment.
The chargers can sit in a planned compartment or shelf, while cable openings at the back help keep cords contained. The drills themselves can remain in accessible holders below or beside the charging area.
I make sure electrical equipment remains accessible for inspection and maintenance. I would not permanently cover electrical connections behind a fixed panel where they cannot be reached.
Clearance and ventilation should follow the manufacturer’s requirements for the equipment being stored there. If the project involves permanent electrical work rather than simply organizing existing equipment, I would follow applicable electrical requirements and use qualified help where appropriate.
Pro Tip: I photograph the cable layout before closing or reorganizing a compartment. That gives me a quick reference later if I need to identify which cable belongs to which charger.
Floor-to-Ceiling Cabinet
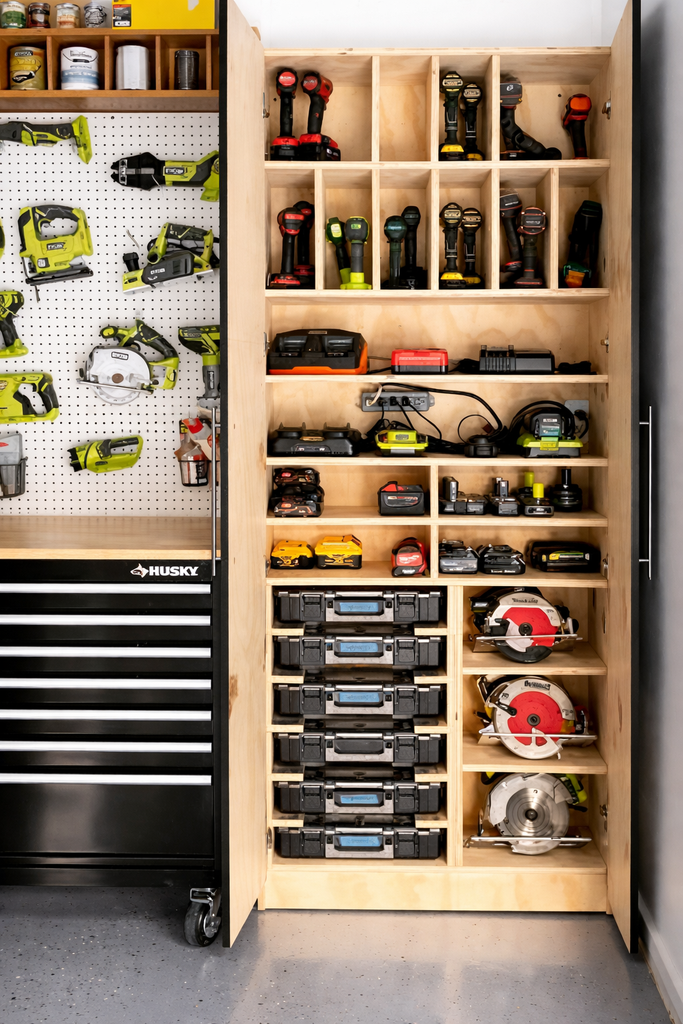
A floor-to-ceiling cabinet makes sense when I have a large tool collection and want to dedicate an entire wall to drill and cordless-tool storage.
I can keep everyday drills around the easiest-to-reach section, place batteries and chargers nearby, and reserve other shelves for larger cases or less frequently used equipment.
I prefer adjustable shelves because the storage needs can change when I buy a different tool. Smaller accessories also do not need the same shelf depth as bulky cases.
Before building or installing a tall cabinet, I check the ceiling height, floor level, door clearance, and the cabinet’s loaded weight. Proper anchoring is particularly important for tall storage so the finished unit remains stable.
Pro Tip: I intentionally leave some adjustable capacity instead of designing every compartment around my current tools. That gives the cabinet room to adapt as the workshop changes.
FAQS
Can You Store Drills With Batteries Attached?
It depends on the battery and tool manufacturer’s instructions and on how long I plan to store the drill.
For everyday organization, keeping a battery attached can be convenient if the manufacturer permits it. For longer periods of storage, I follow the specific battery manufacturer’s recommendations rather than applying one rule to every cordless tool.
I also avoid unsuitable environments such as areas with excessive heat or moisture and follow the manufacturer’s guidance for charging and storage conditions.
What’s the Best Height to Mount a Drill Rack?
I prefer a height where I can remove a drill without stretching above my shoulders or bending deeply. Chest to eye level can be comfortable for many people, but the best position depends on the user’s height, the drill weight, and the surrounding workspace.
Before permanently mounting the rack, I test the largest drill at the proposed height. I also check that the rack will not interfere with shelves, cabinets, lighting, or the workbench.
How Do You Organize Multiple Cordless Drills?
I give each frequently used drill its own position and keep commonly used batteries and chargers in the same general area.
Bits and small accessories work better in labeled containers than loose on a shelf. For a larger collection, I group tools by type or frequency of use so I can find the right one without searching through every compartment.
How Much Space Should You Leave Between Drill Slots?
There is no single spacing measurement that works for every drill. I base the layout on the widest drill-and-battery combination and then add enough room to grip and remove the tool comfortably.
I test the actual tools before making all the cuts. This is especially important when drills have bulky battery packs or handles that extend beyond the main body.
Where Should Drill Chargers Be Stored?
I prefer a dedicated shelf, cabinet section, or charging bay where the chargers are easy to identify and the cords can remain organized.
The charging area should provide the clearance and environmental conditions specified by the manufacturer. I also keep electrical connections accessible rather than permanently hiding them behind fixed construction.
Are PVC Pipe Holders Good for Drill Storage?
They can work for some drills when the pipe diameter, holder shape, and mounting method are appropriate.
I test the actual tool before making several holders, smooth all cut edges, and secure the PVC to a structure capable of supporting the tool’s weight. PVC is a material option, not a universal holder for every drill design.
Choosing a Drill Storage Setup
| Storage situation | Useful direction |
|---|---|
| Very little wall space | Bench-top unit or compact station |
| Narrow wall section | Narrow drill tower |
| Several drills | Vertical cubbies or full-wall organizer |
| Dust concerns | Compact wall cabinet |
| Frequent charging | Dedicated charger shelf or built-in charging bay |
| Small budget or DIY project | Minimal slot rack or PVC holders |
| Large collection | Floor-to-ceiling cabinet |
| Need flexibility | Adjustable shelving or modular storage |
The goal is not to build the largest storage system possible. I choose the smallest setup that gives every tool a clear place while leaving enough room to work comfortably.
Read this next: 22 Jeans Storage Ideas for 2026
Conclusion
I have found that good drill storage is less about building the biggest organizer and more about giving every tool a sensible place. When the drill, battery, charger, bits, and accessories have logical storage locations, putting everything away becomes much easier after a project.
For a small workshop, I would start with a minimal slot rack, PVC holders, or a compact plywood station. A larger collection may justify a charging cabinet, full-wall organizer, or floor-to-ceiling cabinet.
Whatever setup I choose, I measure the actual tools first, allow enough removal clearance, support wall-mounted and tall storage appropriately, and follow the specific manufacturer’s instructions for batteries and charging equipment. That keeps the storage useful during real projects instead of turning it into another source of workshop clutter.