21 DIY Wall Shelves Ideas That Turn Blank Walls Into Beautiful Storage
I have lost count of how many times I stared at a blank wall in our house and thought, something should live there. That is how these diy wall shelves ideas started, one wall at a time, usually on a Saturday morning with a tape measure in one hand and coffee in the other.
Every shelf in this list is something I have either built myself or helped a friend build, and I kept notes on what worked, what wobbled, and what I would do differently. I picked these by starting with the walls that bothered me most, then testing each design for a full month of real life before it earned a spot here.
You do not need a workshop full of tools for most of these. A drill, a level, and a free afternoon will carry you through at least half the list, and I will tell you exactly where each project gets tricky.
Key Takeaways
- Always anchor shelves into studs or use proper wall anchors; a shelf full of books is heavier than it looks.
- Start with one wall and one shelf style before committing to a whole room of matching shelves.
- Leave breathing room between objects; a shelf that is packed edge to edge just looks like clutter on a wall.
- Measure your tallest books and vases before you drill, not after.
1. Reclaimed-Wood Floating Shelves

I built my first set of these from an old barn board a neighbor was throwing out, and they are still the shelves I love most. I cut the board to 36 inches, sanded it until it felt smooth enough for bare hands, and mounted it on hidden steel rods so it looks like the wood is simply growing out of the wall.
The honest downside is that reclaimed wood is never perfectly straight, so one of my boards has a slight dip in the middle that I notice every single day. I fixed the wobble by shimming the bracket, but if perfect lines matter to you, buy a new board and distress it yourself instead.
Cost: $25–$45 per shelf | Time: 2 hours | Difficulty: Easy
2. Honeycomb Hexagon Shelves

These little hexagons changed the whole feel of my hallway, which used to be the most boring wall in the house. I cut six boards at 30-degree angles, glued and nailed them into hexagon rings, and hung them in a loose cluster instead of a stiff row, which makes the wall feel playful rather than formal.
My mistake was hanging the first one with a single small nail, and it slid sideways within a week. Use two fixings per hexagon and a level for every single one, because a crooked hexagon is painfully obvious. They hold plants and small ceramics beautifully but are too shallow for books.
Cost: $30–$50 for a set of three | Time: 3 hours | Difficulty: Moderate
3. Industrial Pipe Shelves
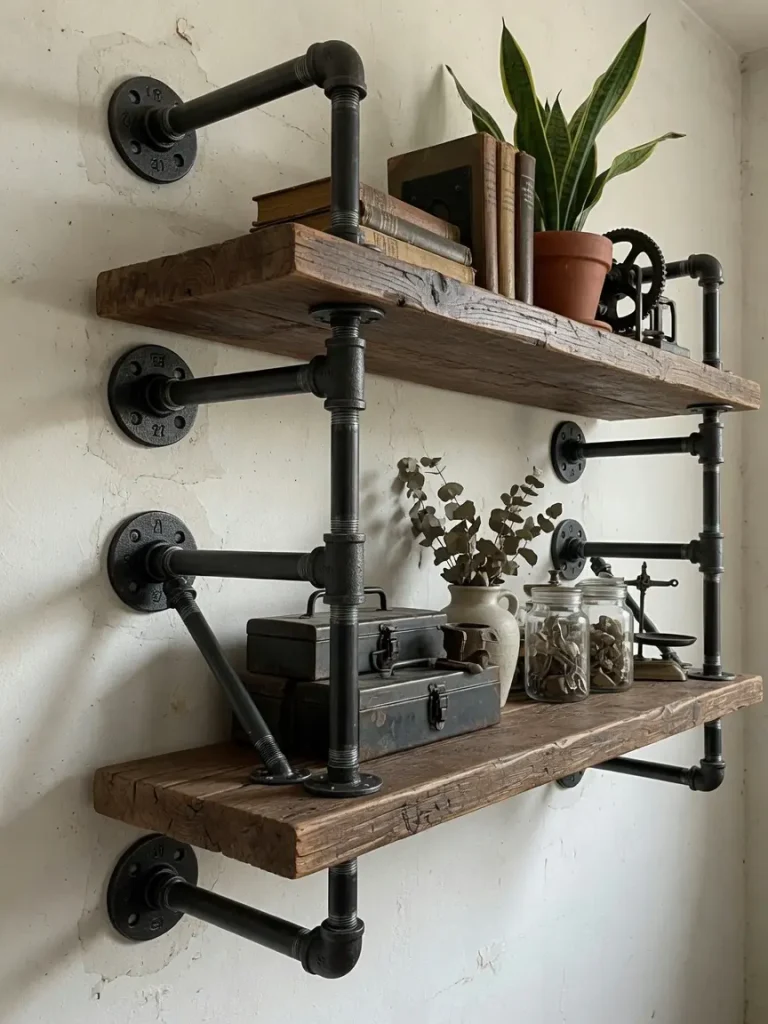
Image credit: Cozymust
I made these for my husband’s office wall, using black iron pipe fittings and a thick pine plank, and they instantly made the room feel like a loft instead of a spare bedroom. The trick is assembling the pipe frame on the floor first, then marking the wall through the flanges so every hole lines up.
The downside is weight and cost: iron fittings are not cheap, and the whole unit is heavy before you even put a book on it. I anchored every flange into a stud, and I would never trust these on drywall anchors alone. They are worth it, though, because they hold a serious amount of weight without sagging.
Cost: $60–$90 per shelf | Time: 3 hours | Difficulty: Moderate
4. Leaning Ladder Shelf

This is the shelf I recommend to every renter I know, because it leans against the wall and needs almost no drilling. I built mine from two side rails and five rungs of pine, each rung getting deeper toward the bottom so the shelf feels stable and looks intentional rather than like an actual ladder.
My personal lesson came when my cat discovered the top rung, so now the heaviest pots live on the bottom and the top holds only a trailing plant she ignores. The downside is that a leaning shelf eats a little floor space, so it is not ideal for a very narrow hallway.
Cost: $40–$70 | Time: 2–3 hours | Difficulty: Easy
5. Kitchen Open Shelving

I replaced one run of upper kitchen cabinets with open shelves, and it was the scariest and best decision I made in that room. I used two thick oak boards, mounted on heavy-duty hidden brackets, and kept only our prettiest everyday dishes, bowls, and a few plants on display.
The honest downside is dust and grease, which settle on everything near a stove no matter how clean you are. I wipe the shelves every Sunday now, and I moved the shelves away from directly above the stove after the first month. If you hate dusting, keep open shelving to one short run, not the whole kitchen.
Cost: $50–$80 per shelf | Time: 2 hours | Difficulty: Moderate
6. Spice-Jar Shelves

Cooking got so much easier the weekend I put my spices on a narrow wall shelf instead of digging through a cabinet. I used a 4-inch-deep pine board with a small front lip, mounted at eye level beside the stove, and decanted everything into matching glass jars with handwritten labels.
The mistake I made was mounting it too close to the stove, and the heat faded my labels and made the paprika clump. I moved it to the side wall, and the spices have stayed fresh since. Keep the shelf shallow, because deep spice shelves just hide jars behind jars.
Cost: $15–$30 | Time: 1 hour | Difficulty: Easy
7. Bathroom Towel Shelves

Our tiny bathroom finally felt like a spa the day I hung two shelves above the toilet and rolled the towels instead of folding them. I used cedar boards because cedar handles bathroom humidity better than pine, and I sealed them with a clear water-resistant finish.
The downside is that bathroom shelves collect damp air, so I leave the door open after showers and never store spare toilet paper there. Rolled towels look wonderful but they do unravel if guests grab from the middle, so I roll them tightly and stack only two high.
Cost: $20–$40 | Time: 1–2 hours | Difficulty: Easy
8. Glass Display Shelves

I put glass shelves in our bathroom because I wanted storage that almost disappeared, and they do exactly that. I bought tempered glass panels with chrome brackets, measured twice, and had a friend hold each panel while I tightened the brackets, because glass shows every fingerprint and every crooked line.
The honest downside is cleaning: glass shelves show water spots and dust within days. I keep a small squeegee in the bathroom now, which sounds fussy but takes ten seconds. Never use non-tempered glass for a shelf, and keep heavy bottles off the top shelf.
Cost: $35–$60 per shelf | Time: 1–2 hours | Difficulty: Moderate
9. Plant Wall Shelves

My plant collection outgrew every windowsill, so I built a run of staggered shelves on the sunniest wall in the living room. I spaced them 14 inches apart so trailing plants could hang without brushing the shelf below, and I put a small saucer under every pot after learning the hard way about water rings.
The lesson I will not forget is the day I watered a fern over a hardwood floor and left a pale ring on the wood. Now every plant has a saucer, and I water with a long-spout can over the sink. Plants on shelves need more light than you think, so watch them for a week and move any that start reaching.
Cost: $25–$50 | Time: 2 hours | Difficulty: Easy
10. Rustic Dish Shelves

I built these from rough-sawn pine for our dining room, and they hold the handmade bowls we collected on trips, which makes the wall feel like a story instead of storage. I left the wood slightly rough and finished it with food-safe oil, since the bowls actually get used at dinner.
The downside of rough wood is splinters, and I found one the embarrassing way while reaching for a bowl barefoot in the kitchen. Sand the front edges smooth even if you want a rustic look, and keep the rough texture on the top surface only. These shelves are shallow, so they suit bowls and plates, not tall pitchers.
Cost: $30–$55 | Time: 2 hours | Difficulty: Easy
11. Cafe-Style Dishware Shelves

After a trip to a little cafe with open dish shelving, I came home and copied the look in our kitchen with two long shelves. I grouped white dishes together, added a few wooden boards at the end, and left one section deliberately empty, which is the trick that keeps it looking like a cafe instead of a cupboard door left open.
My honest complaint is that guests sometimes put things back in the wrong place, and the display slowly drifts into chaos. I fixed it by giving every category its own zone and telling the family once, which mostly worked. Open dish shelves also mean you see chips and stains, so keep your best pieces here.
Cost: $45–$75 | Time: 2 hours | Difficulty: Easy
12. Minimalist White Floating Shelves

When I wanted a calm bedroom wall, I painted two floating shelves the exact color of the wall so the objects seemed to float on their own. I used MDF boards, filled every screw hole, and sanded between coats, because white paint shows every single flaw in the board underneath.
The downside is that white shelves show dust and scuffs faster than wood, and one careless bump with a vase left a mark I still see. I touch them up twice a year now with a small brush. They are perfect for a few special objects, but they look wrong when overloaded, so I keep three items per shelf, maximum.
Cost: $20–$35 per shelf | Time: 2 hours | Difficulty: Easy
13. Living-Room Display Shelves

Our living room had one long empty wall that swallowed every picture I hung, so I installed three staggered shelves and finally gave our travel finds a home. I varied the heights, putting a tall vase on the highest shelf and low bowls below, which keeps the eye moving across the wall instead of stopping in one spot.
The mistake I made first was spacing the shelves evenly like rungs on a ladder, and the whole wall looked flat and dull. Staggering them changed everything. The downside is that display shelves invite collecting, and I now have a rule: one new object in means one old object out.
Cost: $40–$70 | Time: 2–3 hours | Difficulty: Easy
14. Plant-Filled Wall Shelves

I turned a dull stairwell wall into a green wall with four shelves of trailing pothos and ferns, and it is now my favorite corner of the house. I mounted the shelves at slightly different depths so the plants cascade at different lengths, and I chose only plants that tolerate the lower light of a stairwell.
The honest downside is watering day, which takes twice as long now because I carry the watering can up and down the stairs. I solved half the problem by keeping a small can on the landing. Never hang a shelf above a staircase without checking that you can actually reach it safely with a step stool.
Cost: $30–$60 | Time: 2 hours | Difficulty: Easy
15. Reading-Nook Book Shelves

I built a small reading nook for my daughter by putting two low shelves beside her armchair, just high enough for her to reach her current books. I painted them her favorite sage green, rounded the front corners with sandpaper, and let her arrange the books herself, which she did by color, not by author.
The downside is that low shelves become a magnet for everything else, and within a week hers held toys, hair clips, and a half-eaten snack. We made a rule together that the shelves are for books only, and it mostly holds. Keep reading-nook shelves low and sturdy, because kids lean on them.
Cost: $25–$45 | Time: 2 hours | Difficulty: Easy
16. Home-Office Shelves

My home office used to be a desk pushed against a bare wall, and adding two shelves above it changed how I work. I keep reference books and a small plant on the top shelf and everyday supplies in baskets on the lower one, so the desk itself stays clear for actual work.
The mistake I made was mounting the lower shelf too low, and I bumped my head on it twice before moving it up four inches. Measure from your seated head height, not from the desk surface. The downside is that office shelves collect paper clutter, so I do a five-minute clear-out every Friday.
Cost: $30–$55 | Time: 2 hours | Difficulty: Easy
17. Entryway Shelf With Hooks

Our entryway had no place for keys, and we lost them daily until I built a shelf with hooks underneath. I used a chunky pine board, screwed in five sturdy metal hooks, and mounted the whole thing at shoulder height by the front door, with a small dish on top for sunglasses.
The honest downside is that an entryway shelf becomes the family’s dumping ground within days, and ours briefly held mail, gloves, and a dog leash collection. I added a small basket for mail and a rule that anything left for a week gets moved. Use hooks rated for real weight, because a heavy bag will pull a cheap hook straight out.
Cost: $20–$40 | Time: 1–2 hours | Difficulty: Easy
18. Rope-and-Board Hanging Shelf

I made this hanging shelf for our bedroom window wall, using a pine board and thick cotton rope knotted at the corners, and it sways very slightly, which sounds like a flaw but actually makes the plant look alive. I hung it from a ceiling joist with a heavy-duty hook, not from a plasterboard ceiling.
The downside is the sway, which means it is useless for anything that tips easily, so I only put a sturdy potted plant on it. My first attempt used thin rope that stretched over a month and left the shelf tilted, so use thick rope and re-check the knots after the first two weeks.
Cost: $15–$30 | Time: 1 hour | Difficulty: Easy
19. Coffee-Bar Shelves

I carved out a coffee corner in our kitchen with two shelves above a small cart, and mornings genuinely feel better now. The top shelf holds jars of beans and a French press, and the lower shelf holds our favorite mugs, hung from small hooks so they do not crowd the board.
The downside is that coffee shelves get stained and sticky faster than any other shelf in the house, and I wipe them down twice a week. I also learned to keep the mugs away from the steam of the kettle, because condensation made the shelf damp. Keep the shelf depth at 8 inches so mugs fit without sticking out.
Cost: $25–$50 | Time: 2 hours | Difficulty: Easy
20. Bedroom Accent Shelves

I added a single long shelf above our bed, styled with a lamp, a framed photo, and a small plant, and it finished the bedroom in a way a headboard never did. I mounted it well above pillow height after measuring twice, because nobody wants to sit up into a shelf in the dark.
The honest downside is that anything above a bed makes some people nervous, and my sister refused to sleep under it on her first visit. I used two stud anchors and tested it by hanging from it myself, which settled the argument. Keep it light above a bed, and never put glass directly over a pillow.
Cost: $25–$45 | Time: 1–2 hours | Difficulty: Easy
21. LED-Lit Display Shelves

I added a slim LED strip under our display shelf, and in the evening the whole wall glows softly, which makes even ordinary ceramics look like a gallery. I used a battery-powered strip with a remote so I did not have to wire anything, and I stuck it to the underside near the back so the light washes the wall, not your eyes.
The downside is batteries, which I forget to change until the shelf goes dark for a week. I finally switched to a plug-in strip with a timer, which solved it. Also, warm white light flatters wood and ceramics, while cool white makes the same shelf look like a shop window, so choose warm white.
Cost: $30–$50 including LED strip | Time: 2 hours | Difficulty: Moderate
DIY Wall Shelves Ideas at a Glance
| Idea | Best For | Budget |
|---|---|---|
| Reclaimed-Wood Floating Shelves | Living rooms and bedrooms | $25–$45 |
| Honeycomb Hexagon Shelves | Hallways and kids’ rooms | $30–$50 |
| Industrial Pipe Shelves | Offices and lofts | $60–$90 |
| Leaning Ladder Shelf | Renters and plant lovers | $40–$70 |
| Kitchen Open Shelving | Kitchens | $50–$80 |
| Spice-Jar Shelves | Kitchens | $15–$30 |
| Bathroom Towel Shelves | Bathrooms | $20–$40 |
| Glass Display Shelves | Bathrooms and display walls | $35–$60 |
| Plant Wall Shelves | Sunny living rooms | $25–$50 |
| Rustic Dish Shelves | Dining rooms | $30–$55 |
| Cafe-Style Dishware Shelves | Kitchens | $45–$75 |
| Minimalist White Floating Shelves | Bedrooms | $20–$35 |
| Living-Room Display Shelves | Living rooms | $40–$70 |
| Plant-Filled Wall Shelves | Stairwells and sunny walls | $30–$60 |
| Reading-Nook Book Shelves | Kids’ rooms | $25–$45 |
| Home-Office Shelves | Home offices | $30–$55 |
| Entryway Shelf With Hooks | Entryways | $20–$40 |
| Rope-and-Board Hanging Shelf | Bedrooms | $15–$30 |
| Coffee-Bar Shelves | Kitchens | $25–$50 |
| Bedroom Accent Shelves | Bedrooms | $25–$45 |
| LED-Lit Display Shelves | Display walls | $30–$50 |
Mistakes I Made (So You Don’t Have To)
I once hung a shelf full of books on drywall anchors alone, and it sagged within a month. Now I find the studs first, every single time, and I use anchors rated for twice the weight I expect.
I drilled a whole row of shelves before measuring my tallest vase, and it never fit. Measure your tallest objects before you drill, not after, and leave an inch of clearance above them.
I overloaded my first display shelf until it looked like a storage unit, which defeated the whole purpose. Now I follow a simple rule: if I cannot dust around an object, the shelf is too full.
I skipped the level on a long shelf because I was in a hurry, and the slope was visible from across the room. A level takes thirty seconds and saves a weekend of regret.
Frequently Asked Questions
How much weight can a DIY wall shelf hold?
It depends entirely on the fixings. A shelf screwed into two studs can hold 30 to 50 pounds easily, while drywall anchors alone should be trusted with much less. When in doubt, use stud fixings and check the anchor rating on the packet.
What is the best wood for DIY wall shelves?
Pine is cheap, light, and easy to cut, which makes it perfect for beginners. Oak and walnut look richer but cost more and are harder to cut. For bathrooms, cedar handles humidity better than either.
How high should I hang wall shelves?
For display shelves, eye level or slightly above works best, usually 60 to 66 inches from the floor to the center of the shelf. Above a desk or sofa, leave at least 18 inches of clearance so you never bump your head.
Can I put wall shelves on plaster walls?
Yes, but plaster is brittle, so drill slowly with a masonry bit if needed and use fixings made for plaster. Old plaster can crumble around a big hole, so start small and test one fixing before drilling the rest.
Final Thoughts
The best wall in your house is probably the one you walk past without noticing, and one good shelf is all it takes to change that. Start with the idea that fits your room and your confidence level, and build from there.
If you make one of these diy wall shelves ideas, take a photo before and after, because the difference will surprise you. I still smile every time I walk past my hallway hexagons, and I hope your wall gives you the same feeling.




2 Comments